| Home Prev | Next |
The next task after installation of InControl is usually adding on or more NetWall devices (either physical or virtual) so that they come under InControl management. This can be done in one of two ways:
Automatically Using Zero Touch
The zero touch features allows certain hardware models of Clavister firewalls to be added automatically to InControl. However, the cOS Core configuration must be in its factory default state for this to be used so it may not be suitable for existing firewalls and cannot be used at all with virtual firewalls.
Because of its simplicity, this method of device addition is the recommended method if it is available. It is described in detail, along with a list of supported hardware models, in Chapter 8, Zero Touch.
Manually
Where the zero touch feature cannot be used, a firewall must be added manually and this chapter describes how to do this.
Manually adding a firewall consists of the following key steps:
Log in as an administrator to cOS Core and create a Pre-Shared Key (PSK) object that defines the hexadecimal key that InControl will use for access. Then, define a Remote Management object to allow InControl access and that uses the Pre-Shared Key object. These tasks are described fully in the previous Chapter 6, Preparing the Firewall.
Open the InControl client and add the NetWall device, including the key from the Pre-Shared Key object created in the previous step. This rest of this chapter described this second step in detail.
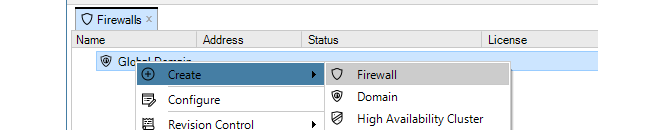
To add a firewall to InControl using the InControl client, press the Firewalls button in the main ribbon toolbar.

This opens the Firewalls tab in the client's central panel.

Before any firewalls are added, the tab contains only the Global Domain which is the parent for all sub-domains or devices. The Global Domain has its own set of configuration values which can be applied to all of its children.
Above the tab, is a new toolbar for firewall specific operations. Press the plus button followed by selecting the Firewall option in the menu to add the new device.

Alternatively, this step could be done by right-clicking the Global domain node in the Firewalls tab and choosing Firewall from the Create menu.
The New Firewall dialog will now appear and the properties of the firewall can be entered. In this example, the new device will be called My_FW.
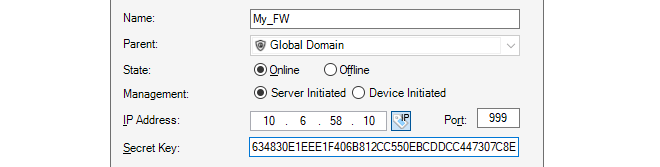
The name, address (IPv4, IPv6 or FQDN) and secret key of the device are entered along with a comment. The new device doesn't need to be online at this point but it is more straightforward if it is so that any failure to connect can be seen immediately. Note that the name of the device can only be changed later using the CLI console command set Device Name=. InControl will then automatically update its interface.
The default parent for a new device is the Global Domain but it could be any subdomain that has been previously defined.
If the firewall is being added using Device Initiated Netcon (the firewall initiates the addition) then the Firewall Initiated option (shown below) should be selected and the Remote Management ID that is specified in the corresponding Remote Management object in cOS Core should be used instead of the IP address. This is discussed further in the previous Chapter 6, Preparing the Firewall.

The Secret Key is the hexadecimal Netcon key required by cOS Core for communication with InControl (Netcon is a secured Clavister proprietary protocol). This key must be the same value as the Passphrase property of the Pre-Shared Key object in cOS Core which is used with the Remote Management object that allows InControl control. Obtaining this key is explained further in Appendix B, Netcon Key Generation.
When the key is obtained, it should be copied to the Windows system clipboard and then pasted into the secret key field of the new firewall dialog.
After completing the dialog and adding the new device, it will appear in the Firewalls tab under its parent domain. The global domain will be the parent if no other domain is specified in the new firewall dialog.
Note that if a new device is added and it does not have a valid license, this will be indicated by an alarm appearing.

How Device Naming Works with InControl
When a firewall is first added to InControl, it is given a device name. In the example above, the name My_GW was used. The firewall will previously have a name assigned to it (the default name is System) but the name assigned in InControl when a device is first added will overwrite the old name in the firewall's configuration.However, if after adding a firewall to InControl, the device name is later changed directly on the firewall (outside of InControl) then this new name will overwrite the name in the InControl database.
Potential InControl and cOS Core Version Mismatches are Flagged
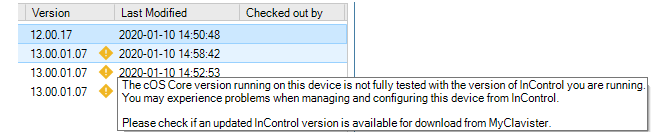
Usually, a release of cOS Core coincides with a release of InControl and it is recommended to always update both together because an older version of InControl might not be compatible with all the features in a later cOS Core release. If InControl detects that there may be such a mismatch then a yellow warning icon is displayed next to the firewall as shown below. However, this is only a warning to check if there is a later version of InControl to upgrade to. In certain instances this icon can appear but there may be no newer InControl version available.
Binding a License
As explained in Chapter 13, Licensing there are a number of licensing options for InControl usage.If cOS Core is running in the 2 hour demonstration mode, no licensing is needed.
If cOS Core has a license then the CENTRALIZED_MANAGEMENT option in the license has to be enabled. If this is not the case then an alarm is generated to indicate this as shown above.
If neither of the above two options is the case then cOS Core has to have a valid InControl Server License bound to it. Additionally, each firewall that doesn't have the CENTRALIZED_MANAGEMENT license option enabled must be explicitly be bound to this InControl server license.
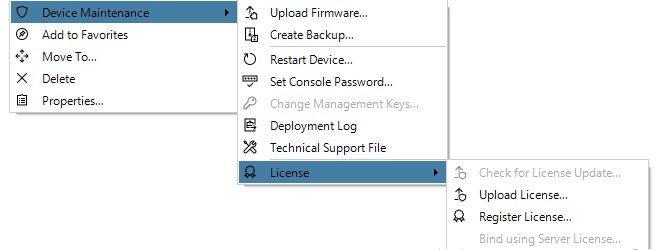
Binding to InControl is done by right-clicking on the firewall and selecting the Bind using Server License... option.
When the firewall is added, an alarm appears in the Alarms tab list panel to warn that it is unbound. Binding can also be done by right-clicking this alarm in the alarm list and selecting the bind option from the displayed context menu.
Binding firewalls to the server license is also discussed in Chapter 13, Licensing but is repeated here for emphasis as this step can be forgotten.
Editing the Configuration
By double clicking the new firewall, the object navigation tree opens as a new tab in the central part of the InControl interface.
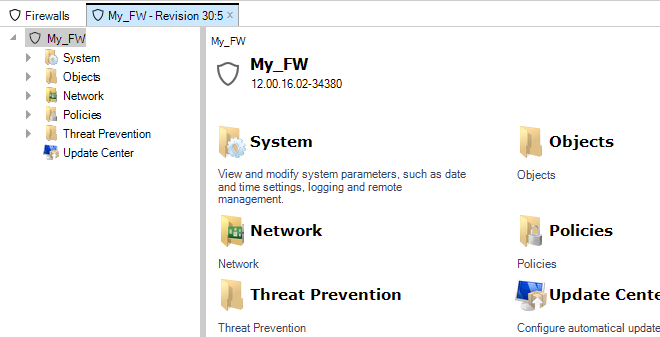
The tab title text in the example above is My_FW - Revision 30:5. The numbers "30:5" represent the number of times this firewall's configuration has been edited via InControl and non-InControl means. The number to the left of the colon is the number of times the configuration has been edited by non-InControl means. The number on the right is the number of times it has been edited using InControl.
The navigation tree to the left of the tab shows the object hierarchy of the configuration. This will be structured differently between a cOS Core version and an earlier CorePlus version.
![[Note]](images/note.png) |
Note: InControl must parse a configuration on initial opens |
|---|---|
|
The very first time an added firewall's configuration is opened and read by InControl, there will be a brief delay while the configuration is parsed and loaded into the server database. The delay will depend on the processor speed of the InControl server. Subsequent opens will not have this delay. |
Key Aspects of Configurations
The key configuration areas for the firewall now accessible through the firewall tab or the tree in the Navigation panel are:The Address Book
This contains definitions of the symbolic names used by InControl for IP addresses, IP networks and IP address ranges.
The Address Book is filled with a number of default entries.
Rules
This is a list of all IP Rules which determine the rules for traffic flow through the NetWall device. Each is defined using a security policy that describes the traffic it affects in terms of the source and destination interface as well as the source and destination IP address plus a service.
Some default rules exist by default but the default set will not allow anything but management traffic to flow.
Services
This is a list of services with each entry normally being defined in terms of a protocol (TCP or UDP or TCP/UDP) and a port number. These services are then used to define security policies such as those defined in the IP rule set which is described above.
A large set of services is defined by default.
Routes
The routing table(s) determine which networks can be found on which interfaces. By default there is one main routing table which contains default routes for all interfaces. This table may need to be expanded and modified.
All of the above features are fully described further in the cOS Core Administrators Guide. An example of editing a configuration is described later in Chapter 10, Editing Configurations.
Deleting Devices
If a device is to be deleted then this can be done by right-clicking it and choosing Delete from the context menu.

A confirmation dialog is displayed before the delete is finalized.

It is important to be certain about wanting to delete the firewall since there is no undelete following confirmation.
Switching from Online to Offline
In the properties dialog for a firewall, the administrator has the option to have the device either Online or Offline. These states can be set either when a firewall is added to InControl or they can be changed after a firewall is added. These states are defined as follows:Online
This is the default state for a firewall and means that it is under the control of InControl and InControl is communicating with it.
Offline
The Offline state means that the firewall is not under the control of InControl and behaves as an autonomous device. In this state, no changes made in InControl will affect the firewall. The firewall itself will be unaffected by changing to the Offline state and will continue running as though nothing has happened.
Switching to the Offline state can only be achieved by the administrator manually changing the state in the InControl interface. It is never done automatically, even if the firewall is no longer functioning.
A newly added firewall can be marked as being Offline, in which case the IP address and PSK are not needed for addition but will need to be entered later if the state is changed to Online.
Switching Back to Online from Offline
If the administrator changes the firewall status from Offline back to Online, the following will happen:If they have not been previously entered, the firewall's IP address and PSK must entered in order to connect to it.
On connection, InControl will read the current configuration of the firewall and this will overwrite the current configuration stored in the InControl database and the device will perform a reconfigure operation.
InControl will present the user with a warning that the InControl database will be overwritten and ask if it should continue. It should be noted that will still be possible to later revert the configuration in InControl to the earlier version.
The firewall will now be under the control of InControl with no change to its local configuration.
To revert the, now online, firewall to a previous configuration, the administrator can select another configuration from the revision history.
![[Tip]](images/tip.png)