| Home Prev | Next |
This chapter will look at editing the configurations of firewalls under InControl control. The example of creating a new IP rule set entry will be used to illustrate the steps involved. The rule set entry will be an IP Policy that allows the firewall to respond to incoming ICMP Ping requests.
"Pinging" a firewall from any computer is a quick and simple way to check if the firewall is up and running. When cOS Core starts for the first time only a predefined IP rule set called main will exist and it will not contain an entry that allows ICMP Pings so they will be dropped.
IP Policy Setup Example Assumptions
The following names and IP addresses are assumed:The interface chosen as the management interface is called lan.
The IP address of interface lan is 192.168.101.240 with the netmask 255.255.255.0. This network is defined as an IP4 address object called lannet in the cOS Core configuration.
The InControl server or client resides on the same subnet and has an IP address of 192.168.101.100.
A firewall has already been defined to InControl and given the name My_FW in InControl.
![[Note]](images/note.png) |
Note |
|---|---|
|
You will have to substitute the information above with the actual interface name and IP addresses of a specific installation. |
When InControl is started, the firewall My_FW will appear in the Firewalls tab.

All ICMP Traffic is Initially Dropped
Let us show that the initial cOS Core configuration drops all traffic and will therefore drop any ICMP traffic such as a Ping request.To do this, open a standard Windows command console on the management computer and leave InControl running. At the command prompt, given the assumptions explained above, type:
> ping 192.168.101.240
The command should return output similar to that shown below.
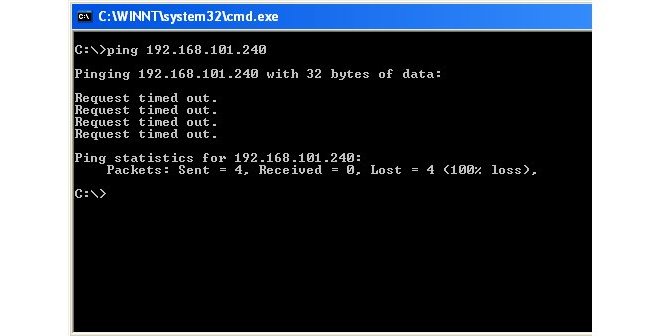
The above output shows that cOS Core is ignoring the ICMP protocol packets, and the Ping command returns the Request timed out message.
Adding an IP Policy
The steps to add an IP Policy that allows cOS Core to respond to Ping requests are as follows:First, check out the My_FW firewall by pressing the Check out button.

Providing no other InControl client has My_FW checked out, the check out will succeed and the current user, in this case admin, will appear as the locking user.

The check out event will also be automatically logged in the Audit Trail.


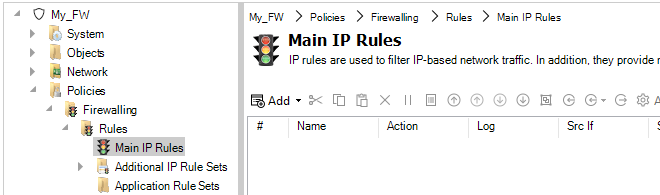
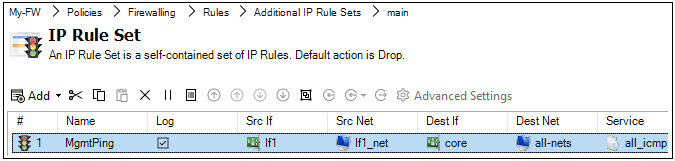
The firewall Configuration tab is now displayed. The name of the tab always comes from the name of the firewall. Selecting Policies > Firewalling > Rules > Main IP Rules in the navigation tree will display the main IP rule set. Note that an IP empty rule set is equivalent to dropping all traffic without any logging so at least one entry has to exist for traffic to be allowed to flow. Note that some Clavister hardware models will already have some predefined entries that allow protected clients to reach the Internet.
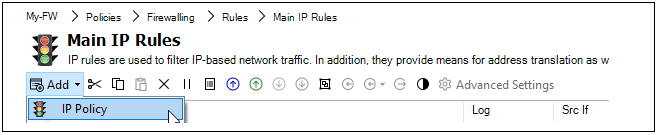
By pressing the Add button, a new IP Policy can be defined to allow ICMP Ping messages to reach the firewall.
Now, enter the properties of the IP policy. First, define the General properties. Any suitable name can be specified, such as MgmtPing.
The Action is set to Allow so the traffic can flow.

Next, specify the Address Filter of the rule which says where the affected traffic is coming from and where it is going to. These filtering properties are common to many of the rule sets in cOS Core.
Note that the Destination Interface is set as Core which means that the ICMP ping request will be directed to the firewall itself and it is cOS Core that will respond.

The Service is set to all_icmp which is one of the predefined cOS Core services. Optionally, the Schedule property can be used to specify times when the entry is to be active (the default is always active).

If required, enable the sending of log messages when this IP policy is triggered.

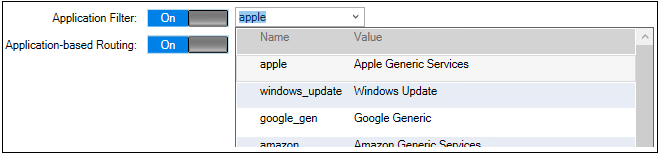
If required, an application type can also be selected as one of the filtering criteria (available in cOS Core versions from 14.00.07). This option also allows an alternate routing table to be selected for the triggering traffic (this feature is known as Application Based Routing in cOS Core documentation).
Next, press the OK button to save the IP policy. The IP policy will now appear as an entry in this IP rule set although the entry does not become active until the changed configuration is deployed in the next step.
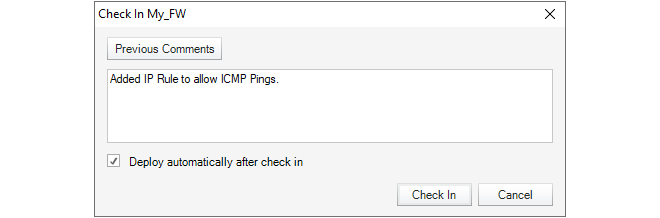
Finally, check the new configuration in and deploy it. This can be done in a single step by pressing the Check In button.

The check in dialog allows a comment and also the option to deploy in the same operation.
The audit log shows that the two operations of check in and deploy have taken place.

Alternatives for Deploying Configuration Changes
If a firewall configuration is changed but has not yet been deployed, InControl will provide several visual reminders and paths to deployment in the client interface:The Needs Deployment and Recommended Actions buttons will both be incremented with a new item. Clicking either can begin the deployment procedure.

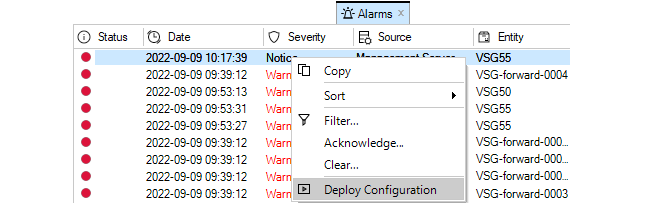
An Alarm is generated and right-clicking this alarm will provide access to the deploy option through the context menu.
Right-clicking the firewall in the Firewalls tab will display the deploy option in the context menu. If no deploy is needed this option will not appear in the menu.

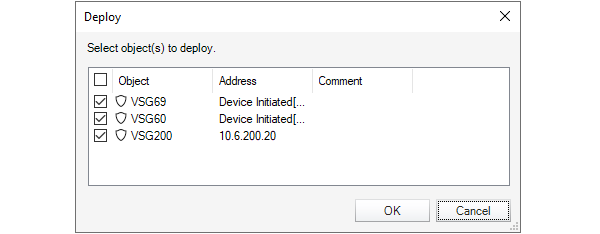
One more option is to use the Deployment button in the Firewalls tab toolbar ribbon. If there is a deploy waiting for multiple firewalls, the Multiple Deploy option in the submenu should be chosen.

This will display a further dialog which allows the administrator to choose which firewall configurations to deploy.
Configuration Errors and Warnings
As a configuration is being modified, any configuration issues can be dynamically detected by InControl before deployment. A summary of these are displayed in a panel at the top of the configuration objects pane. An example of a single configuration error with two warnings is shown below.

The issues can be one of the following types:
Errors - These are serious issues that will prevent deployment and must be fixed.
Warnings - These are issues which could cause problems but will not prevent deployment.
Clicking either Errors or Warnings will expand the pane to provide a more detailed explanation of the issues. Shown below is an example of this after Errors has been clicked. Here, a value has not been specified for an address object.

Verifying that Ping Works
Now verify that cOS Core doesn't drop all traffic and the firewall replies to ICMP Ping requests. At the Windows command prompt in a console window, type:> ping 192.168.101.240The command should now result in output similar to that shown below.
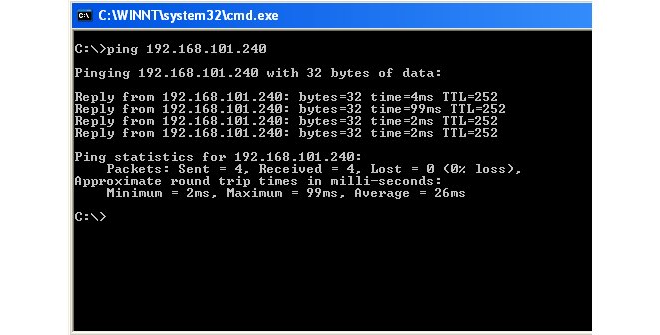
If the Ping command returns a Request timed out message, the InControl connection to the firewall did not succeed. Refer to Chapter 27, Troubleshooting Connections for possible reasons.
Editing an Existing Object
In most cases, once a configuration object is created, there is a choice of two ways to change it using InControl:Double click the object's line in the object list to open a new edit window in order to change any of the properties.
Alternatively, directly click once on the cell of the property value to be changed in the object list. The cell will open and allow the value to be changed directly in the cell without opening an edit window. Unless the cell is for a textual value such as a name or comment, a drop-down list will appear from which a new value can be chosen.
Below, an example of the in-cell editing of an IP rule set entry's Action property is shown. After the action cell is clicked once, a drop-down list of possible values is displayed. After changing the cell's value, pressing the Return key will close the cell and complete the edit.

The drawback to in-cell editing is that not all object properties are displayed and only the displayed ones can be changed with this method.
Using Objects Inherited From InControl Domains
It is possible for a firewall configuration to include objects that are common to a number of firewalls and which can be edited once for all inheriting configuration. This is achieved by using InControl domains. Using and viewing these inherited objects is discussed in Chapter 16, Domains. InControl provides a set of favorites buttons in the toolbar ribbon of the Configuration tab. The purpose of these is to provide shortcuts for quickly opening some of the most important aspects of a typical configuration without having to use the navigation tree.
