| Home Prev | Next |
Revision Management is the ability to save and track changes made to firewall configurations and is an important tool for managing firewall devices. Revision management allows the administrator to keep track of what was changed in configurations, when it was changed, who made the changes and provides the ability to roll back to older configuration versions. These features are also sometimes referred to as configuration version control.
Two key features of revision management with InControl are:
The ability to archive many configuration versions in the InControl server database, including a record of who made the changes and when they were made.
The checking out and checking in of configurations so that only one InControl client is updating a configuration at any one time.
Check Out and Check In
The version control system revolves around the operations of configuration Check Out and Check In.
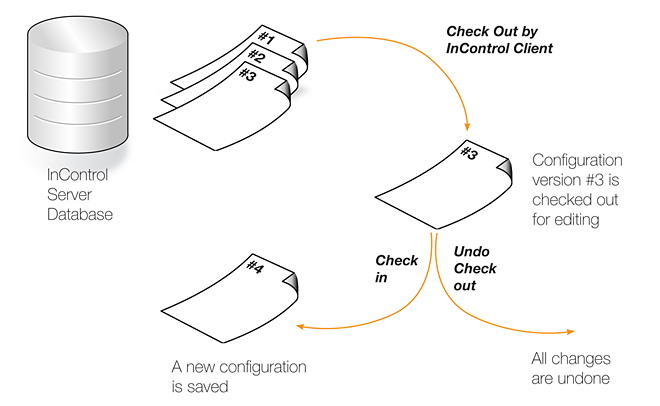
A configuration in the InControl database can be either "checked in" or "checked out". The default is "checked in" and an administrator accessing a configuration in this mode will find that it is read-only and no modifications can be made. Several administrators may access the same "checked in" configuration simultaneously in read-only mode from different clients.
![[Note]](images/note.png) |
Note: InControl and cOS Core Web Interface version control are separate |
|---|---|
|
If version control is performed through InControl, the Web Interface should not be used to upload previously backed up configuration versions. Web Interface backups are independent of InControl. Once InControl version control is adopted, version control through the Web Interface should not be used. |
Checking Out a Configuration
Whenever an administrator wants to start modifying a configuration, the configuration should be first checked out. This can be done as a separate operation but will occur automatically when the first change is made to a configuration.Checking out can be done separately by pressing the check out button in either the Firewalls tab toolbar or the toolbar for the individual firewall's tab.

![[Tip]](images/tip.png) |
Tip: A keyboard shortcut exists for check in/out |
|---|---|
|
A range of InControl operations can be executed with a keyboard shortcut. For both check out and check in, the shortcut is Ctrl+Shift+C after selecting the target in the Firewalls tab. All available shortcuts are listed in Appendix D, Keyboard Shortcuts. |
The administrator who performs the checking out, now gets exclusive write access to the configuration. As long as the configuration remains checked out, all attempts to check out the configuration by other management clients will fail. This prevents two InControl clients editing the same configuration simultaneously.
In a multi-administrator environment with multiple InControl clients, the best practice is to try and ensure a configuration is not left checked out for any longer than is absolutely necessary.
Already Checked Out Devices
If a firewall is already checked out by another InControl client, this is indicated in the Locked by column with the name of the user who has performed the check out. In the example below, the user admin has already checked out the firewall My_FW.

Since the checking out of a firewall is an exclusive operation, it cannot be done on an already checked out device and this option will be disabled in the InControl client interface.
Alarms
If a firewall has a new alarm associated with it, an exclamation mark icon will appear next to the firewall's icon.

Open the Alarms tab to investigate this further. In the above example, the status of the firewall is Unreachable which may be the cause for the alarm. This topic is discussed further in Chapter 14, Alarms.
Automatic Check Out
If a firewall has its configuration changed in some way without first checking out the unit, the firewall is automatically checked out by InControl. If the unit is already checked out by someone else, it is only possible to read configuration information. When all necessary changes have been made to the configuration, the administrator needs to perform a check in operation in order to commit the changes to the database. The check in operation stores a new version of the configuration in the management database and changes the mode to "checked in", meaning that the configuration once again is read-only.If a firewall's configuration has been changed, this is shown by an asterisk appearing next to the firewall's name in the Firewalls tab.

Check in can be done by pressing the Check In button for the firewall.

A dialog appears to confirm and complete the check in. It is recommended that the administrator add a comment for each check in. This provides an easy way to identify changes in the revision history.
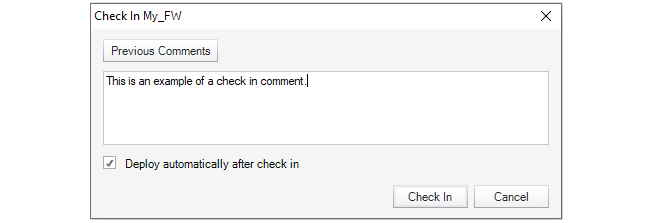
This dialog also provides the option to automatically deploy the configuration at the same time that the check in occurs. This option is disabled by default but enabled in the example above.
Deploying Changes
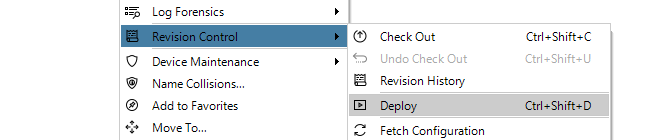
It must be remembered that the check in operation only copies updated configurations to the InControl server database. The changed configuration must be next deployed to the actual firewalls. This can be done by selecting the deploy option.

Using deploy will cause all configuration changes since check out to be deployed to the relevant firewalls. The progress of the actual upload of configurations to the hardware units is indicated by progress bars that appear in a bottom panel in the client interface.
Like many other options, a deploy can also be initiated by right-clicking the firewall in the Firewalls tab and selecting the option in the context menu.
If the InControl client is closed before configuration changes are deployed, those changes are still saved between client sessions. When that same InControl client is started up, undeployed changes will still be visible in the client's view of the configuration.
Exiting the Client with Checked-out Configuration
If the client is exited with a checked-out configuration, this is allowed. However, InControl will display a confirmation dialog before the exit is allowed if the checked-out warning feature is enabled in the General Settings for the client. These settings are described in Section 5.5, Client Settings.If the client does exit with a checked-out configuration then after opening the client again with that same username, the checked-out state will remain along with any uncommitted changes. However, if the InControl server is restarted, all check-outs and any pending changes are lost.
Clients Can Cancel an Existing Checkout
It is possible for one client to cancel a check-out performed by itself using the Undo Check-out button.

However, it is not possible to use this function to undo a checkout performed by another username. Only an InControl server restart will undo all checkouts.
Checking for Deployment Problems
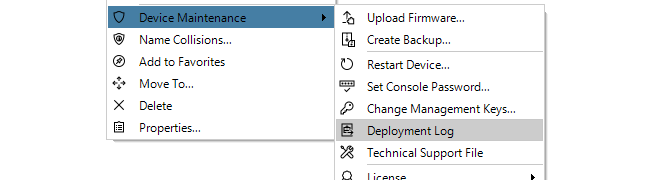
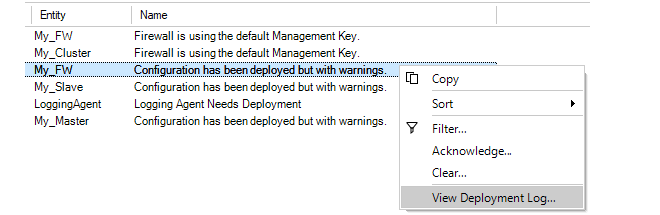
If there are any problems in the configuration that prevent deployment, the InControl client will indicate this by automatically displaying the Deployment Log Dialog.However, some configuration problems are not so serious that they prevent deployment but still result in a warning message. These warnings are also shown in the Deployment Log Dialog but this time it is not shown automatically. Instead, the log can be viewed at any time after deployment by pressing the Deploy Log button in the toolbar.

This option can also be selected through the context menu for a firewall in the Firewalls tab.
An example of the Deployment Log Dialog is shown below. This shows warning messages relating to issues with the IPsec tunnels MyTunnel and MyTunnelTwo.

If a deployment has any errors or warnings, a single alarm will be generated and this will appear in the Alarms tab. The deployment log can also be viewed by right-clicking this alarm and selecting the View Deployment Log option.
Deployment logs are always fetched directly from a firewall so the deployment may have been initiated from the Web Interface or CLI. Also, the log only relates to the last deployment made for a firewall.
Deploying Multiple Configurations
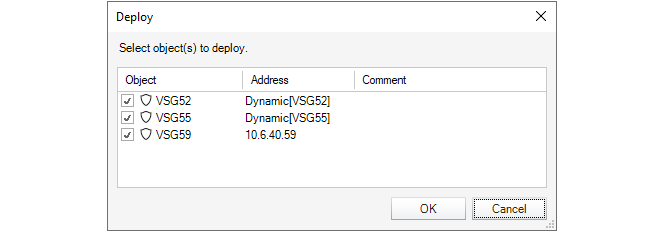
An alternative to using the deploy button is to choose the Multiple Deploy option.

This will display a dialog that lists the changed configurations that are yet to be deployed so that individual entries in the list can be selected for deployment. By default, all the changed firewalls are selected in the displayed list.
Undoing Check Out
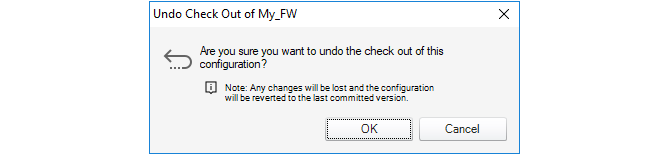
In the event that a configuration is checked out and changes are made but the changes are to be discarded while the check out is reversed, pressing the Undo Check Out button can achieve this.

The following dialog is displayed if this option is chosen:
Forcing Undo Check Out
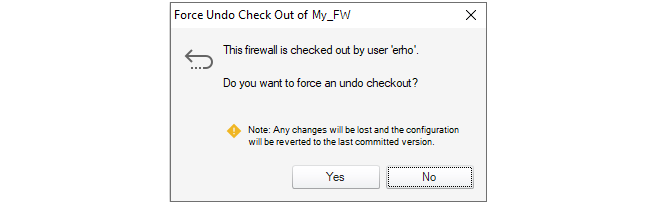
A user in the administration group can force the undoing of a checkout by any other user. This is done by choosing the Undo Check Out option which will result in this dialog.
Checking In Domains Changes
Domains such as the Global Domain, can be checked out, modified and deployed just like a firewall. However, when a domain is checked out, any child domains or firewalls are not automatically also checked out.When a domain is checked in and one or more firewall configurations inherit changed objects from the domain, an alarm is raised for the affected firewalls. These firewalls then need to have their configurations manually deployed to have the domain changes take effect (deployment does not need a firewall to be also checked out).
If a firewall that inherits changes is checked out then such a deployment cannot take place. In this case, any inherited changes will be queued on the InControl server. The next time the firewall has its configuration deployed following check-in, the queued changes are applied.
Every time a new configuration version is created and activated, a configuration revision number is allocated to the version. This number has two parts and is of the form nn:mm. This number appears next to the firewall name in the title of the tab that appears for editing in InControl.The first part of the number, nn, is incremented every time a new configuration is activated through a non-InControl interface such as the Web Interface or CLI. The second part of the number, mm, is incremented every time a new configuration is activated through an InControl client. Both numbers will start at 1. The most recent configuration version is therefore associated with the highest version number from either number.
Whenever a firewall configuration is changed through a non-InControl interface, any connected InControl server will be automatically notified that there is a configuration change and what the new version number is. All clients connected to the server will then be informed of this change.
Concurrent Changes Made Outside InControl
Even if an InControl client checks out a firewall configuration, it is still possible that the configuration could be changed by another non-InControl user during the period it is checked out.By using the CLI or Web Interface, another user could change the configuration outside the direct supervision of InControl. However, when such configuration changes are made, the InControl server will detect them and any InControl client that has checked out that configuration will present a warning message to tell the user that something has changed. The message gives the user the option to update their view of the configuration and this is the recommended action.
However, it is strongly recommended when using InControl that all configuration changes are made through the InControl client and using the Web Interface or CLI is avoided. This will also mean that the InControl audit log correctly reflect all configuration changes made.
In the Revision Control option of the context menu for a firewall is the Revision History option.

Selecting this brings up the Revision History tab which lists all the configuration changes made.

By selecting a particular revision, a summary of that revision can be displayed at the bottom of the Revision History tab.

The button Check Out and Open allows any revision in the history to be opened. It can then be viewed, even changed and then it can be deployed to the firewall. If it is deployed, it becomes the current configuration and moves to the top of the list in the Revision History tab.
By selecting the Difference tab, the difference between the selected configuration and its predecessor can be seen.
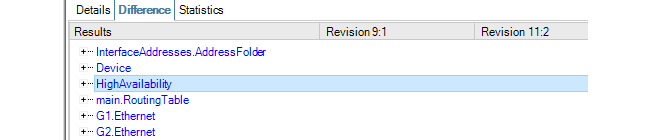
Additions and deletions are marked as such. A change appears in blue and the old and revised values are shown in their respective columns. Expanding the node at the left can reveal more details about the change.

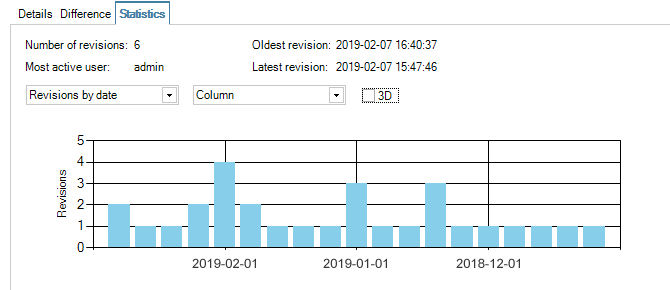
The Statistics tab provides the ability to see graphical representations of revision changes by date or by user. An example of a typical bar chart presentation is shown below.
Revision History Node ID Changes for HA Clusters
When examining the revision history of an HA cluster, the Node ID can either be zero or one. If this ID changes between revisions on the history, it is not a cause for concern.The value of the Node ID reflects which unit in the cluster was changed first. Zero indicates the master and one indicates the slave. If all changes are performed under the control of InControl, the Node ID will remain constant.
However, if changes are made outside of InControl then the Node ID can change in the revision history. Such changes might be made with the Web Interface or the CLI but may also come from cOS Core version changes performed outside of InControl.