| Home Prev | Next |
Overview
The Zero Touch feature can be used to automate either of the following tasks in cOS Core:Adding New Devices
The zero touch feature can automate the addition of NetWall firewalls to InControl. When a new firewall is powered up and physically connected to the Internet, it can be automatically detected by InControl and added as a device under centralized management. The correct license will also be automatically installed.
Replacing the Hardware of Existing Devices
Zero touch can help automate the replacement of the hardware for a device that has previously been added to InControl. This includes automatically installing the correct license and cOS Core version into the new hardware, as well as installing the configuration of the old hardware.
Note that the new replacement hardware should ideally be the identical model type as the old hardware. If it is not then the configuration's Ethernet interfaces may need reassignment and this is discussed in Chapter 28, Dissimilar Hardware Replacement (cOS Core).
New hardware often requires little or no local configuration to be performed. Often, untrained personnel need only unpack a new device, physically connect it to the Internet on a designated interface and power it up.
When setting up device addition or replacement using the zero touch feature, the physical device does not have to be online and reachable by InControl at the time of the setup. This is known as setting up a shadow appliance in InControl. Once the zero touch setup in InControl is complete, hardware can then be connected at any later time and the InControl server will automatically complete the addition or replacement process, even if the InControl client is no longer open.
It should be noted that the zero touch feature is not supported on virtual cOS Core firewalls. It is also only supported on certain Clavister hardware models and these are discussed next.
Supported Clavister Hardware Models
The following Clavister hardware models (along with the interface name used for Internet connection) can support the zero touch feature:
NetWall 100 Series (Internet connection on the WAN1 interface).
NetWall 300 Series (Internet connection on the G6 interface).
NetWall 500 Series (Internet connection on the G4 or X1 interface).
NetWall 6000 Series (Internet connection on the G8 or X1 interface).
NetWall 200R Series (Internet connection on the G2 interface).
NetWall E10 (Internet connection on the WAN interface).
NetWall E20 (Internet connection on the G1 interface).
NetWall E80 (Internet connection on the G2 interface).
NetWall E80B (Internet connection on the WAN interface).
Note also that a version of cOS Core that supports the zero touch feature (12.00.16 or later) must be installed on the hardware and the device must have its default cOS Core configuration. All the prerequisites for the feature will now be discussed in detail.
Setup Prerequisites for Zero Touch
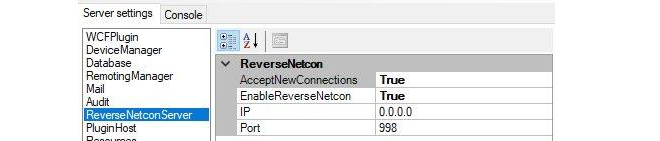
The following are the setup prerequisites if one of the above Clavister hardware models is to be added to InControl or replaced using the zero touch feature:The reverse Netcon feature must be enabled in the InControl server. This is done by opening the server management interface and setting both AcceptNewConnections and EnableReverseNetcon to a value of True, as shown below.
The associated MyClavister account must have the FQDN or IP address of the management InControl server set. There can only be one InControl server defined for one MyClavister account.
The license for the device exists in its associated MyClavister account and the zero touch feature must be enabled for that license. Note that it is possible to configure a MyClavister account so that zero touch is enabled by default on all licenses for any zero touch capable device.
A connection must be created in InControl with the relevant MyClavister account. This can be done at any time by pressing the Licenses button in the InControl client and then pressing the License Center button in the Licenses tab. This button is shown below.

If the account link is not set beforehand, the MyClavister credentials will be prompted for by the InControl client when the zero touch tab is opened.
The device to be added or replaced must have Internet access so it is able to reach the public IP address of the MyClavister system.
The device that is added or replaced must be running cOS Core version 12.00.16 or later. This may require an initial local upgrade of the factory installed cOS Core version on the device. Performing version upgrades locally on Clavister hardware is discussed in the separate cOS Core Administration Guide and can be done using the cOS Core Web Interface.
The cOS Core configuration of the device must have the "factory default" cOS Core configuration. Following an upgrade to a version that supports zero touch, this will require a manual reset to the default cOS Core configuration. In the Web Interface this is done by going to:
Status > Maintenance > Reset & Restart
And then selecting the following option:
Reset the configuration to current core default
![[Caution]](images/caution.png) |
Caution: A full hardware reset will undo version upgrades |
|---|---|
|
A full hardware reset to the factory defaults will undo any cOS Core version upgrades and this option should therefore not be chosen. Resetting to the default cOS Core configuration is all that is required after upgrading. However, any existing configuration will be lost after this reset. Note also that saving any local configuration changes after a configuration reset will disable the zero touch feature in the hardware since cOS Core will no longer have its default configuration. |
The DHCP enabled interface on the hardware should be connected to an ISP or other network that can provide Internet access. The connecting network must also have a DHCP server enabled which can provide a public DNS server address to cOS Core as well as allocate an IP address to the connecting interface.
Access should not be blocked by surrounding network equipment for TCP traffic on port 998. This traffic is required for the hardware to communicate with the InControl server. DNS traffic between the hardware and public DNS servers must also not be blocked.
The sections that follow will describe in detail how to set up the zero touch feature.
Initial Setup Steps in MyClavister for Zero Touch
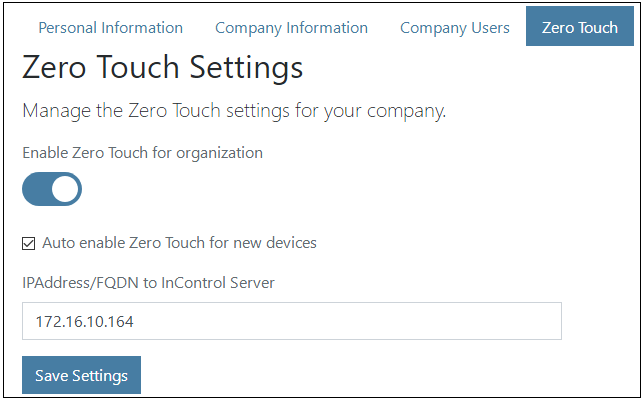
Regardless if a new device is being added or an existing device is being replaced, the following steps should first be followed in the MyClavister section of the Clavister website:Log into the relevant MyClavister account and select Settings followed by the Zero Touch tab.
Enter the IP address or FQDN for the InControl server. Note that the Auto enable checkbox can be checked if all new licenses will have zero touch enabled by default if the device supports the feature. If this checkbox is left unchecked then new licenses must have the zero touch feature enabled individually, as described in the next step.
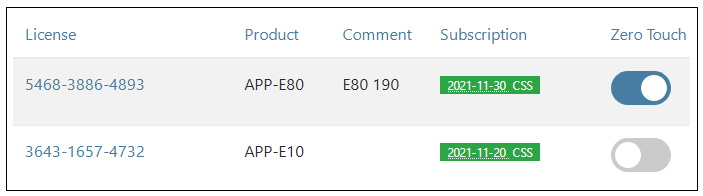
If the Auto enable option described in the previous step is not switched on, then zero touch must be enabled manually for each individual device license. This is done by going to Licenses and pressing the Zero Touch button on the right of the device's license, as shown in the example below. If the feature is not available for a device then the zero touch button will be disabled. Enabling zero touch on an individual license may take a few moments to complete.
Adding a New Device Using Zero Touch
Once the MyClavister setup described above has been performed, the following steps can be used for adding a new device to InControl (in other words, adding a device for which there is no existing entry in the Firewalls tab list).Open the InControl client and press the zero touch button in the InControl client toolbar.

This will open the Zero Touch Lobby pane in the interface.

Note that if an association with the relevant MyClavister account has not been created previously for InControl then the administrator will be prompted to enter the MyClavister account credentials.
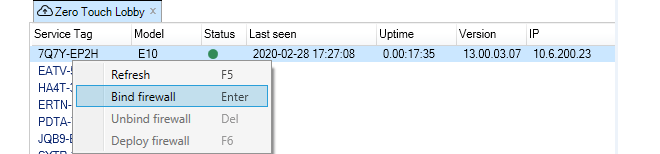
InControl will query the MyClavister server and present a list of any devices that can be added or replaced using zero touch. A device will have a red dot next to it if the device has never before contacted the InControl server, as shown below.

If a device in the list is switched on and makes contact with the InControl server, the red dot next to it will change color to green and details about the device will also be displayed, including the length of time the device has been powered up and its geographic location based on its IP address. An orange color indicates that the device has been reachable previously but is not currently reachable.
To begin the addition process after selecting the device line, either select the Bind button in the toolbar or right-click and select the Bind firewall option from the context menu, as shown below. Only one device in the lobby list can be added at one time.
A new set of dialogs will appear in the zero touch pane. On the left hand side, select the domain in which the new firewall will reside with a single mouse click. Do not select a single device when performing addition.

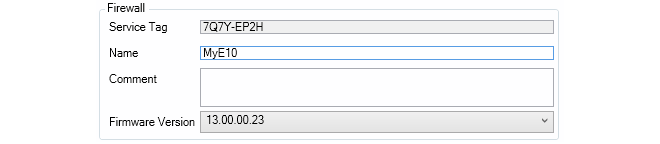
On the right side, enter the device information for the firewall. Usually, only the name is required. If the device name entered is different from the local name on the firewall itself, the local name will be changed to the InControl name automatically. The cOS Core version can also be specified and this will be installed automatically on the physical firewall as part of the addition process if higher than the current local version. The exception is if the firewall has a version higher than the version selected in InControl. In this case InControl will not attempt to change the local version.
Press the Bind firewall button to create a shadow appliance entry in the Firewalls tab list. The addition process will begin as soon as the device is powered on and connected to the Internet. The InControl client does not need to be open when this takes place. It is also possible to edit the default configuration of the shadow appliance before it is uploaded to the hardware.

If the device is already accessible the addition process will begin immediately. If it is not accessible, the addition process will begin when it becomes accessible. In either case, if the zero touch lobby is open in the InControl client, a display like the example below will be presented which flags each processing stage as it completes.

After the addition process is complete, the device will be removed from the zero touch lobby list and it will appear as a normal device under the Firewalls tab.
Replacing Existing Device Hardware Using Zero Touch
Zero touch can also be used when replacing the hardware of a device that has been previously added to InControl and has an existing entry in the Firewalls tab list. As part of the zero touch process, InControl will automatically install a valid license plus the correct cOS Core version if required. In addition, InControl will upload the old cOS Core configuration into the new hardware.The setup steps for replacement are almost identical to the procedure for adding a new device, which is described above. However, there are some small differences. The MyClavister setup is first performed in the same way when adding a new device or replacing an old one. Most importantly, the license for the replacement hardware should have the zero touch option enabled.
Note that if a device is being replaced with dissimilar hardware (where the Ethernet interface names and/or number are different) then a new and modified firewall configuration must be created in InControl based on the old configuration. Performing this additional step is described in Chapter 28, Dissimilar Hardware Replacement (cOS Core).
Below is the complete list of InControl steps for zero touch device replacement. Screenshots have been left out because they are mostly identical to those used previously in the description for device addition.
Open the InControl client and press the zero touch button in the InControl client toolbar.
The Zero Touch Lobby pane will open in the interface.
InControl will query the MyClavister server and list any devices that can be replaced using zero touch.
To begin the replacement process, either select the Bind button in the toolbar or right-click the device line and select the Bind firewall option from the context menu.
A new set of dialogs will appear in the zero touch pane. A key difference in this step when compared with adding a device is that the device that is being replaced should be selected and not a domain.
On the right side, the device information for the firewall is displayed. Neither the device name or the cOS Core version can be changed when replacing hardware.
Press the Bind firewall button to mark the device in the Firewalls tab as a shadow appliance. The replacement process will begin as soon as the device is powered on and connected to the Internet. This may be immediately if the hardware is already accessible. The InControl client does not need to be open when this takes place. It is also possible to edit the current configuration of the shadow appliance before it is uploaded to the hardware.
After the replacement process is complete, the device will be removed from the zero touch lobby list and it will appear as it originally did under the Firewalls tab.
Using the Unbind Option
After a Bind operation is performed and before a device becomes available to InControl for addition or replacement, it is possible to use the Unbind option to undo the bound status. This could be useful if it is discovered that a mistake was made when setting up zero touch in InControl.Using the Deploy Option
Usually, once the zero touch addition or replacement is initiated, the whole process will continue automatically. Should this process fail for some reason, it will be automatically tried again every subsequent hour. Should the administrator wish to force the retry at any time, the Deploy option can be used to do this. To end the retrying of a failed deployment, the Unbind option discussed above should be used.Indicators in the Firewalls Tab
As discussed previously, when a bind operation is performed for device addition or replacement, if the physical firewall is not online then a shadow appliance is created. This shadow appliance will appear in the Firewalls tab list with the distinctive cloud icon of zero touch next to an identifier in the Status column.

When the actual hardware becomes accessible and the zero touch operation can commence, a progress bar will appear next to the shadow appliance to indicate progress, as shown below.

After the zero touch operation completes, the zero touch indicator in the Status column will disappear. If the zero touch operation could not complete because of an error, a red triangle will appear next to the shadow appliance, as shown below. Performing a mouse over of the device will show more information in the tooltip that appears.

Note that the red triangle may also appear momentarily between state transitions during the execution of a zero touch addition or replacement. This is normal behavior and does not indicate an error.
Demo Mode and Lockdown Mode Have No Effect
After cOS Core is started for the first time and has no license installed, it will run in demo mode for two hours after which it will enter lockdown mode. Neither of these two states affect the functioning of zero touch so it does not matter how long a zero touch enabled firewall has been powered up before it is brought under InControl management. As long as cOS Core has its default configuration, it will continue to try to contact any InControl server assigned to it with the zero touch feature.Demo mode and lockdown mode are described further in the separate cOS Core Administration Guide.
Local Console Messages Generated by cOS Core
When cOS Core starts up for the first time on a zero touch enabled device, various local console messages will be displayed as it tries to establish a connection with its designated InControl server. These messages do not need to be monitored but are mentioned here to aid any troubleshooting activity.The initial zero touch related message on the console will be the following:
Generating a Zero Touch ID
This will be followed by:
Generating a Netcon PSK
And the final message that indicates that an attempt is being made to contact the InControl server:
New Reverse Netcon connection
Understanding the internal operation of the zero touch feature is not required to use it but it could be helpful when troubleshooting problems. The normal sequence of events involved in the operation of zero touch is as follows:
The InControl server IP address or FQDN is registered in the relevant MyClavister account, as well as the zero touch feature being enabled in the account for the device's license.
When the InControl client is started and the Zero Touch lobby pane opened, the client queries the MyClavister server to populate the lobby list.
The administrator performs a Bind operation on a lobby list entry to make the device ready for addition or replacement when it becomes accessible. If it is not immediately available, a shadow appliance appears in the Firewalls tab list.
The physical device is connected to the Internet using the designated Ethernet interface. This interface has a DHCP client automatically enabled on it by cOS Core (see the device list near the beginning of this chapter for the designated interfaces).
The device receives its public IP address via DHCP as well as the address of a public DNS server.
Using DNS lookup, the device retrieves the IP address of its designated InControl server for the zero touch feature from the MyClavister system.
Provided cOS Core has its default configuration, the device contacts the InControl server to say that it is ready.
Note that if the InControl server is not available, the device will periodically retry to contact the server until it is successful and this will continue indefinitely, or until any change to the device's local cOS Core configuration is saved.
When the InControl server receives the notification from the device, it matches it with the list of waiting bound devices. If a match is found, the addition or replacement operation is executed.
The InControl server will install the relevant cOS Core license from MyClavister into the hardware and possibly upgrade the cOS Core version if this is needed. If the operation is hardware replacement, InControl will also upload the cOS Core configuration from the original hardware. With new device addition, the current default cOS Core configuration is uploaded.
After the addition or replacement process is complete, the device disappears from the InControl zero touch lobby. The shadow appliance status is removed if had been assigned.