| Home Prev | Next |
The Netcon Protocol
All remote management of Clavister NetWall and NetShield firewalls, including configuration, monitoring and upgrades by InControl is secured through encryption and authentication. The proprietary protocol used for this is called Netcon. Netcon also uses TCP as a transport protocol on destination port 999.New Firewalls Require a Netcon Key
As explained in Chapter 7, Adding Firewalls, when setting up communication with a firewall, InControl requires that a Netcon key is pasted into the Secret Key field in the new firewall dialog.

The required Netcon key is obtained from cOS Core outside of InControl using the following steps:
A. Create a new 512 bit Pre-Shared Key object.
B. Enable the Netcon management protocol with the created key.
C. Save and activate the new configuration.
![[Note]](images/note.png) |
Note: Netcon For cOS Stream |
|---|---|
|
For NetShield see the cOS Stream Administrators Guide for details. |
The above steps can be performed in one of two ways:
Using the Web Interface.
Using the CLI.
These two methods are now described in detail.
When the Web Interface is used, the steps to obtaining the key are as follows:A. Create a new 512 bit Pre-Shared Key object.
Open a direct browser window to the cOS Core Web Interface of the firewall which is to be defined in InControl.
Go to Objects > Key Ring > Add Pre-Shared Key and the page for creating a Pre-Shared Key object will be displayed.

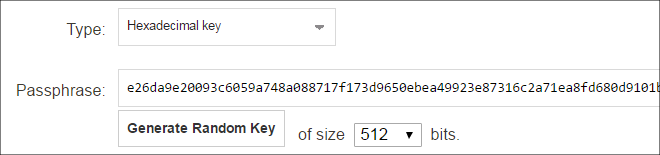
Select a suitable name for the key, for example my_key.
Select Hexadecimal Key.
Select 512 from the bit size choices and press the Generate Random Key button.
A key will be generated and will appear in the Passphrase field. right-click this and select Copy to copy the key text to the Windows system clipboard.
Press the OK button.
B. Enable the Netcon management protocol with the created key.
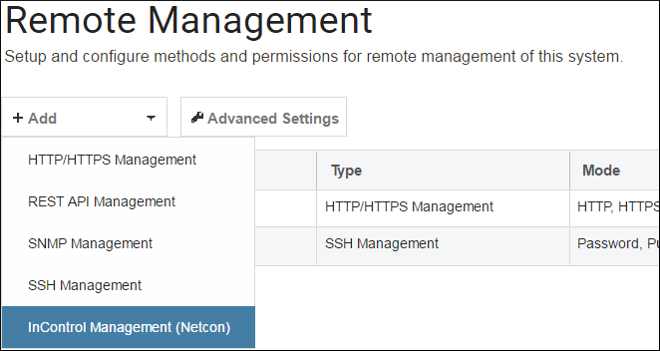
Still in the Web Interface, go to System > Remote Management > Add > InControl Management (Netcon) and the page for Netcon management will be displayed.
Set the PSK field to the key called my_key created previously.
Select the interface and network where the InControl client computer is located. Any network can be specified by using the value all-nets but it is more secure to specify a narrow IP range.
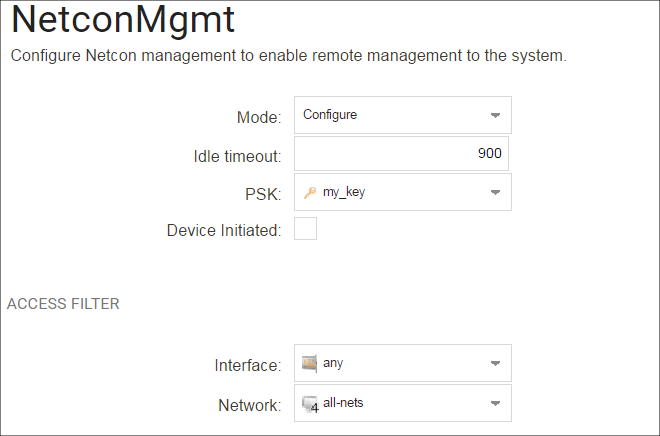
Press the OK button.
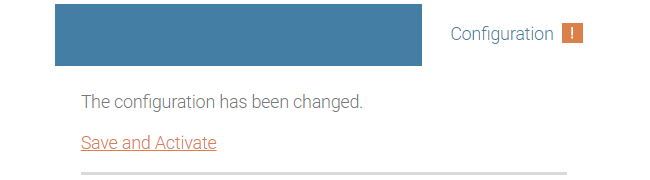
C. Save and activate the new configuration with the changes.
In the toolbar, go to Configuration > Save and Activate to activate the new configuration.
Finally, the key can be pasted into the InControl new firewall dialog in InControl. The Web Interface browser window can be closed.

An example of a Netcon key pasted into the secret key field is shown below.

When the CLI is used instead of the Web Interface to get the secret key, connection can be from a Secure Shell (SSH) client or directly via a console attached to the firewall's local console port. The steps for obtaining the key are as follows:
A. Create a new 512 bit Pre-Shared Key object.
Using the pskgen we generate a new PSK object called my_key with a 512 bit key.
Device:/> pskgen my_key -size=512If my_key already exists, then this command will set its key to be the one generated.
Using the show command to display the key created.
Device:/> show PSK my_key

 Property  Value
---------  ----------------------------------------
    Name:  my_key
    Type:  HEX (Hexadecimal key)
  PSKHex:  b2c8b532ba54f5da6040a05c3176b06a32beb547
           acd199477e8a47b768ab3b31ab6a9e0539094f7d
           35d7948041a6ef85b734c130cc20220c7cd4a8b6
           d0cfc734
The PSK will now be displayed as shown in the example above and can be copied to the Windows system clipboard and later into the InControl new firewall dialog.
B. Enable the Netcon management protocol with the created key.
We will assume that management by InControl is to be enabled for the lan interface. The CLI command would be:
Device:/> set RemoteManagement RemoteManagementNetcon
		Key=my_key
		Interface=lan
		Network=all-nets
The network on which the InControl workstation is located is specified above as being all-nets. It would be more secure to give a more specific network address.
C. Save and activate the new configuration with the changes.
Activate the configuration changes.
Device:/> activateThen immediately commit the new changes (otherwise they will be automatically undone 30 seconds after the activate command).
Device:/> commit
At this point, the required key is in the system clipboard and ready to be pasted into the InControl new firewall dialog.
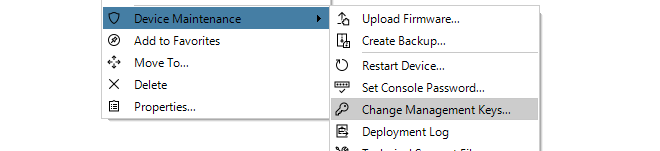
Once a firewall is added to InControl, the InControl client provides the ability to automatically change the Netcon key to a new matching value on both server and firewall. If the firewall is still using the default key, an alert is automatically generated in InControl client and it is highly recommended that this is changed as soon as possible. The new key is generated randomly by InControl and does not need to be input manually.This function can be found in the Firewalls tab toolbar.

Alternatively, this function can be found in the context menu displayed after right-clicking the firewall.
It will not be possible to change the keys in this way if:
The firewall does not have a cOS Core license and is in 2 hour demonstration mode.
The firewall's configuration is checked out. Either a check in must be performed or the check out must be undone.