| Home Prev | Next |
When a full installation of InControl is performed, a single instance of the ILA is always installed along with a full installation of InControl and working with this instance is described in Section 23.2, The InControl Logging Agent (ILA). It could also be installed separately using the individual ILA installation .exe file. This ILA instance is known as the Default instance.
Multiple ILA Instances and the Logging Agents Manager
Sometimes, there can be a use case to have multiple ILAs running on the same server so that logging information is divided up, with different firewalls or groups of firewalls sending their log messages to different ILA instances. InControl provides this feature through a separate piece of software called the Logging Agents Manager.The Logging Agents Manager is installed as part of the standard InControl installation. If it is started by selecting it via the Windows Start menu, a graphical user interface is displayed. A typical example of this is shown below.

Each line in the display shows details for an individual ILA instance along with its current status. The default ILA instance will be shown with the name "Default".
Steps for Configuring a New ILA Instance
The following steps are needed when configuring a new ILA instance:Create a new named instance in the Logging Agents Manager and manually start the two services associated with an instance. Doing this is fully described in this section.
Using the InControl client, associate one or more firewalls with the new ILA instance. Doing this is described in Section 23.2, The InControl Logging Agent (ILA) under the heading Configuring cOS Core for ILA Logging.
Also using the InControl client, set the user permissions that allow the collected data to be read and reports generated from it. This is also described in this section.
Adding a New ILA Instance in the Logging Agents Manager
A new ILA instance is added by pressing the plus button
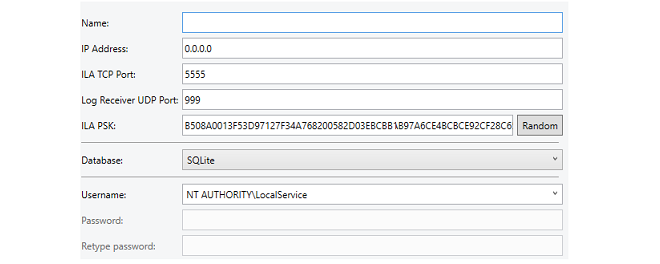
The following properties can be set for an ILA instance:
Name
A symbolic name for the instance. This is only used for displaying instance information in the instance manager. Note that this name cannot be changed once it is assigned.
IP Address
This is the IPv4 address or addresses of the network cards in the local computing environment on which incoming messages will be accepted. This is 0.0.0.0 by default (all networks) which is the normal setting with the default ILA instance.
The usual reason for changing this setting from the default of all networks is if there are multiple network cards that could receive messages, such as in a cloud computing environment.
ILA TCP Port
The TCP port on which the instance will listen. This must be unique for each ILA instance and by default, the manager will set this to the next available port number. However, the manager cannot know about other applications that might use the port number it chooses so the administrator can set a specific port if that is required.
ILA PSK
By default, the instance manager will pick a random PSK to use for security between the ILA instance and firewalls. Pressing the Random button will generate a different random PSK. Alternatively, a PSK could be entered manually.
Database
The type of database used by the ILA instance. By default, this is set to SQLite.
Selecting another database type, such as MySQL, may require additional settings, in which case the dialog will expand to allow entry of those settings. Database choices are discussed further in Section 23.7, The Log Analyzer.
Username and Password
This is the Windows username under which the instance will run. The drop-down box provides the option to select from the following alternatives, which do not require a password:
NT Authority\LocalService (the default)
NT Authority\NetworkService
.\LocalSystem
Another arbitrary username can also be entered for the instance, in which case an associated password must also be entered. The instance manager will then automatically create the associated Windows folders for this user and the services for the ILA instance will run under this username. This will ensure total separation in Windows between the ILA instances and their associated data.
After defining the settings of the new instance, press the OK button to close the dialog and add the instance to the manager list. Each new instance has two new Windows services associated with it. The following should be noted about these services:
Directly after adding a new instance, the two associated service processes must be started manually by pressing the two start buttons on the right hand side of the line displaying the instance in the manager display. Using these buttons is discussed later in this section.
The two services only need to be started manually directly after creating the new instance. The services are set to always start automatically after a complete restart of Windows.
The two services will always have the same names in the Windows process list for all instances, and these are ILA.exe and LogReceiver.exe.
The processes will continue to function, regardless if the instance manager is open or not. The instance manager can therefore be closed once any instance additions or changes are made.
The LogAgentAdmin permission needs to be enabled for administrators so they can add or delete ILA instances in InControl.
For users, the Read and ExecuteLogQuery permissions need to be enabled so that the logs collected by ILA instances can be read and analyzed.
Setting permissions is described further in Chapter 20, User Accounts and Groups.
Stopping and Restarting ILA Services
ILA services for all defined instances will be automatically started during Windows system startup. The instance manager has two columns in its display which show the current status for both the ILA service (ILA.exe) and the Log Receiver service (LogReceiver.exe) for each instance.In order to stop and/or restart any of these services, the columns in the display also include buttons for each instance to allow the administrator to do this. An example is shown below.

Note that the order of starting the services is important but the administrator does not need to worry about this since one start button will be automatically disabled if the other start button needs to be pressed first.
To edit an ILA instance, select the line for the instance in the manager display and press the Edit button. A dialog similar to the one used for creating a new instance will be displayed, allowing any of the instance's parameters to be changed.![[Important]](images/important.png) |
Important: Properties may also need to be changed in the client |
|---|---|
|
If a property of an instance that affects communication with firewalls is changed (for example, the log agent port number) then this must also be changed for the ILA definition in the InControl client. Otherwise, communication between relevant firewalls and the ILA instance will be lost. |
After editing an ILA instance, the services need to be restarted for the changes to take effect so the manager presents a confirmation dialog for this to be done automatically, as shown below.

Note that during the services restart there will be a short period during which any log messages sent to the ILA instance will be lost. If the services are not restarted immediately then any changes made to an ILA instance will come into effect following a later restart.
To delete an ILA instance, select the line for the instance in the manager display and press the red crossed delete buttonA confirmation dialog will be displayed to make sure this is what the administrator wants to do. On deletion, the instance's service processes will be stopped and all the related instance files, including the database files, will be deleted.
![[Note]](images/note.png)