| Home Prev | Next |
This section describes setting up Single Sign On (SSO) in EasyAccess when connecting to resources behind a NetWall firewall through the Clavister OneConnect SSL VPN client. Usually, the target web page after successful OneConnect connection will be an EasyAccess MyApps web page. However, an external landing webpage could be used instead. The aim is to have the user land on the target webpage after successful OneConnect connection and then be able to open any of the service providers on the webpage without further authentication.
A Summary of authentication processing steps with OneConnect
The processing sequence with OneConnect would be the following:cOS Core is set up to authenticate the user by sending a RADIUS authentication request to an EasyAccess RADIUS scenario. Successful authentication could be based only on username/password credentials but EasyAccess may be configured to use a multifactor RADIUS authentication option, such as using OneTouch. The multifactor authentication option can be added as required to the EasyAccess scenario but will not be discussed further in this section.
Note that once OneConnect is started, all the traffic from the client will go through the SSL VPN tunnel so cOS Core must be configured to allow this traffic to flow between the VPN tunnel and EasyAccess server. The server might be located locally to the NetWall device or it could be located remotely across the Internet.
The EasyAccess server performs normal RADIUS authentication on the user. The RADIUS scenario that handles authentication is configured to creates a unique UUID which is bound to a persistent user session so the user need not authenticate again later.
The EasyAccess server sends a URL back to cOS Core as part its RADIUS response with the UUID added to it. This URL is preconfigured as part of the RADIUS scenario setup and it points to the identity provider of a federation scenario on the EasyAccess server. Pointing directly back to the identity provider in this way simplifies the setup steps.
The URL is forwarded back to the OneConnect client by cOS Core as part of the successful authentication response. This is standard cOS Core behavior and does not need to be configured.
The URL is automatically opened by the OneConnect client in the user's default web browser.
The browser connects to the EasyAccess server and the target identity provider give the browser a SAML assertion based on the UUID in the URL without further authentication being needed. This exchange will not be visible to the user.
Once it has the SAML assertion, the client browser is redirected to the default service provider URL that has been set for the identity provider. This is typically a MyApps webpage on the EasyAccess server that provides access to different service providers. However, it could be a specific external service provider.
The target webpage accepts the user as authenticated based on the SAML assertion in the browser.
Authentication for the target webpage will persist throughout the browser session. If the browser is closed, this is lost.
Below are the detailed steps for setting up EasyAccess with OnConnect.
A. Set Up cOS Core for RADIUS Authentication of OneConnect
It will be assumed in this section that cOS Core has been correctly configured to authenticate incoming connections from OneConnect clients using RADIUS and that the RADIUS server used is the EasyAccess server.Configuring cOS Core to do this is described in the SSL VPN section of the separate cOS Core Administration Guide..
B. Create a RADIUS Scenario
A new RADIUS scenario must be created to authenticate the OneConnect client. Creating a basic senario is described in Section 5.1, Basic RADIUS Scenario Setup. The RADIUS scenario could use one of the multi-factor authentication options, such as that described in Section 5.2, RADIUS with Token Scenario SetupC. Change the list of RADIUS scenario valves
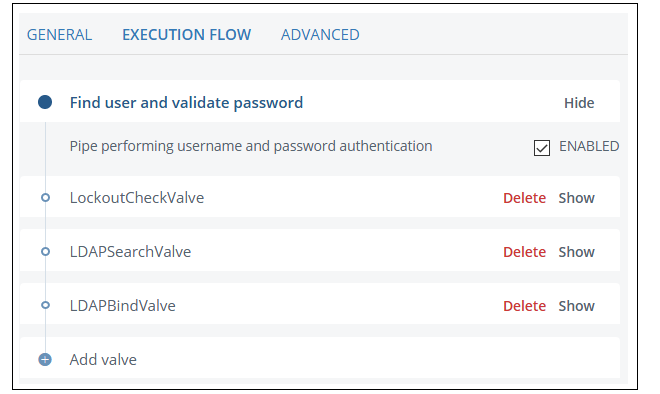
Particular valves nust be set up in the RADIUS scenario in a specific order.First, open the scenario for editing in the EasyAccess WebUI and select the Execution Flow tab. By selecting the Show link, the default list of valves will be displayed. The typical RADIUS scenario list valve is shown below.
This list must be modified to contain the following valve types and in the following order:
To create the above valve list, the following steps are required:
A SessionCreateValve is needed because RADIUS does not include the concept of a session. No changes are required to the default values of the SessionCreateValve shown below.
{
  "name": "SessionCreateValve",
  "enabled": "true",
  "config": {
    "proceed_on_error": "false"
  }
}
Modify the LDAPSearchValve to have the values required. The following JSON lists example values:
{
  "name": "LDAPSearchValve",
  "enabled": "true",
  "config": {
    "connection_ref": "bbd7198c-0a6c-43aa-b62b-cd7552c8b4cf",
    "base_dn": "dc=your,dc=base,dc=change,dc=com",
    "scope": "SUB",
    "size_limit": "0",
    "filter_template": "uid={{request.User-Name}}",
    "attributes": "*"
  }
}
Modify the LDAPBindValve as required. For example:
{
  "name": "LDAPBindValve",
  "config": {
    "connection_ref":"bbd7198c-0a6c-43aa-b62b-cd7552c8b4cf",
    "password_param_name":"User-Password",
    "userid_param_name":"User-Name"
  }
}
Add an UUIDCreateValve to create and store a random UUID. For example:
{
  "name": "UUIDCreateValve",
  "enabled": "true",
  "config": {
    "proceed_on_error": "false",
    "name": "alias_value"
  }
}
Create a SessionBindValve to bind the session to the UUID. This means that the session can be loaded later using the "Alias" or UUID string.
{
  "name": "SessionBindValve",
  "enabled": "true",
  "config": {
    "alias": "{{item.alias_value}}",
    "proceed_on_error": "false"
  }
}
Create a PropertySetValve that creates a property which contains the URL which is to opened by the OneConnect app. In this case, the UUID will be also passed as a parameter with the URL. For example:
{
  "name": "PropertySetValve",
  "enabled": "true",
  "config": {
    "proceed_on_error": "false",
    "name": "clavister-url",
    "value": "https://www.example.com/saml/authenticate/samldispatch/?accesstoken={{item.alias_value}}"
  }
}
Note that the example-url will be referenced by the vendor specific attribute in the RADIUS scenario. This attribute will be set in step D.
Create a SessionBindToUidValve to bind the session to the user ID received from the LDAPSearchValve. This will be used in the SAML Assertion.
{
  "name": "SessionBindToUidValve",
  "enabled": "true",
  "config": {
    "proceed_on_error": "false",
    "userid": "{{item.uid}}"
  }
}
Now create a SessionPersist Valve to make the session persistent otherwise it will disappear after each authentication.
{
  "name": "SessionPersistValve",
  "enabled": "true",
  "config": {
    "proceed_on_error": "false"
  }
}
D. Specify the vendor specific attribute
Using the scenario editor in the WebUI, select the Advanced tab for the RADIUS scenario and set the vendor specific attribute. This specifies where to find the URL that will be sent to the OneConnect client after successful authentication. In the screenshot below the value "clavister-url" refers to the value parameter string in the PropertySetValve created previously. The value 5089 is the vendor ID for Clavister and the type value 4 must be used with OneConnect.E. If not MyApps, create a new Federation Scenario
If the target webpage for SSO is not a MyApps page, create a simple federation scenario as described in Section 6.1, Basic Federation Scenario Setup and also upload into EasyAccess the SAML SP Metadata for the service provider.If the target webpage is an EasyAccess MyApps page, no metadata upload is required but the MyApps scenario will have to be set up. Doing this is described in Section 6.5, MyApps Setup.
F. Add the SAML authenticator
A SAML authenticator must be defined that the OneConnect client redirects to. This is done in the WebUI by selecting the Advanced tab and clicking the pen icon next to the Authentication - HTTP option, as shown below.Define a HeaderSAML authenticator by adding the following JSON anywhere.
{
  "alias": "samldispatch",
  "name": "HeaderSAML",
  "configuration": {
    "idpID": "f1dab3a5-02a0-43c6-afef-9d8e39323eb3",
    "pipeID":"tokenPipe"
  }
},
Note that the idpID value must be a SAML identity provider. Another federation scenario might have to be created in order to get this SAML identity provider.
F. Add the tokenPipe
To add the new pipe referred to by the HeaderSAML authenticator created above. click the pen next to Pipes in the Advanced options.Enter the following JSON anywhere to define the new pipe called tokenPipe.
{
  "id": "tokenPipe",
  "valves": [
    {
      "name": "SessionLoadByAliasValve",
      "config": {
        "aliasid": "{{request.accesstoken}}",
        "require_session": "true",
        "require_auth_session": "false"
      }
    },
	{
      "name": "LDAPSearchValve",
      "enabled": "true",
      "config": {
        "connection_ref": "bbd7198c-0a6c-43aa-b62b-cd7552c8b4cf",
        "base_dn": "dc=your,dc=base,dc=change,dc=com",
        "scope": "SUB",
        "size_limit": "0",
         "filter_template": "uid={{session.user_id}}"
      }
    },
    {
      "name": "AssertionProvider",
      "config": {
        "targetEntityID": ""f1dab3a5-02a0-43c6-afef-9d8e39323eb3",
        "nameIDAttribute": "uid",
        "sourceID": "myapps",
      }
    },
    {
      "name": "SessionClearAllAliasValve",
      "config": {}
    }
  ]
},
The pipe tokenPipe contains the following valves:
SessionLoadAliasValve
This loads the previous session that was made persistent in the RADIUS scenario in step A using the user's UUID. The UUID is part of the URL that the OneConnect client opens in the browser. To retrieve the session, the aliasID property is set to this UUID using {{request.accesstoken}}.
Note that the require_session parameter is set to true so that if there is no session with the specified alias, flow execution will fail. This makes it impossible to connect using a random UUID.
LDAPSearchValve
A valve is required that creates an item instance in EasyAccess memory. An ItemCreateValve could be used for this. Alternatively, an LDAPSearchValve will also perform the task and will additionally retrieve user data based on the user ID bound to the session.
AssertionProvider
This is an assertion provider for the target webpage. The targetEntityID is the ID of an identity provider and this must have the same value as the idpID used in the HeaderSAML authenticator created earlier.
The sourceID will be the same as the entityID value in the MyApps scenario if MyApps is being used.
Other values would be added as required by the service provider. For a MyApps page, the JSON values listed above would be sufficient.
The nameIDAttribute could also be set to {{session.user_id}}.
SessionClearAllAliasValve
This clears all aliases from the session. This is done to avoid the remote possibility that an attacker might successfully replicate an alias.