| Home Prev | Next |
This section explains how to use InControl to upgrade the version of cOS Core or cOS Stream for the firewalls under its control. Device upgrades can be performed on one device at a time, or in a batch of multiple devices and the upgrades can be initiated immediately, at a scheduled time, or when required.
The steps to perform an upgrade on one or many devices at once are the following:
Log into the relevant MyClavister account and download to local disk the appropriate .upg file for the required upgrade on the relevant platform. All the downloaded files should be for the same cOS Core version.
Create an upgrade job in the InControl client. Upload the .upg file(s) from local disk into the job and also specify which devices, HA clusters or domains they will be applied to and when.
The Firmware Upgrade Jobs Tab
To begin building an upgrade job, press the Upgrade button in the toolbar ribbon, the Firmware Upgrade tab will open.

The Firmware Upgrade Jobs tab shows all the defined upgrade jobs that are waiting to be manually started, are currently in progress, are scheduled to be executed, or have already completed. Initially, the job list will be empty.

A new upgrade job can now be created by pressing the Create (plus) button in the toolbar ribbon, which is shown below.

This will open the New job dialog. Below is an example of the upper portion of the New job dialog with example values specified for the input fields.
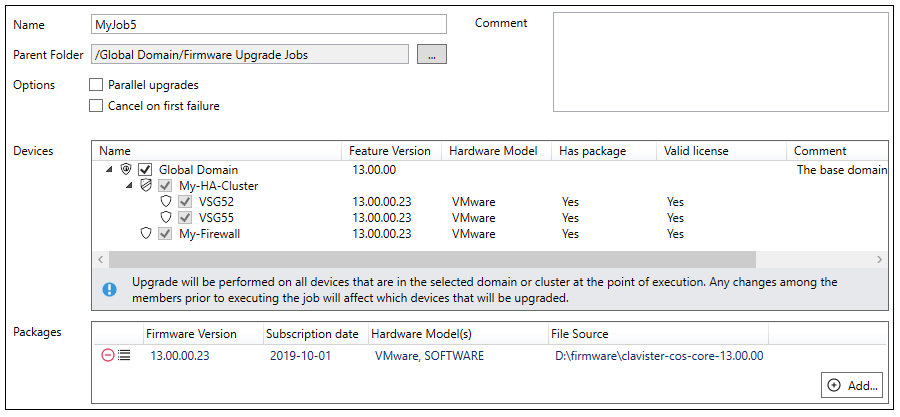
Beginning with a suitable name for the job, the New job dialog shown above has the following additional components:
Parent folder
This is the folder on the InControl server where the job definition will be stored. Normally, the default setting is adequate but different folders could be used if there is a need to separate created jobs for different sets of users. New folder creation is possible in the InControl library browser (this is discussed further in Chapter 24, The Library Browser).
Parallel upgrades
This option should be selected if more than one device is to be upgraded and InControl is to perform these upgrades in parallel when possible. This can shorten the total upgrade time for several devices.
For a large number of parallel device upgrades, InControl will, in fact, limit the number of simultaneous parallel upgrades so InControl resources are not overwhelmed. As soon as one upgrade finishes, the next one will start so the limit is never exceeded.
Cancel on first failure
This option should be selected if there are multiple devices to upgrade and a single upgrade failure will cancel the remainder of the job. If the Parallel upgrades option is also selected, this can still be relevant for a large number of devices because not all upgrades may begin at once.
Devices
The Devices windows allows selection of the devices to be upgraded. The selection could be individual devices but could also be an HA cluster or even an entire domain. If an HA cluster parent object or domain is selected, the contained devices will be automatically selected and grayed out.
Packages
The Packages window allows the upload of one or more .upg files to the InControl server by pressing the Add... button. The progress bar at the lower-left of the dialog shows upload progress for this. All the .upg files in a job must be for the same cOS Core version but possibly for different platforms.
As mentioned earlier in this section, the .upg files will first need to be manually downloaded from MyClavister.
The icons
![]() on the left of each added .upg file can be used to delete the file from
the job or to display the "Change Log" for that upgrade file. The log can indicate any specific
upgrade issues the administrator should be aware of before proceeding.
on the left of each added .upg file can be used to delete the file from
the job or to display the "Change Log" for that upgrade file. The log can indicate any specific
upgrade issues the administrator should be aware of before proceeding.
As .upg files are selected and uploaded, the Has package column in the Devices window will automatically change from a value of No to a value of Yes when InControl matches a .upg file to a device. The N/A (No package) value in the Valid License column will also disappear when a match is found.
If the Valid License column changes to a value of N/A (Old package) (as shown in the example below), this indicates that InControl cannot determine if an older .upg file is compatible with the license on the device. Caution is advised in this situation because the file could be incompatible and cause the device to enter lockdown mode after an upgrade attempt.

Selecting the Job Execution Time
The lower part of the New job dialog allows the administrator to specify when the job is to run.

The time when the job is run can be one of the following choices:
Manually Triggered - The job will remain in the job list until it is launched manually.
Immediately - The job will run as soon as the New job dialog is closed.
Scheduled - The job will run at the time and date specified.
Note that any scheduled job that is waiting in the job list could be manually started at any time, before its scheduled start.
Matching .upg Files to Devices
A job can have multiple devices and multiple .upg files selected. When the job runs, InControl will automatically update using the .upg file relevant to the device. The following should be noted about this matching process:There can only be one matching .upg file for each device selected. InControl will not allow two or more different .upg files that could be used with the same device and an error message will indicate this when trying to save a job definition.
If a selected device has no matching .upg file, the job can be saved but will immediately fail when it runs. There must be a matching file for all selected devices.
If the domain does not have recursive permissions to upgrade all of its child devices, InControl will automatically uncheck the checked domain and instead check the individual devices within it that can be upgraded. The individual devices will not be grayed out so this individual device selection can be changed.
The following should be noted when upgrading HA clusters:When an HA cluster is upgraded, the parent cluster object is usually selected in the New job dialog (and this is recommended). If this is done, InControl will always upgrade the master device first and then the slave with a short delay between upgrades. The required failovers between devices are performed automatically. A parallel upgrade will not be done even if the Parallel option is selected.
Instead of selecting the parent HA cluster object, individual cluster members could be selected separately, such as when the administrator wants to check that there are no problems with an upgrade.
Note that the job list can also be viewed and managed using the Library Browser The list is found in the browser's Firmware Upgrade Jobs folder. The browser is discussed further in Chapter 24, The Library Browser.
If a job is of the Manually Triggered or Scheduled type then it can be run at any time by selecting it in the list and then pressing the Start button in the upgrade toolbar ribbon. If not manually started in this way, scheduled jobs will run automatically at their scheduled time.
A progress bar in each line in the job list indicates the job's progress. This progress bar summarizes the progress for all the upgrades performed by the job. An example of this is shown below.

The green portions of the progress bars indicate successful upgrades and the red portions failures. If an orange portion is seen, this indicates a successful upgrade but with warnings which can be examined in the Progress dialog (discussed below).
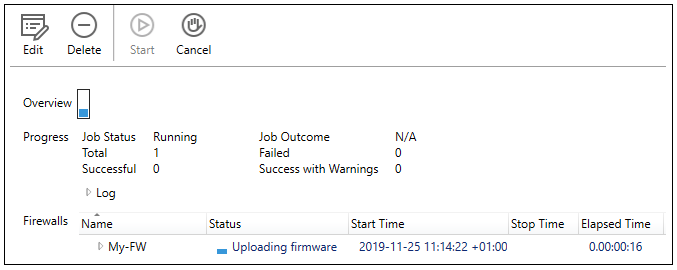
Even if the Firmware Upgrade tab is not visible, upgrade job progress will also be displayed by the InControl client in its progress pane at the bottom of the window. An example of this is shown below.

Note that the ordering with which individual devices within a running job are upgraded is random and is not determined by the ordering of devices in the New job dialog.
Selecting a line in the Firmware Upgrade tab job list and then selecting the Progress button in the toolbar ribbon will display a progress dialog for that job. This dialog provides more detailed job information, both during and after job execution. The Progress dialog is automatically displayed straight away when the Immediate option is selected in the New job dialog and the job is saved then begins to execute.
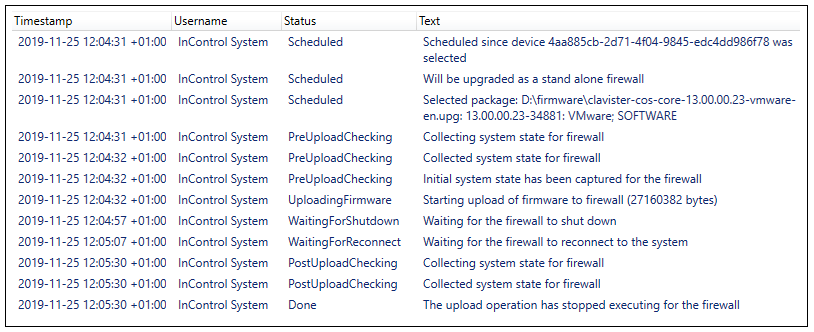
Viewing the Upgrade Log After Completion
After a job finishes, the Progress dialog can be opened to display a log of the actions taken during the upgrade, as shown in the example below. This can be useful for troubleshooting an upgrade problem. The log will be retained until the job is deleted by the administrator. However, the .upg files associated with a job are deleted from the InControl server as soon as a job has completed.
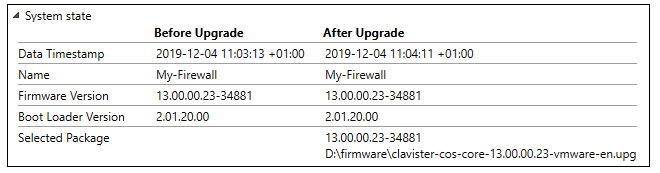
In addition to the Log part of the completed Progress dialog, the lower System state part of the dialog can be expanded to show the old and new states of the upgraded devices, including techsupport command output. An example portion of this system state information is shown below.
Availability of Devices During Upgrades
While a device is being upgraded as part of a job, it becomes temporarily unavailable to the InControl client. In the Firewalls tab, the device will have the value Unavailable in the Status column during the upgrade. After the upgrade is complete, the device will return to its original available status. If a job is running, it can be canceled by using the Cancel button. The following should be noted about a canceled job:Any ongoing upgrade operation on a device will still run to completion after cancel is selected. However, any part of the job where the upgrade has not yet begun will be canceled. Jobs with the Parallel option selected can also be affected since there is a limit to how many upgrades are running simultaneously.
In the case of upgrading an HA cluster, the upgrade of both devices will run to completion if the parent cluster object was selected in the New job dialog and the upgrade has begun on only one node in the cluster.
Once a running job has been canceled, it is not possible to restart the job so it completes. To complete any unfinished portion of a canceled job, a new job must be created.
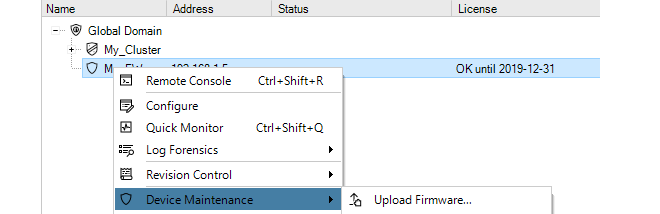
Upgrading Directly From the Firewalls Tab
It should be noted that it is possible to create an upgrade job for a given device or HA cluster more directly by right-clicking on the device in the Firewalls tab list and selecting the Device Maintenance > Upload Firmware menu option.
This will open the Firmware Upgrade tab and then the New job dialog directly. The job name will be filled in automatically by InControl with the text string made up of the device name and time, as shown in the example below.

The Immediate option in the New job dialog will also be automatically selected so that when the dialog is closed, the Progress dialog will open straight away and the upgrade will commence. Any of these default New job options could be changed before closing the dialog.
However, it should be noted that it is not possible to directly select a domain and upgrade all the devices it contains in this way. Instead, an upgrade job must be created and then the domain is selected within the job.
Ignore the Local Changes Detected Alarm
Sometimes, a firewall upgrade can generate the following warning alarm:Local changes have been detected on device.This alarm can indicate that a change to a cOS Core configuration has been performed locally, outside of InControl management. However, it is also generated whenever there is a change to the cOS Core version. It can therefore be ignored after an upgrade of cOS Core.
This alarm is also discussed in an article in the Clavister Knowledge Base at the following link: