| Home Prev | Next |
cOS Core provides an additional type of VPN connection called SSL VPN. This makes use of the Secure Sockets Layer (SSL) protocol to provide a secure tunnel between a remote client computer and a Clavister firewall. Any application on the client can then communicate securely with servers located on the protected side of the firewall.
For Clavister NetWall products, all the proprietary Clavister SSL VPN clients have the product name of OneConnect. However, the cOS Core SSL VPN Interface only supports versions of the Clavister OneConnect client prior to 3.0. The OneConnect client versions from 3.0 onwards are only supported by the cOS Core OpenConnect Interface. This alternative interface is discussed further in Section 11.7, OneConnect VPN.
![[Note]](images/note.png) |
Note: cOS Core supports OpenConnect clients |
|---|---|
|
The SSL VPN Interface discussed in this section does not support third party OpenConnect clients. However, OpenConnect clients are supported by the cOS Core OneConnect Interface, which is discussed further in Section 11.7, OneConnect VPN. |
The Advantage of SSL VPN
The key advantage of SSL VPN is that it enables secure communications between a client and the firewall using the HTTPS protocol. In some environments where roaming clients have to operate, such as hotels or airports, network equipment will often not allow other tunneling protocols, such as IPsec, to be used.In such cases, SSL VPN provides a viable, simple, secure client connection solution.
The SSL VPN Disadvantage
A disadvantage of SSL VPN is that it relies on tunneling techniques that make extensive use of TCP protocol encapsulation for reliable transmission. This leads to extra processing overhead which can cause noticeable latencies in some high load situations.SSL VPN therefore demands more processing resources than, for example, IPsec. In addition, hardware acceleration for IPsec is available on some hardware platforms to further boost processing efficiency.
Cryptographic Suites and TLS Version Supported by cOS Core
cOS Core supports a number of cryptographic algorithms for SSL VPN. Only some are enabled by default and all can be either enabled or disabled. All the supported algorithms are listed in Section 14.9, SSL Settings. Note that TLS versions 1.0 and 1.2 are supported by cOS Core but not version 1.1. Refer to Section 14.9, SSL Settings for how to set the minimum version that is allowed.By default, only the four algorithms which are considered the most secure are enabled. It is not recommended to enable the weaker algorithms and they exist primarily for backwards compatibility.
Changing the Default SSL Certificate
cOS Core uses a default self-signed certificate for SSL communication but this can be replaced. Doing this is described in a Clavister Knowledge Base article at the following link:https://kb.clavister.com/354848289
SSL VPN Setup
The following setup steps are required for SSL VPN with cOS Core:For a Windows client computer
A proprietary Clavister VPN SSL client application needs to be installed and configured to route traffic to the IP address of the Clavister firewall.
If not already installed, the Windows SSL VPN client can be installed as part of the initial SSL VPN connection process when accessing the firewall through a web browser. cOS Core sends back the VPN Portal webpage to the browser with a link for downloading and installing the client. This client is described further in Section 11.6.4, The Windows SSL VPN Client.
For an Apple MacOS client computer
A proprietary Clavister SSL VPN client for Apple MacOS is downloadable from the Apple App Store. This client is described further in Section 11.6.5, The Apple MacOS SSL VPN Client
If an attempt is made to connect to the SSL VPN from an Apple Mac using a browser and the client is not installed, cOS Core will send back the VPN Portal webpage with a link to the App Store for downloading the client.
cOS Core needs to be configured to accept SSL connections from one of the clients. This is discussed next and the setup is the same, regardless of which type of client is used for connection.
A Summary of cOS Core Configuration Setup for SSL VPN
The following list is a summary of steps: for setting up SSL VPN:On the Clavister firewall side:
An SSL VPN Interface object needs to be created which configures a particular Ethernet interface to accept SSL VPN connections.
An Authentication Rule needs to be defined for incoming SSL VPN clients and the rule must have the Interface property set to be the name of the SSL VPN object created above.
The Authentication Agent of the rule must be set to L2TP/PPTP/SSL VPN and the rule's Terminator IP must be set to the external IP address of the firewall's listening interface.
The PPP Agent Options for the rule should have only the PAP option enabled.
If only a specific IP address, network or network range is to be made available to the client through the tunnel then this can be specified as an option on the SSL VPN interface. Otherwise, it is assumed that all client traffic will be routed through the tunnel.
Client users need to be defined in the Authentication Source of the authentication rule. This source can be a local user database, a RADIUS server or an LDAP server.
Define appropriate cOS Core IP Policies to allow data flow within the SSL VPN tunnel. As discussed below, IP Policies do not normally need to be defined for the setup of the SSL VPN tunnel itself, they are only needed for the traffic that flows inside the tunnel.
Specify the interfaces on which client IPs will be ARP published. This is necessary so a server behind the firewall knows how to send replies back to an SSL VPN client.
Usually, the only time proxy ARP needs to be enabled is if the IPs assigned to clients are part of an already existing subnet that clients need access to. In that case, proxy ARP must be enabled on the interface that has the corresponding subnet. If the traffic is routed by the firewall, for example with an Allow IP policy or a NAT IP policy, proxy ARP is not needed.
The option exists with cOS Core SSL VPN to automatically ARP publish all client IPs on all firewall interfaces but this is not recommended because of the security issues that are raised.
Routes for clients do not need to be defined in the routing tables as these are added automatically by cOS Core when SSL VPN tunnels are established.
The detailed configuration steps for SSL VPN in cOS Core is described next in Section 11.6.2, Configuring SSL VPN in cOS Core.
To configure SSL VPN in cOS Core, an SSL VPN Interface object must be defined for each interface on which connections will be made. The object properties are as follows:
General Options
Name
A descriptive name for the object used for display in the cOS Core configuration.
Inner IP
This is the IP address within the tunnel that SSL VPN clients will connect to.
All clients that connect to the SSL VPN object interface are allocated an IP from the SSL VPN interface's IP Pool. All the pool addresses as well as the Inner IP must belong to the same network and these define the relationship between the firewall and the connecting clients.
A private IP network should be used for this purpose. The Inner IP itself must not be one of the IP Pool addresses that can be handed out to connecting SSL VPN clients.
The interface on which to listen for SSL VPN connection attempts. This could be a physical Ethernet interface but it could also be another logical interface. For example, a PPPoE or VLAN interface could be used.
Server IP
The Ethernet interface IP address on which to listen for SSL VPN connection attempts by clients. This will typically be a public IPv4 address which will be initially accessed using a web browser across the Internet. The following should be noted about this IP:
The Server IP cannot be an IP address which is ARP published on the interface. In order for SSL to work on ARP published IPs, a core route with an accompanying proxy ARP property must be used. This is done with the following steps:
Define a route with the Interface property set to core and the Network property set to the Server IP value.
Set the route's Proxy ARP property to the interfaces which clients are connecting to.
Proxy ARP is explained further in Section 4.2.6, Proxy ARP.
Server Port
The TCP/IP port number at the Server IP used in listening for SSL VPN connection attempts by clients. The default value is 443 which is the standard port number for SSL.
Client IP Options
Dynamic Server Address
Instead of a fixed IP address for the SSL VPN Server IP being handed out to clients, this option makes it possible to hand out a Fully Qualified Domain Name (FQDN) instead.
For example, the FQDN might be specified as server.example.com. When a client connects to the SSL VPN interface, this FQDN is handed out to the client which then resolves the FQDN using DNS to a specific IP address. This allows the server address to change dynamically with only the DNS entry being changed.
If this option is specified, the Server IP in General Options above is ignored.
IP Pool
As described above, client IP addresses for new SSL VPN connections are handed out from a pool of private IPv4 addresses. This pool is specified by an IP address object defined in the cOS Core address book. It is not the same as an IP Pool object used with IPsec.
The pool addresses do not need to be a continuous range but must belong to the same network. The Inner IP property must also belong to this network but must not be one of the pool IPs.
|
Note: Pool addresses must not exceed a /24 network size |
|---|---|
|
SSL VPN will not function correctly if an IP address is handed out that exceeds the size of a Class C subnet (a /24 network with netmask 255.255.255.0). |
Primary DNS
The primary DNS address handed out to a connecting client.
Secondary DNS
The secondary DNS address handed out to a connecting client.
Client Routes
By default, all client traffic is routed through the SSL tunnel when the client software is activated. This behavior can be changed by specifying that only specific IPv4 addresses, networks or address ranges will be accessible through the tunnel.
When this is done, only the specified routes through the tunnel are added to the client's routing table and all other traffic is routed as normal. A maximum of five custom routes can be specified for a tunnel.
Add Route Option
Proxy ARP
So that SSL VPN clients can be found by a network connected to another Ethernet interface, client IP addresses need to be explicitly ARP published on that interface.
This Add Route option allows the interfaces for ARP publishing to be chosen. In most situations it will be necessary to choose at least one interface on which to publish the client network.
Specifying IP Policies for Tunnel Traffic Flow
No IP Policies need to be specified for the setup of an SSL VPN tunnel itself, provided that the advanced setting SSLVPNBeforeRules is enabled (by default, it is). However, appropriate IP Policies need to be specified by the administrator to allow traffic to flow through the tunnel.Since SSL VPN connections originate from the client side, the SSL VPN interface object should be the source interface of the IP policy and the source network should be the range of possible IP addresses that the clients can be given. Specifying the source network as all-nets would of course work but it is always more secure to use the narrowest possible IP address range.
For more information about specifying IP Policies see Section 3.6, IP Rule Sets.
There is an Upper Limit for the Number of SSL VPN Clients
There is a default upper limit of simultaneously connected SSL VPN clients is 64. This limit applies to the total of all SSL VPN client connections across the entire system. This limit can be increased by the administrator to a maximum value of 1000 (within the limits of the license) and cannot have a value less than 10.To change this value in the Web Interface, go to Network > SSL and press the Advanced Settings button. The property Max Sockets defines the maximum number of clients.
SSL VPN with PPPoE
Where PPPoE is used as the method of connection to the Clavister firewall over the Internet, it is possible to have SSL VPN function over the PPPoE connection.This is done by setting up the SSL VPN tunnel so that the Outer Interface property of the SSL VPN tunnel object is specified to be a PPPoE configuration object instead of a physical Ethernet interface. Setting up a PPPoE interface object is described in Section 3.4.6, PPPoE.
RADIUS Server Setup for Automatic Opening of URLs
One of the authentication sources that can be used for user authentication with SSL VPN connections is a RADIUS server. Both the Windows and MacOS clients for cOS Core SSL VPN have the ability to automatically open a specific URL in the default browser if the RADIUS server sends back the URL as part of the authentication exchange. cOS Core forwards this URL back to the client to achieve this.In order for automatic URL opening to function, the administrator must configure the RADIUS server appropriately so it sends back the URL inside a RADIUS attribute during authentication. The RADIUS values to use for this are the following:
Vendor-ID - 5089
Vendor-assigned attribute number - 4
Attribute format - String
The behavior of the Clavister clients when they receive a URL is fixed and they will always attempt to open the URL in the default browser.
This feature can be used for Single Sign On (SSO) access to different remote applications through a web browser using a suitable Identity Provider (IDP). For example, the PhenixID Authentication Server (PAS) software product can be used as the IDP. Setting up SSO in the PAS is described further in the separate documentation for that product.
This section provides examples of SSL VPN setup.
Example 11.25. Setting Up an SSL VPN Interface
This example shows how to set up a new SSL VPN interface called my_sslvpn_if.
Assume that the physical interface If2 is used to listen for client connections and this has an external IP address already defined in the address book called sslvpn_server_ip. Connections will be made using SSL VPN to a server located on the network connected to the firewall's If3 Ethernet interface.
Assume also that the IPv4 addresses that will be handed out to clients are defined by the address book object sslvpn_pool. For this example, this contains the simple address range 10.0.0.2-10.0.0.9.
Another address book IP object sslvpn_inner_ip is defined to be 10.0.0.1 and this will be the inner IP of the cOS Core end of the tunnel.
1. Create an SSL VPN Object
Command-Line Interface
Device:/> add Interface SSLVPNInterface my_sslvpn_if
			InnerIP=sslvpn_inner_ip
			IPAddressPool=sslvpn_pool
			OuterInterface=If2
			ServerIP=sslvpn_server_ip
			ProxyARPInterfaces=If3
Note: If multiple Proxy ARP interfaces are needed, they are specified as a comma separated list. For example: If3,If4,If5.
InControl
Follow similar steps to those used for the Web Interface below.
Web Interface
2. Create an Authentication Rule
Command-Line Interface
Device:/> add UserAuthRule Name=ssl_login
			Interface=my_sslvpn_if
			AuthSource=Local
			LocalUserDB=LocalUserDB
			OriginatorIP=all-nets
			Agent=PPP
			TerminatorIP=sslvpn_server_ip
InControl
Follow similar steps to those used for the Web Interface below.
Web Interface
The new cOS Core configuration should now be deployed.
For external client connection, a web browser should be directed to the IP address my_sslvpn_if. This is done either by typing the actual IP address or using a URL that can resolve to the IP address.
Example 11.26. Setting SSL VPN Interface Client Routes
This example shows how to change the SSL VPN tunnel called my_sslvpn_if so that the only route added to the routing table of clients is a route to the protected network protected_server_net which is already defined in the cOS Core address book.
Command-Line Interface
Device:/> set Interface SSLVPNInterface my_sslvpn_if
			ClientRoutes=protected_server_net
InControl
Follow similar steps to those used for the Web Interface below.
Web Interface
For the cOS Core SSL VPN Interface to function with a Windows based PC as a client, a proprietary Clavister SSL VPN client called OneConnect must be installed on the PC. Note that the SSL VPN Interface only supports OneConnect client versions prior to 3.0 (also known as OneConnect Classic). OneConnect client versions from 3.0 onwards are only compatible with the cOS Core OneConnect Interface, which is described in Section 11.7, OneConnect VPN.
Downloading the Clavister SSL VPN client for Windows that is compatible with the SSL VPN Interface can be done using the following steps:
A web browser is opened and the protocol https:// is then entered into the browser navigation field followed by the IP address or URL for the Ethernet interface on the firewall that is configured for SSL VPN.
The IP address will be the same as the Server IP configured in the interface's SSL VPN object. The port can also be specified after the IP address if it is different from the default value of 443.
With https, the firewall will send a certificate to the browser. By default, this is not CA signed and so it must be accepted as an exception by the user before continuing. It is possible to configure the a CA signed certificate if one is available and doing this is discussed in Section 2.1.4, The Web Interface.
cOS Core now displays a login dialog in the browser.
The credentials entered are checked against the user database. If the user is authenticated, a web page is displayed which offers two choices:
Download the Clavister SSL VPN client software
If this option has not been chosen before, it must be selected first to install the proprietary Clavister SSL VPN client application.
Connect the SSL VPN client
If the client software is already installed, selecting this option starts the client running and an SSL VPN tunnel is established to the firewall. This is discussed next in more detail.
Running the Client SSL VPN Software
An SSL VPN tunnel is established whenever the Windows SSL VPN client application runs. Conversely, the tunnel is taken down when the application stops running.There are two ways for the tunnel to be established:
To login by using a web browser to surf to the SSL VPN interface as described above. Once the client software is installed, only the option to establish the tunnel is selected.
Once the client software is installed, it can be started by selecting it in the Windows Start menu. The SSL VPN client user interface then opens, the user password is entered and when OK is pressed the tunnel is established and any client computer application can then make use of it.
The difference between the two approaches above is that when the SSL VPN client software is started by browsing to the SSL VPN interface, the correct settings for the tunnel are downloaded to the SSL VPN client software and stored as the client's configuration file.
As long as these settings have not changed between tunnel sessions, it is possible to start the SSL VPN client software running by selecting it in the Start menu and connecting to the same SSL VPN interface. In particular, the SSL VPN client checks the certificate used by the SSL VPN interface by comparing a certificate fingerprint stored in the configuration file with a fingerprint sent by the interface.
The reason for checking the certificate in this way is that it solves the "man in the middle" problem where a malicious third party might try to intercept communications between the firewall and the client.
When the SSL VPN client software is started, it is possible to connect to an SSL VPN interface on a Clavister firewall that has not been connected to before. This is done by enabling the option Specify Custom Server and explicitly specifying the IP address, port and login credentials for the server.With the Specify Custom Server option enabled, the SSL VPN client ignores any configuration file parameters previously downloaded by an SSL VPN connection established using the web interface. In particular, it does not check the certificate used by the firewall.
The disadvantage of using the custom server option is that there is no certificate checking and the "man in the middle" problem remains.
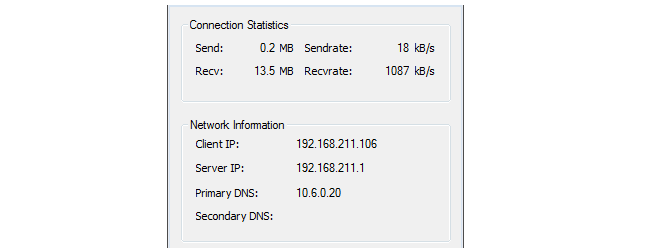
Client Transfer Statistics
When the SSL VPN client is running, an icon for it will appear in the system tray. Clicking this icon will bring up the client's interface showing amounts of data transferred since tunnel setup. Whenever the SSL VPN client application runs, the following happens:The added default route directs all traffic from the Windows client through the SSL tunnel.
When the Windows SSL VPN client application ends, the SSL tunnel is closed and the default route in the Windows routing table is removed, returning the routing table to its original state.
An SSL connection is made to the configured Ethernet interface on a Clavister firewall and the next available IP address is handed out to the client from the associated SSL VPN object's IP pool.
In addition, a single route for the client is added to the cOS Core routing table. This route maps the handed out client IP address to the associated SSL VPN interface.
To remedy this problem, the Clavister SSL VPN client software should be started by selecting it in the Windows Start menu and then stopped.
Manually Specifying the Client's Default Gateway
If the SSL VPN client's connection to the server is NATed, it is important that the client's route to the default gateway is not added manually in a Windows console using the "route add" command.If the default gateway has been added in this way, the SSL VPN link will become established and function for a short time before the link stops working and the client gives the following error message: SSL stream closed unexpectedly. If the client console is then opened, it will show there was an error when reading from the SSL socket.
This problem is solved by not using the Windows console to manually add the default gateway route. Instead, do this through the Windows Control Panel or allow the SSL VPN client software to add the route automatically.
For the cOS Core SSL VPN Interface to function with a MacOS based computer as a client, the proprietary Clavister SSL VPN client must be installed on the computer. This client can be downloaded from the Apple App Store under the product name OneConnect but note that the SSL VPN Interface only supports OneConnect client versions prior to 3.0. OneConnect client versions from 3.0 onwards are only compatible with the cOS Core OneConnect Interface, which is described in Section 11.7, OneConnect VPN.
While the OneConnect client is running and a connection established, all network traffic will be routed through the SSL VPN tunnel.
The screenshot below shows the configuration screen that will be displayed after the OneConnect app is started.
The main client screen consists of the following fields:
Status
This will show a value of Not Connected, Connecting or Connected. A connection attempt will be made when the Connect button is pressed. The attempt will end if an error occurs (for example, an authentication error) or if the connection attempt times out because the firewall is unreachable.
Server Address
The IP address of the interface on the firewall for SSL VPN connection. This will be the same as the value of the Server IP property configured for the cOS Core interface's SSL VPN object.
The port number will default to 443 but this can be changed by adding a colon character to the IP address followed by the new port number. For example, 203.0.113.5:445.
The server address can also be specified as an FQDN instead of an IP address. For example, sslvpnserver.example.com.
Account Name
The username for authentication.
Password
The password associated with the username for authentication.
The configuration values entered are remembered between sessions. The setting up of SSL VPN on the firewall does not require any special settings for the MacOS client.
![[Tip]](images/tip.png)