| Home Prev | Next |
cOS Core Starts After Power Up
It is assumed that the NetWall 6000 Series unit is now unpacked, positioned correctly and power is applied. If not, the earlier chapters in this guide should be referred to before continuing.Clavister's cOS Core software is preloaded on the NetWall 6000 Series and will automatically boot up after power is applied. After the start-up sequence is complete, an external management computer can be used to configure cOS Core. The management computer's operating system can be any kind as long it can run a standard modern web browser for configuration using the cOS Core WebUI.
cOS Core Access Methods for Setup
Initial cOS Core software configuration can be done in one of the following ways:Using a web browser across a network connection
A standard web browser running on a standalone management computer (sometimes referred to as the management workstation) can be used to access the cOS Core Web Interface. This provides an intuitive graphical interface for cOS Core management.
When this interface is accessed for the first time, a setup wizard runs automatically to guide a new user through key setup steps. The wizard can be closed if the administrator wishes to go directly to the Web Interface to perform setup manually.
The wizard is recommended for its simplification of initial setup and is described in detail in Section 4.1, Web Interface and Wizard Setup. The wizard assumes that configuring public Internet access is one of the tasks to be performed and has a step for this.
Using CLI commands across a network connection
The setup process can be performed using CLI commands which are input into a remote management computer running an SSH client. The management computer is linked across a network to an Ethernet interface on the firewall.
Once a network link to the CLI has been established, the manual configuration steps using the CLI are described in Section 4.3, Manual CLI Setup.
The CLI allows step by step control of the setup process and should be used by administrators who fully understand both the CLI and the setup steps required.
Using CLI commands via the local console
Alternatively, CLI access is possible using console emulation software running on an external computer connected directly to either the micro-USB console port on the 6000 Series hardware or via the RS-232 RJ45 console port. The USB port has precedence when both are connected. Micro-USB connection is described in Section 3.6, Micro-USB Console Port Connection and RJ45 connection is described in Section 3.5, RJ45 Console Port Connection.
In the default NetWall 6000 Series configuration, login credentials are enabled for the local console. These are a username of admin and a password of admin. These credentials come from the predefined cOS Core admin user, which is also used for SSH and Web Interface access.
The Default Management Ethernet Interface
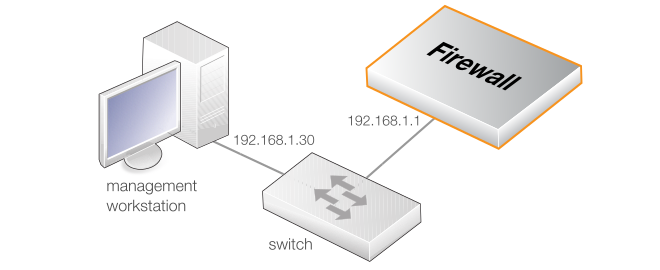
After first-time startup, cOS Core automatically makes network management access available on a single predefined Ethernet interface and assigns to it the private IPv4 address 192.168.1.1 and network 192.168.1.0/24.For the NetWall 6000 Series, the physical default management Ethernet interface is G1.
This network connection could be made via a local switch using standard Ethernet cables, as shown in the illustration below.
Direct local Ethernet connection to the G1 interface can be done without a switch by using a suitable crossover cable. However, all the RJ45 interfaces on the NetWall 6000 Series support Automatic MDI-X so a crossover cable is not necessary.
Connection to an ISP for Internet Access
For access to the public Internet, another 6000 Series Ethernet interface should be selected for connection to an ISP. For example, G2 could be selected, although any other available interface could be used instead. In the cOS Core setup wizard, this interface used is always generically referred to as the WAN interface. cOS Core setup for Internet access is discussed further in Chapter 4, cOS Core Configuration.Note that in the default cOS Core configuration for the NetWall 6000 Series, the G8 interfaces already has a DHCP client enabled so an IP addresses can be automatically assigned by an ISP on connection.
Management Computer Ethernet Interface Setup
Traffic can flow between the designated management computer's Ethernet interface and the firewall's default management Ethernet interface if they are on the same IP network. This means the management computer's Ethernet interface should be first assigned the following static values:IP address: 192.168.1.30
Subnet mask: 255.255.255.0
Default gateway: 192.168.1.1
![[Tip]](images/tip.png) |
Tip: Using another management interface IP address |
|---|---|
|
The IPv4 address assigned to the management computer's Ethernet interface could be any address from the 192.168.1.0/24 network. However, the IP chosen must be different from 192.168.1.1 which is used by cOS Core's default management interface. |
The following appendices at the end of this guide describe how to set up the management computer IP with different operating systems: