| Home Prev | Next |
InControl can be used to quickly create a Software Defined Wide Area Network (SD-WAN). InControl SD-WANs consist of groups of cOS Core firewalls connected by IPsec tunnels. These tunnels connect together networks which are attached to any of the firewalls in an SD-WAN grouping (in other words, LAN to LAN connections).
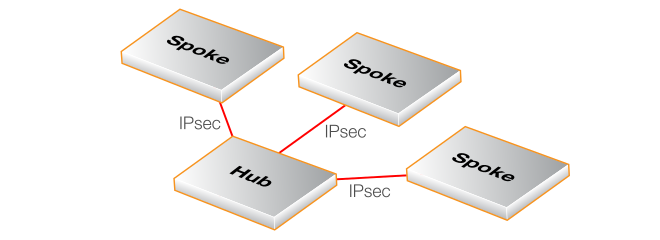
The basic architecture of InControl SD-WAN groupings is the hub and spoke pattern. This is where a single firewall (the hub) is connected to one or more other firewalls (the spokes). Networks on the spokes will then be able to securely communicate with other networks via the hub. These other networks might include the Internet, a network local to the hub, or a network local to another spoke.
The hub and spoke pattern is intended to reflect the common organizational structure where a hub is located at a central location, such as a head office, and spokes are located at multiple remote locations, such as branch offices. This network topology is illustrated in the diagram below.
A Summary of SD-WAN Setup Steps
The following steps provide a simplified summary of how to set up a new SD-WAN:Make sure all the firewalls for an SD-WAN grouping are in the domain for which the SD-WAN will be defined or spread across that domain and subdomains beneath it. The simplest arrangement is to have all the firewalls in a single domain. This could be the global domain but it is strongly recommended to create a special subdomain for each SD-WAN. Such a subdomain should only have multiple SD-WANs associated with it if firewalls in the domain are part of more than one SD-WAN.
Create an SD-WAN group for the domain and assign the firewall that will be the hub, specifying which hub network will be available to spokes and the tunnel endpoint that the spokes will connect to.
Add one or more other firewalls as the spokes to the SD-WAN, specifying which local spoke network will be able to connect through the tunnel to the hub network and via which local interface.
Add any IP rule set entries that are required to allow the relevant traffic to flow between the spokes and the hub in the SD-WAN. This is in addition to automatically created IP rule set entries which allow ICMP Ping messages between all elements of the SD-WAN.
Manually deploy all changes.
The above steps are expanded in the detailed setup example given later in this section.
Notes About Using the SD-WAN Feature
The following should be noted when configuring SD-WANs:The SD-WAN feature should be seen by the administrator as a configuration tool that automates the creation of SD-WANs. Only the SD-WAN grouping object is specific to InControl. All the other components used are standard configuration objects in cOS Core and are fully visible to the administrator. However, these cOS Core objects are largely kept separate in each firewall configuration by creating special SD-WAN address folders, routing tables and IP rule sets. The specially created objects are located in the configuration of the domain that contains the SD-WAN.
The intention is that the SD-WAN configuration tool should be used to edit and delete most of the configuration objects created by an SD-WAN so some of these will not be described in detail. An exception is the objects involved in creating new IP rule set entries, which is covered in depth later in this section, since new rules will be needed to allow different types of traffic to flow between SD-WAN components.
Although the SD-WAN feature is capable of creating complex topologies, the administrator might also find it useful for quickly creating a simple arrangement of a hub and a single spoke with an IPsec tunnel connecting them.
As mentioned previously, it is recommended to have all the firewalls in an SD-WAN group run the same version of cOS Core and to upgrade them together. It is also recommended to run the latest cOS Core version on all firewalls in an SD-WAN group. However, these are not strict requirements and firewalls in an SD-WAN could be running different cOS Core versions, as long as the versions are 13.00.04 or later.
Each SD-WAN has its own shared IP rule set associated with it which is placed in the configuration of the containing domain. The default IP rule set entries created only allow ICMP Ping messages inside the tunnels between all the components in the SD-WAN. It should be noted that allowing this ICMP traffic is required for an SD-WAN to function correctly so this traffic should not be restricted by any changes to the default IP rule set entries.
In addition, a set of Zone objects are created in the containing domain's configuration and these zones are automatically assigned to all the IPsec tunnels created and also the relevant interfaces of the hub and spokes. These zones and their names are discussed later in this section when describing how to add additional IP rule set entries.
The IPsec tunnels created will largely use the cOS Core IPsec Tunnel object default settings. One of the exceptions is the IKE and IPsec proposal lists which are automatically configured specifically for the SD-WAN feature and are contained by the SD-WAN's domain. cOS Core IPsec tunnels are discussed further in the separate cOS Core Administration Guide but the administrator should not need to change the properties of tunnels that the SD-WAN feature creates.
It is possible to create new hub and spoke combinations from firewalls that are already part of an existing hub and spoke group. For example, a firewall that is already a spoke in one group could be itself made a new hub in another hub and spoke group. However, this will require that all the firewalls involved are located in the same domain (or across a domain and its subdomains).
An HA cluster can be designated as a hub or spoke instead of a standalone device. This has no effect on the SD-WAN configuration.
IPv6 is not supported for either the outer tunnel endpoints or the networks that communicate through tunnels.
When an SD-WAN is created, no firewall configuration changes are automatically activated. Like any other configuration changes, they must be manually deployed in InControl.
A Detailed SD-WAN Setup Example
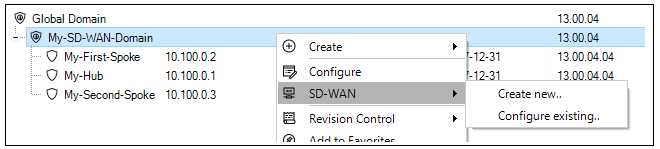
This example will set up a simple SD-WAN group consisting of a hub and two spoke firewalls. It will be assumed that the firewalls will already have the names My-Hub, My-First-Spoke and My-Second-Spoke and these are already located in a domain called My-SD-WAN-Domain. The setup steps are as follows:Right click the domain within which the SD-WAN will be created and select the SD-WAN > Create new... option. The firewalls which will be part of the SD-WAN must already reside within the domain, as shown below.
A dialog will be displayed which allows an SD-WAN name to be assigned and also for the hub firewall in this SD-WAN to be selected.

In the same dialog, the hub network that will be available to the spokes can be defined along with the local hub endpoint addresses for the outside and inside of the tunnels to the spokes. Note that the External Tunnel Address can be specified as an FQDN instead of an IPv4 address.

The last part of the dialog allows the type of routing from the spokes to be selected. The first option only routes traffic from the spokes that are destined for a network within the SD-WAN. The All traffic option should be selected if "all-nets" traffic (for example, Internet traffic) is also to be routed by spokes to the hub through the connecting tunnel.

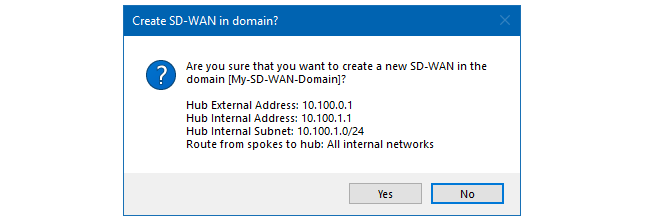
Now press Ok and the hub will be configured after a final confirmation dialog. An example of this dialog is shown below.
The dialog for configuring this hub will be automatically opened. Select at least one firewall that will be a spoke, more can be added later after the SD-WAN is created. In this example, the firewalls called My-First-Spoke and My-Second-Spoke will be selected.

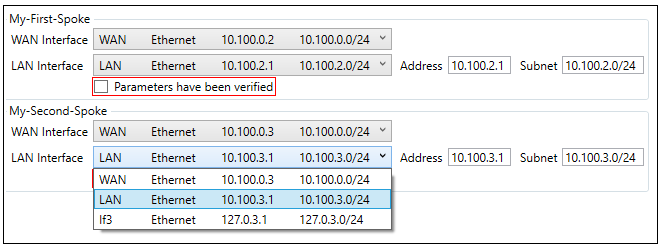
The Configure selected device button should now be pressed to allow the selection of the interfaces and networks that will connect with the hub. The WAN Interface is the interface on each spoke that will connect with the hub. The LAN Interface is the interface which has the local spoke network which will connect to the remote hub network.
Note that the Parameters have been verified checkboxes needs to be checked before the configuration can be saved. Also note that alternative values for the LAN interface address and subnet can be entered on the right-hand side if the default values need to be changed.
After completing SD-WAN setup, the final step in InControl is to manually deploy all changes.
The SD-WAN configuration tool is accessed by right clicking the domain in which the SD-WAN resides and selecting the SD-WAN > Configure existing... menu option.

A dialog will be presented to choose the SD-WAN of interest, even if there is only one in the domain.

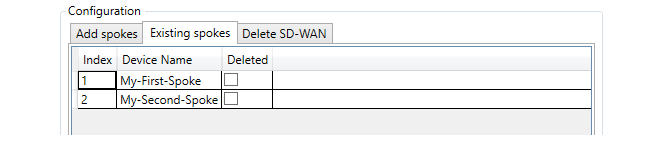
After choosing the domain, the SD-WAN editing dialog will open. This is the same dialog that was seen before when adding spokes to a new SD-WAN. In this case, the purpose will be to make further changes to the SD-WAN, such as adding more spokes or deleting existing spokes under the Existing Spokes tab.
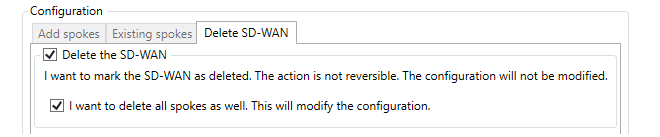
The Delete SD-WAN tab provides a tool for deleting the entire SD-WAN from the domain. Both the options provided will delete the SD-WAN but only when the spokes are also deleted will the actual firewall configurations be changed. In other words, by not selecting the spokes it is possible to leave all the firewall level SD-WAN objects intact and just delete the SD-WAN object in InControl. However, this will mean that any further SD-WAN configuration will need to be done manually and the SD-WAN configuration tool can no longer be used.
As with creating an SD-WAN, all SD-WAN edits must also be manually deployed in InControl.
Creating Additional IP Rule Set Entries to Allow Specific Types of Traffic
The IP rule set entries that are automatically created for an SD-WAN are contained in a separate shared IP rule set which is automatically added to the domain that contains the SD-WAN. This shared rule set is used by both the hub and spokes and this is the rule set that should be modified by the administrator to allow specific types of traffic to flow.The shared IP rule set associated with an SD-WAN can found in the configuration associated with the containing domain under the Additional IP Rule Sets folder, which is shown below.

An IP rule set created by the SD-WAN feature will have a name of the following form:
SDN<number>Rules
This is the rule set to which all new entries, such as IP policies, should be added to control traffic flowing through the IPsec tunnels. This rule set is automatically populated by a number of entries which allow ICMP messages to flow between components in the SD-WAN. A typical set of these entries is shown below.
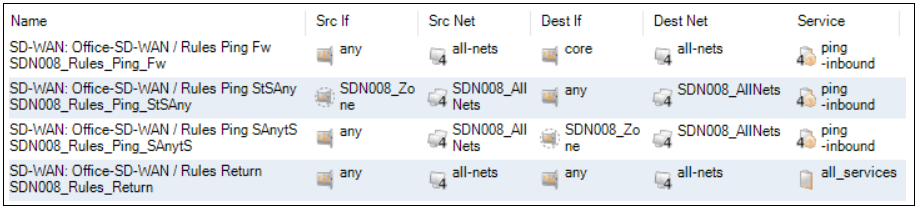
It is recommended to not change these default entries for ICMP traffic since ICMP messaging is needed for the SD-WAN to function correctly. Instead, new entries should be added.
It is recommended to use the automatically assigned zone names when referencing interfaces in new rule set entries. The zone objects that are automatically created by an SD-WAN are located in the configuration of the domain that contains the SD-WAN. The following zone to interface assignments are automatically made:
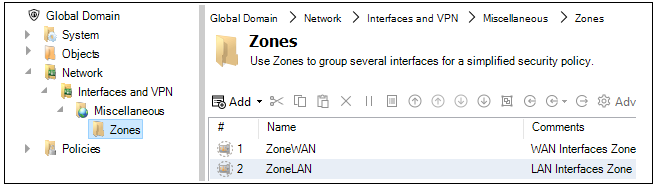
The interface on all spokes connected to the local network belong to the zone called ZoneLAN. This zone object is always located in the configuration of the global domain and the same object is used for all SD-WANs.
All interfaces on spokes that are connected to the hub belong to the zone called ZoneWAN. This zone object is also always located in the configuration of the global domain and this single object is used for all SD-WANs. The screenshot below shows the location of both zones.
All IPsec tunnel interfaces belong to a zone called SDN<number>. This zone object is located in the configuration of the domain containing the SD-WAN so there is one of these zone objects for each SD-WAN. An example of the location of this zone is shown in the screenshot below.

As an example, consider the requirement that all Internet traffic from the local networks on all spokes is to be allowed through the tunnels to the hub which is already set up with Internet access. Two rule set entries would be needed with the filters (the SD-WAN name of SDN001 is assumed).

Routing of Internet traffic from spokes is dealt with automatically provided that the All traffic option has been selected in the Routing from spokes option when setting up the SD-WAN.
Referencing the Hub's Local Network Interface
The hub's local network interface does not have a zone automatically set up and assigned to it. The recommended approach is this interface is to be referenced in an SD-WAN's shared IP rule set is to create a new zone in the domain configuration and assign this zone to the hub's interface. This zone can then be referenced in the shared rule set. The network address for the hub's local network is referenced using the relevant address object that will have been created in the SD-WAN's address book folder in the domain. It should be noted that when as SD-WAN is created, a new Address Book Folder is created in the containing domain. This folder contains shared IP address objects for the SD-WAN that should be referenced by any new IP rule entries that control SD-WAN traffic flow. Below is an example screenshot of the folder created for an SD-WAN called SD-WAN-0003, showing the first few entries of the folder.
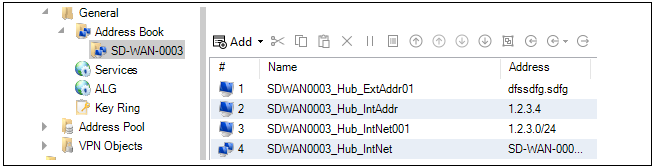
The folder contains address objects for referencing both hub networks and referencing spoke networks as well as referencing collections of these networks. An explanation of the address object's contents is automatically inserted into the Comments property of each object when they are added as part of SD-WAN creation. They can be used as needed by the administrator when new IP rules set entries are added.
Specifying Specific IPsec Tunnels in Rule Set Entries
Sometimes, it may be required to create a new rule set entry which references a particular tunnel and the common SD-WAN zone assigned to all tunnels cannot be used. Instead, the tunnel must be referenced by name. All SD-WAN related tunnel objects are found in the containing domain's configuration and the naming conventions used are the following:For an IPsec tunnel on a hub which goes to a spoke, the tunnel name will be similar to the following:
SDN006_S0001_T1_sp
For an IPsec tunnel on a spoke which goes to a hub, the tunnel name will be similar to the following:
SDN006_S0001_T1_hu
Notice how they are similarly named except for the hub of spoke postfix. This indicates that they are opposite ends of the same tunnel.
Viewing Firewall Membership in SD-WANs
One way to view firewall membership in an SD-WAN is to open the SD-WAN object. However, this may not provide a quick answer if the question is: which SD-WANs include a given firewall?To answer this question quickly, open the Firewalls tab. The column with the title SD-WAN shows the SD-WAN membership for each firewall. An example of this from the Firewalls tab is shown below.

Where a firewall is a member of many SD-WANs so that the column cannot show all of them, mousing over the column entry will show a tooltip that displays all the parent SD-WANs in a tooltip. This column is automatically enabled but can be turned off or on using the tab's customization option. This customization is described further in Section 5.3, Using the Client.
![[Note]](images/note.png)