| Home Prev | Next |
The InControl server management interface provides a number of options for management of the server. These are discussed in this chapter.
Displaying the Server Management Interface
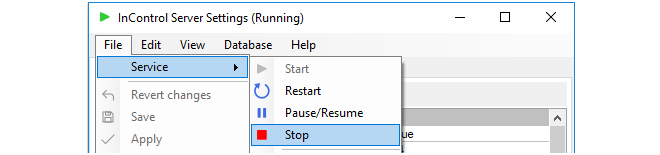
Selecting Clavister InControl Server Settings from the Windows start menu causes the management user interface for the server to be displayed. Displaying this interface will not affect the running of the server if it is already started. If the server is not running then displaying the management interface will have the effect of also starting the server.The InControl server runs as a Windows service and appears in the Windows process list as ICS.exe. It will be started automatically after initial installation and after hardware restart and will only be stopped by choosing the File > Service > Stop menu option in the server management interface (or alternatively, stopping it through the Windows process manager).
Stopping and Restarting the Server
Closing the server management interface will also not affect ICS.exe. If the service needs to be stopped or restarted then it is recommended that this is done with the Service > Stop or Restart option in the user interface.
Setting the Audit Level
The Audit Level determines which server audit messages are saved to disk as a log. These messages are generated by various server events such as shutdown and startup and are saved in a folder in the server installation directory for analysis through the InControl client. Only server messages that are at or above the set audit level priority will be logged and this level can be different from the general audit level described above.It is important to remember that the server log messages being discussed here are totally separate from the log messages generated by cOS Core and relate only to server activity, not the activity of connected firewalls.
The server audit files can be viewed with a text editor but should not be edited in any way. Their format needs to be preserved, otherwise they cannot be viewed through the InControl client.
Configuring a Syslog Server
By setting the value of the Syslog parameter to True, server log messages can also be sent to an external Syslog server. The Syslog server's IP address needs to be specified, as well as the desired level of the messages that are sent.The Server Interface Console
The server interface contains a Console tab which gives easy access to log messages generated by the server. By default, only server start-up and close-down messages appear in the console.

Applying and Saving Server Changes
After any changes are made in the server management interface, the Apply, Save and Revert changes options become enabled in the File menu as shown below:

These options function as follows:
Apply
This option applies any changes to the running server and also saves them to the server configuration file.
Save
This option saves the changes but doesn't apply them to the running server. They will be applied if the server restarts.
Revert changes
Any changes made since the last Apply or Save are undone by this option. The server interface is updated with the values currently stored in the configuration file.
The configuration file for the server is called ICS.exe.config in the server installation directory and this is where server parameter values are stored.
Once any unsaved change is made to the server configuration, this is indicated by an asterisk ("*") appearing to the right of the management interface window title as shown below.

The server provides a simple way to perform backups of the entire server database. It should be remembered that all configuration data for InControl is stored in this database so backup is strongly recommended.
Backing up does not require that InControl client activity stops. The server will, however, delay client responses until the backup process is complete. This means that client users may experience a slight delay after sending a request to the server during backup.
The following methods can be used for performing a backup:
Initiating the backup through the server settings management interface.
Initiating the backup through a Windows console command line.
Using a script to schedule automatic backups.
The above options will now be discussed in detail.
1. Backup initiated through the server management interface
In the server management interface, select the menu option Database > Save.

By default, backups are stored in a single file of filetype .ics with a filename that shows the date and time when the backup was created. For example, db2015-02-26_153521.ics might be the default filename created by the interface, where the filename format is:
dbyyyy-mm-dd_hhmmss.ics
The above file naming convention is, however, not mandatory and can be changed in the file chooser but is recommended as a useful way to keep track of when backup files were created. When a command line is used (as described below) this file naming convention is always used and cannot be changed.
When a backup or restore is performed via the server settings management interface, the InControl server will be automatically stopped and restarted
2. Backup initiated through the command line
It is possible to also create backup files through a Windows console command. The command takes the form:
> Server Settings.exe -backup <directory>If the database backup is being saved to a directory called backup_1 then the command would be:
> Server Settings.exe -backup backup_1The command should be issued when the current console directory is the InControl server installation directory. The backup filename used has the default naming format described above and cannot be changed before performing the backup.
When using the Server Settings command to perform a backup or restore, the InControl server will be automatically stopped and restarted.
3. Using a script to schedule automatic backups
A key advantage of backing up using a console command is the ability to use Windows to create a scheduled service that will automatically run a script file containing the command on a regular basis. Creating such a script as well as an example script template can be found in a Clavister knowledge base article at the following link:
https://kb.clavister.com/324735442
Restoration of a database backup can be done in a similar way to creating a backup, either through the Database > Load menu option or with the following Windows console command:> Server Settings.exe -restore <path>
A restore will overwrite the existing database so that should be backed up if it may be required later.
When a database restore is complete, the InControl server will restart automatically and any connected clients will be automatically updated to reflect the configuration data in the new version of the database. Database updates or deployments initiated by clients during the restore process will be rejected by the server.
![[Note]](images/note.png) |
Note: Backup files are automatically compressed |
|---|---|
|
When using the InControl server settings interface or command to create a database backup file, the file is automatically compressed using GZIP to conserve disk space. Decompression is automatic when a backup is restored in the same way. |
Moving the Server Between Computers
The backup and restore function also allows a server installation to be moved from one computer to another. Once the InControl server is installed on another computer, a database backup can then be restored to that new installation and the default empty database will be overwritten with the restored database backup.Disk Space Management
The management interface provides settings for managing the disk space taken up by the server and its database.
These settings are used as follows:
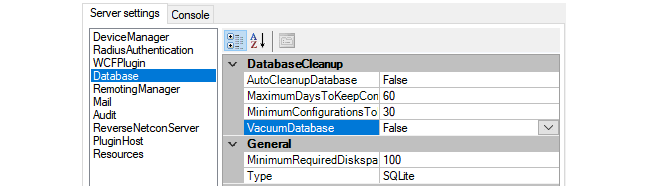
DatabaseCleanup
These settings are used as follows:
Enabling AutoCleanupDatabase means that the automatic cleanup process is initiated on server startup and then repeatedly after each hour has elapsed. Enabling this option will help keep the size of the database from growing continuously and this can both help database efficiency and reduce the time needed to back up the database.
If this option is not enabled, the database file will retain the space occupied by deleted configuration data leading to an ever bigger and less efficient database file.
When the automatic cleanup runs, any configuration in the revision history older than the number of days specified by MaximumDaysToKeepConfigurations is deleted but only if the MinimumConfigurationsToKeep is exceeded for that firewall.
The MinimumConfigurationsToKeep specifies the minimum number of configurations in the revision history to keep for each individual firewall being managed. Only if this number is exceeded for a firewall can any revisions be deleted for that firewall by the automatic cleanup process.
The VacuumDatabase option is only used when the AutoCleanupDatabase option is enabled. If it is enabled, the cleanup process will also compact the database file down to the smallest size possible, removing any unused space in the process. This will make subsequent database access as efficient as possible. This compaction will take place both on InControl server startup and when the automatic cleanup runs.
![[Caution]](images/caution.png) |
Caution: The VacuumDatabase option may consume resources |
|---|---|
|
The VacuumDatabase option may require significant amounts of processing resources to complete, depending on database size. It should therefore be enabled with caution since the server may become unresponsive during a database rebuild. |
MinimumRequiredDisk
This is the amount of free disk space that is required for the InControl server. If the free disk space falls under this value, the only action that occurs is that an alert is created which warns of the condition. This setting is not dependent on the value of AutoCleanupDatabase and the cleanup process is not initiated when the alert is generated.
Type
This parameter is designed for future versions of InControl which will support different database products. At this time only one type is supported and its location is specified by the Path parameter. Neither of these parameters should be changed in the current InControl version.
The SQLite setting will be used for a future feature and should not be changed. This setting is totally separate from the database settings for the ILA server.
Installing a Custom Certificate for Client/Server Communication
For InControl versions after 3.03.01, certificate based gRPC is used for client/server communication. On first time startup of the InControl server, the server will install a self-signed certificate for this into the Windows certificate store.If the administrator would like to use their own certificate, this can be done by installing it into the "Personal" certificate store for the user that runs the InControl server ("System account"). This must be followed by changing the certificate thumbprint in InControl server settings to match the thumbprint of the certificate to use. The detailed steps are as follows:
Download the PsExec utility from Microsoft at the following link:
https://learn.microsoft.com/en-us/sysinternals/downloads/psexec
Open a Windows command console as administrator and run PsExec from the download:
> PsExec -s -i mmcThis will open Microsoft Management Console (MMC) as a system account.
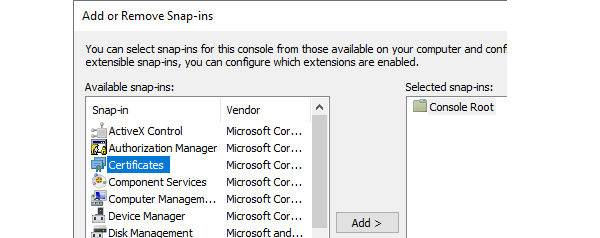
Click on File in MMC and select Add/remove snap-in.

Add Certificates and select My user account in the dialog that pops up.

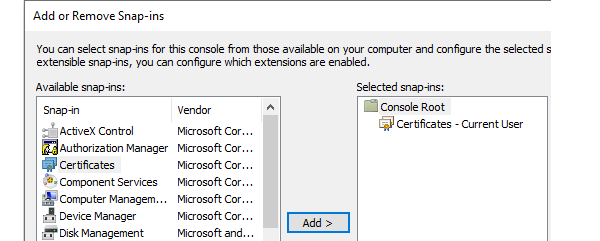
Select Personal > Certificates and it should show the certificate that the InControl server is using.

The new certificate should be imported and placed here.

Open the properties of the new certificate in Windows and copy the Thumbprint value to the system clipboard.
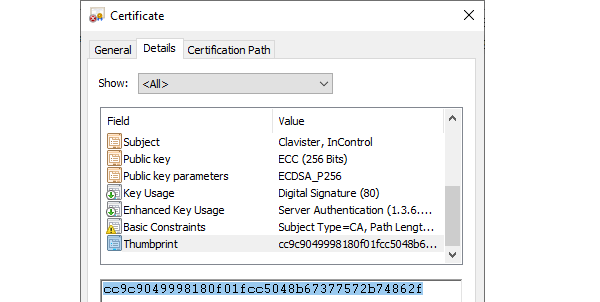
Open the management interface of the InControl server and paste in the system clipboard value to the Certificate Thumbprint field.

The last step is to select File > Save in the server management interface and then select File > Service > Restart.
![[Warning]](images/warning.png)