| Home Prev | Next |
For EasyAccess version 4.0 and later, cluster setup is not part of the standard EasyAccess installation wizard. This means that the cluster configuration must be performed manually.
When to Use a Cluster
Clustering is typically used when high availability is required. However, it may also be used when traffic needs to be spread across multiple nodes using an external load balancer. Clustering can also facilitate software upgrades with zero downtime since one node can be taken offline while a second processes traffic.Cluster Architecture
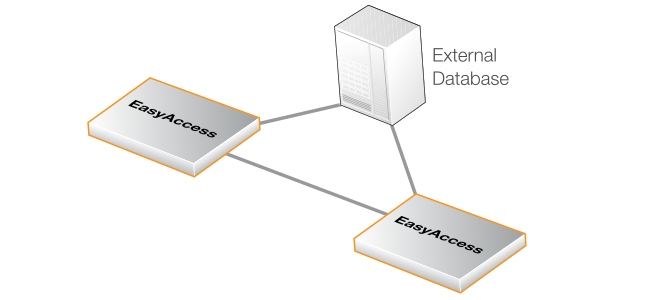
The EasyAccess cluster architecture consists of three components: two standalone EasyAccess installations on separate computers and an external database server. The two EasyAccess servers communicate with each other so they are synchronized. Both servers can communicate independently with the database. This setup is illustrated in the diagram below.With a cluster, an external database must be installed and can be either a MySQL or an MSSQL server. The database can run on the same computer as one of the EasyAccess installations but placing it on a separate, third computer is recommended. The external database itself can be configured to be fault tolerant.
The sections that follow explain how to configure each of these components when setting up a cluster.
Use the following steps to configure the EasyAccess service:
Open the file /classes/cluster.xml in a suitable text editor.
Enable tcp-ip:
<tcp-ip enabled="true">
Enable interfaces:
<interfaces enabled="true">
Add the subsection member-list to the tcp-ip section and add the IP address of the second cluster node as a member in this new section (this is shown in the example at the end of this section).
Assign the local IP address to the properties public-address, interface in tcp-ip as well to interfaces.
Save the changes.
Repeat the above procedure on the other node, reversing the IP addresses of the nodes.
Restart the service on both nodes.
Check the system log on either node to check the two systems are communicating correctly.
Below is an example of a configured cluster.xml file where is 192.168.0.12 is the IP address of the other node:
<network>
	<public-address>192.168.0.11</public-address>
	<port auto-increment="false" port-count="1">5701</port>
	<outbound-ports>
		<!--
		Allowed port range when connecting to other nodes.
		0 or * means use system provided port.
		-->
		<ports>0</ports>
	</outbound-ports>
	<join>
		<tcp-ip enabled="true">
			<interface>192.168.0.11</interface>
			<member-list>
				<member>192.168.0.12</member>
			</member-list>
		</tcp-ip>
		<multicast enabled="false"/>
		<aws enabled="false"/>
	</join>
	<interfaces enabled="true">
		<interface>192.168.0.11</interface>
	</interfaces>
</network>