| Home Prev | Next |
This chapter will detail the setup of LAN-to-LAN IPsec tunnel described in the previous chapter, but using a High Availability (HA) hardware cluster.
An HA cluster consists of two Clavister Firewalls running on identical hardware platforms with identical sets of Ethernet interfaces. One unit is designated the Master and the other is the Slave. Either the master or slave can be the active unit while the other is the passive. If the active unit should malfunction, a failover occurs and the passive unit becomes active and takes over all processing with almost no interruption.
This chapter will approach the setup description as follows:
Private and Shared IP Addresses
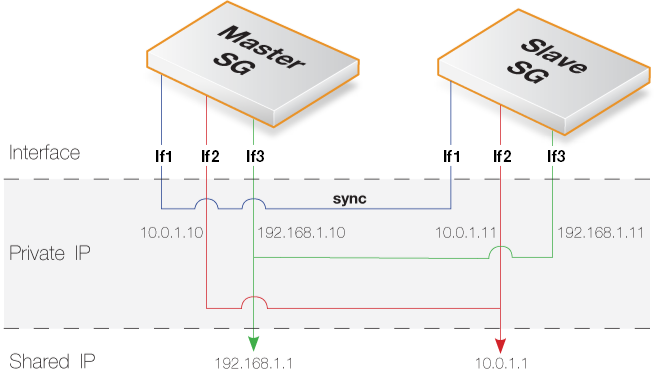
In a cluster, the matching Ethernet interfaces from each firewall form pairs, both of which have the same shared IP. It is this shared IP that is used in the cOS Stream configuration's policies and rules. However, an individual Ethernet interface can also have a unique private IP address which is used for:In the previous chapter's LAN-to-LAN use case with a standalone firewall, the two physical Ethernet interfaces If2 and If3 are used. For a cluster, the shared IP addresses will remain the same for these interfaces but the private IP address of each interface must be reset to a unique value.
In summary, the following IPv4 addresses will be used for setting up HA LAN-to-LAN:
| Interface | Shared IP | Master IP | Slave IP |
|---|---|---|---|
| If2 | 10.0.1.1 | 10.0.1.10 | 10.0.1.11 |
| If3 | 192.168.1.1 | 192.168.1.10 | 192.168.1.11 |
Usage of these IP addresses with the cluster master and slave is illustrated below.
![[Note]](images/note.png) |
Note |
|---|---|
|
As is the case here, the private IP addresses chosen are usually from the same network as the shared IP address. |
HA Setup Steps
Having made the initial decisions about the IP addresses to use, the individual steps for setting up the HA cluster are as follows:1. Select the Master and Slave
Both firewalls are at this point still standalone and identical but not physically connected to each other. It must be first decided which unit will be the Master and which will be the Slave. The choice is arbitrary but the master will be configured first.The master's configuration will also overwrite the slave's configuration and becomes the initial configuration of the cluster. This is important to understand in case the slave configuration is important.
2. Open a Management CLI Connection
Using SSH, open a management CLI connection to the master's management interface.3. Check the EthernetDevice Settings
On each Ethernet interface, the EthernetDevice:0 and EthernetDevice:1 properties should be the same and set to the device name of that interface. For example, check the If2 properties using the command:System:/> show Interface EthernetInterface If2
Property Value
---------------- --------------------
Name: If2
EthernetAddress: <empty>
PrivateIP: 0:<empty> 1:<empty>
HAType: Critical
EthernetDevice: 0:If2 1:<empty>
MTU: 1500
IPAddress: If2_ip
IP4Broadcast: <empty>
RTBMembership: main
Comments: <empty>System:/> set Interface EthernetInterface If2 EthernetDevice:1=If24. Set the Shared IP Addresses
The shared IPs for the LAN-to-LAN use case are set with the following commands:System:/> set Interface EthernetInterface If2 Address=10.0.1.1System:/> set Interface EthernetInterface If3 Address=192.168.1.15. Set the Private IP Addresses
The private IP addresses for these interfaces are now defined:System:/> set Interface EthernetInterface If2
PrivateIP:0=10.0.1.10 PrivateIP:1=10.0.1.11System:/> set Interface EthernetInterface If3
PrivateIP:0=192.168.1.10 PrivateIP:1=192.168.1.116. Set the Sync Interface
A pair of matching interfaces from each firewall will be connected together to form the Sync interface connection. This is the primary connection used for monitoring peer health in the cluster. In this use case, the interface If1 of is assumed to be used for this purpose so the following command should be issued:System:/> Set Interface EthernetInterface If1 HAType=SyncThis command is repeated for both units in the cluster.
7. Set as the HA Master
To set this unit as the HA Master, the following command is entered:System:/> set HighAvailability
Role=Master
ClusterID=1
AutoSyncCfg=No
Enabled=YesThe option AutoSyncCfg is disabled at this time so that manual control of the synchronization process can be retained. Overwriting of the slave's configuration with the master's will be initiated later.
![[Important]](images/important.png) |
Important: The cluster ID must be unique |
|---|---|
|
The ClusterID in the above command must be a unique value for clusters that have a network connection with each other. If setting up a second cluster that has a network connection to the cluster in this use case, another ID must be used. For example, ClusterID=2. Within the same cluster, both the master and slave must have the same ID. |
8. Repeat Configuration for the Slave
Using SSH, open a management CLI connection to the management interface of the other unit and repeat steps 2 to 5.Step 6 is also applied but must be changed to designate this unit as the HA slave. The following command is used to do this:
System:/> set HighAvailability
			Role=Slave
			ClusterID=1
			AutoSyncCfg=No
			Enabled=Yes
The modified slave configuration should then be activated and committed before continuing.
9. Physically Connect Together the Cluster Members
The separate firewalls can now be physically connected together. This is discussed further in the HA chapter of the separate cOS Stream Administration Guide10. Synchronize Manually
The master's configuration can now overwrite the slave's configuration by entering the following command on the slave:System:/> ha -recvconfSystem:/> ha -sendconf11. Enable Automatic Synchronization
Now the configurations have been synchronized manually, automatic synchronization can be enabled on both units. First on the slave:System:/> set HighAvailability AutoSyncCfg=YesSystem:/>activateSystem:/>commit
12. Verify the Cluster Status
After the two firewalls are connected together, synchronization between the cluster nodes will take place automatically. The CLI command ha will indicate that both systems are running in HA mode and that the nodes are alive.If a firewall is not part of a HA cluster, the output when CLI command ha is applied to it will be:
System:/> ha
This device is a standalone system (HA not configured)
If it is the master node in an HA cluster, the output will be similar to the following:
System:/> ha
This device is a HA MASTER
This device is currently Active (for 48s)
HA cluster peer is ALIVE
The time shown in parentheses is the length of time that the cluster node has been in its current active or inactive state.
When the same CLI command is applied to the slave, the output will be similar to:
System:/> ha
This device is a HA SLAVE
This device is currently Active (for 47s)
HA cluster peer is ALIVE
The cluster will now be confirmed as being operational.
Making Further Cluster Configuration Changes
Once the cluster is operational, changing the configuration of both cluster firewalls is done by connecting to either with the CLI, making the configuration changes and then activating and committing the new configuration. When a new configuration is deployed on either peer, it is automatically copied to the other. In this way, the two cluster peers always maintain the same configuration. |
Note: The private IP is used for management connection |
|---|---|
|
When connecting to either cluster member using SSH, it is the private IP address of the management Ethernet interface that must be used. The shared IP of the management interface should not be used. |
Configuring LAN-to-LAN Tunnels
Now that the HA cluster is running, it is possible to continue by following the steps described in Chapter 2, LAN-to-LAN IKEv2/IPsec Tunnels. The cluster members act as a single unit and the interface names If2 and If3 used in the configuration, with IP addresses that are now shared, are the same.