| Home Prev | Next |
Overview
Other sections explore IPsec components in detail. This section provides a summary of the essential steps needed for IPsec setup.It outlines the individual steps in setting up IPsec for the following scenarios:
![[Note]](images/note.png) |
Note: VPN tunnels themselves do not require IP rules |
|---|---|
| As explained in Section 13.2.8, IPsec Tunnels, IP rules do not need to be defined in cOS Stream for VPN tunnel establishment. It is the data passing through a tunnel that requires IP rules which allow it to flow. |
General Tunnel Setup Requirements
Before looking at each of these scenarios separately, it is useful to summarize the common requirements when setting up any VPN tunnel, regardless of the type.Define the Tunnel
First, we must define the tunnel itself. cOS Stream has various tunnel object types which are used to do this, such as an IPsec Tunnel object.
A Route Must Exist
Before any traffic can flow into the tunnel, a route must be defined in a routing table. This route tells cOS Stream which network can be found at the other end of the tunnel so it knows which traffic to send into the tunnel.
In most cases, this route is created automatically when the tunnel is defined and this can be checked by examining the routing tables.
If a route is defined manually, the tunnel is treated exactly like a physical interface in the route properties, as it is in other aspects of cOS Stream. In other words, the route is saying to cOS Stream that a certain network is found at the other end of the tunnel.
Define an IP Rule to Allow VPN Traffic
An IP rule must be defined that explicitly allows traffic to flow between a network and the tunnel. As with route definitions, the tunnel is treated exactly like a physical interface when defining the IP rule.
IP rules are not created automatically after defining the tunnel object and if they do not exist then no traffic can flow through the tunnel and will be dropped instead.
The following sections will look at the detailed setup for each of the VPN scenarios listed earlier.
Create a new IPsecPSK object. This will contain the key as well as a unique combination of LocalID and RemoteID. It is this combination of local and remote ID that is used to associate the key with the tunnel.
Both local and remote ID can take on any string value such as an IP address or email address. They can also incorporate the wildcard asterisk ("*") character.
|
Note: Wildcards cannot be combined in email addresses |
|---|---|
|
If the wildcard character is used in an email address, it must not be combined with other characters. For example, *.user@somename.com cannot be used but *.somename.com can. |
Optionally create an IKEProposalList and/or IPsecProposalList object if the default proposal lists do not provide a set of algorithms that are acceptable to the tunnel remote end point. The ike_high and ipsec_high lists are the defaults.
An IKEProposalList object must contain at least one IKEProposal object. Similarly, an IPsecProposalList object must contain at least one IPsecProposal object. If PFS is required, the IPsec proposal must have DH groups specified otherwise PFS is disabled (the default).
In the Address Book create IP objects for:
The remote VPN gateway which is the IP address of the network device at the other end of the tunnel. Let's call this object remote_gw.
The remote network which lies behind the remote VPN gateway Let's call this object remote_net. This can be an IPv4 or IPv6 network.
The local network behind the Clavister NetShield Firewall which will communicate across the tunnel. Here we will assume that this is the predefined address if1_net and this network is attached to the if1 interface which has the IP address if1_ip. The local network can also be an IPv4 or IPv6 network but the local and remote networks must be the same IP type.
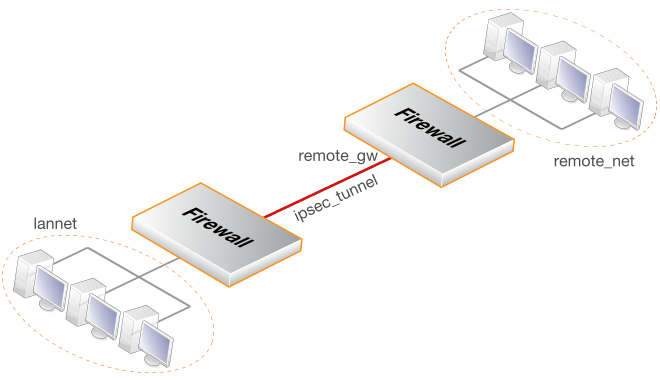
Create an IPsecTunnel object (let's call this object my_tunnel). Specify the following tunnel properties:
Specify the IKEVersion property as IKEv1 if it is not the default value of IKEv2.
Set the IPaddress property of the tunnel. In most cases this can be set to something arbitrary such as 127.0.0.1. If NAT is being used on outgoing traffic, this should be set to an address in the local network.
Set LocalEndpoint to if1_ip.
Set LocalNetwork to if1_net.
Set RemoteNetwork to remote_net.
Set RemoteEndpoint to remote_gw.
If not using the default ike_high list, set IKEProposalList to the proposal list to be used for the tunnel.
If not using the default ipsec_high list, set IPsecProposalList to the proposal list to be used for the tunnel.
Specify a RemoteID for the tunnel. This can be specified using the asterisk ("*") as a wildcard character.
Specify the LocalAuthMethod to be PSK. By default, this also becomes the value for RemoteAuthMethod although the local and remote method could be set to different values.
The IPsec Tunnel object can be treated exactly like any Interface object in later steps.
Set up two IP rules in the main IP rule set for the tunnel:
An Allow rule for outbound traffic that has the previously defined my_tunnel object as the Destination Interface. The rule's Destination Network is the remote network remote_net.
An Allow rule for inbound traffic that has the previously defined my_tunnel object as the Source Interface. The Source Network is remote_net.
| Action | Src Interface | Src Network | Dest Interface | Dest Network | Service |
|---|---|---|---|---|---|
| Allow | if1 | if1_net | my_tunnel | remote_net | all_services |
| Allow | my_tunnel | remote_net | if1 | if1_net | all_services |
The Service used in these rules is All but it could be a predefined service.
| Interface | Network | Gateway |
|---|---|---|
| my_tunnel | remote_net | <empty> |
Example 13.4. LAN to LAN IPsec Tunnel Setup with PSK
This example sets up a LAN to LAN IPsec tunnel with pre-shared keys using the steps describes above. It is assumed the address book has already been filled with the relevant address objects.
Assume the tunnel will connect the local network if3_net to a remote network remote_net. The tunnel extends from the local if3 interface to the remote endpoint remote_ep_ip.
To demonstrate how proposal lists can be customized, both IKE and IPsec will use only aes-128 for encryption and only aes-xcbc for integrity.
The IKE version is not specified so it defaults to IKEv2.
Command-Line Interface
1. Create an IPsecPSK object:
System:/> add IPsecPSK LocalID=site_local@local.com
			RemoteID=site_remote@remote.com
			Type=ASCII
			PSKAscii=somesharedsecretcode
2. Create an IKE proposal list to be used by the IPsec tunnel:
System:/> add IKEProposalList ike_plNow add the first IKE proposal to the list:
System:/> cc IKEProposalList ike_pl
System:/IKEProposalList/ike_pl> add IKEProposal
			EncryptionAlgorithms=aes128-cbc
			DHGroup=2
			IntegrityAlgorithms=aes-xcbc
			PRF=aes-xcbc
Return to the default CLI context:
System:/IKEProposalList/ike_pl> cc
System:/>
Create the IPsec proposal list in a similar way:
System:/> add IPsecProposalList ipsec_plNow add the following IPsec proposal to the list:
System:/> cc IPsecProposalList ipsec_pl
System:/IPsecProposalList/ipsec_pl> add IPsecProposal
			EncryptionAlgorithms=aes128-cbc
			IntegrityAlgorithms=md5
Return to the default CLI context:
System:/IPsecProposalList/ipsec_pl> cc
System:/>
3. Create address book objects:
This step is assumed and not shown in this example.
4. Create the IPsecTunnel object:
System:/> add Interface IPsecTunnel my_tunnel
			LocalAuthMethod=PSK
			LocalID=site_local@local.com
			LocalNetwork=if1_net
			LocalEndpoint=if1_ip
			RemoteEndpoint=remote_gw
			RemoteID=site_remote@remote.com
			RemoteNetwork=remote_net
			IPAddress=127.0.0.1
			IKEProposalList=ike_pl
			IPsecProposalList=ipsec_pl
5. Set up IP rules:
Change the current context to be the main rule set:
System:/> cc RuleSet IPRuleSet mainAdd an IP rule to allow outbound traffic from the local network into the tunnel:
System:/IPRuleSet/main> add IPRule Action=Allow
			SourceInterface=if1
			SourceNetwork=if1_net
			DestinationInterface=my_tunnel
			DestinationNetwork=remote_net
			Service=all_services
			Name=lan_to_tunnel
Add the IP rule for inbound traffic:
System:/IPRuleSet/main> add IPRule Action=Allow
			SourceInterface=my_tunnel
			SourceNetwork=remote_net
			DestinationInterface=if1
			DestinationNetwork=if1_net
			Service=all_services
			Name=tunnel_to_lan
Restore the default CLI context:
System:/main> cc
System:/>
6. Define a route for the tunnel:
Change the current context to be the main routing table:
System:/> cc RoutingTable mainAdd the route:
System:/RoutingTable/main> add Route Interface=my_tunnel Network=remote_netRestore the default CLI context:
System:/main> cc
System:/>
Configuration changes are saved with an activate followed by a commit command.
LAN to LAN security is often provided with pre-shared keys but sometimes it may be desirable to use X.509 certificates instead. If this is the case, Certificate Authority (CA) signed certificates may be used and these come from an internal CA server or from a commercial supplier of certificates.
Creating a LAN to LAN tunnel with certificates follows exactly the same procedures as the previous section where a pre-shared key was used. The difference is that certificates now replace pre-shared keys for authentication. In this case, specify the LocalAuthMethod to be Certificate. By default, the RemoteAuthMethod property will take on the same value so it does not need to be specified.
Two unique sets of two CA signed certificates (two for either end, a root certificate and a host certificate) are required for a LAN to LAN tunnel authentication. They are loaded into cOS Stream as globally available objects. Certificates are associated with a LocalID and it is this value which is used to associate them with a particular tunnel object.
The setup steps are as follows:
Connect to the management interface for the Clavister NetShield Firewall at one end of the tunnel.
Upload the Root Certificate and Host Certificate into cOS Stream using SCP. Using SCP is described further in Section 2.1.6, Secure Copy.
The host certificate needs to have 2 parts added: a certificate file and a private key file. The CA root certificate needs just the certificate file added.
If there is a certificate chain involved between the root and host certificates then all the certificates in the chain also need to be uploaded.
Define Certificate objects that use the uploaded files. These objects must be added as children to a CertificateStore object. With IPsec, they must be added to the predefined store called ipsec.
Set up the IPsecTunnel object in the same way as for pre-shared keys with the following differences:
The LocalAuthMethod of the tunnel must be set to Certificate.
The LocalID property of the tunnel must match the Subject or Subject Alt Name value in the host certificate.
An example of a Subject using Distinguished Name (DN) would be:
CN=vpn.example.com,O=Example Ltd,C=SE
It is also possible to view the value to be used by running the following CLI command:
ike -certshow
Wildcards (asterisk) can be used in some of the fields, example:
CN=*.example.com,O=Example Ltd,C=SE
An example of a Subject Alternative Name using an email:
eric@example.com
Or if an FQDN is used:
mydns.example.com
The LocalID and on one side of the tunnel must also match the RemoteID on the other side of the tunnel. For example, if one side has LocalID=my_id1 and RemoteID=my_id2 then the other side should have LocalID=my_id2 and RemoteID=my_id1.
The RemoteID can alternatively be specified as the wildcard asterisk "*" character meaning that any LocalID on the other side of the tunnel is acceptable.
Connect to the management interface for the Clavister NetShield Firewall at the other side of the tunnel and repeat the above steps with a different set of certificates.
|
Note: The system time and date should be correct |
|---|---|
|
The system date and time should be set correctly since certificates have an expiry date and time. |
It is important to also review Section 16.2, CA Server Access below, which describes important considerations for certificate validation.
Example 13.5. LAN to LAN IPsec Tunnel Setup with Certificates
This example shows how to modify the previous LAN to LAN example to use certificates instead of PSK.
It assumes that the certificate files have been uploaded to cOS Stream using SCP. Assume the file name is my_ca_cert.cer for the root certificate and the filenames my_host_cert.cer plus my_host_cert.key for the host certificate.
Command-Line Interface
Change the CLI context to be the CertificateStore called ipsec:
System:/>cc CertificateStore ipsecSystem:/CertificateStore/ipsec>
Add the CA certificate with its Type property set to Remote:
System:/CertificateStore/ipsec> add Certificate my_ca_cert
			Type=Remote
			CertificateData=file://my_ca_cert.cer
Add the host certificate which has its Type property set to Local:
System:/CertificateStore/ipsec> add Certificate my_host_cert
			Type=Local
			CertificateData=file://my_host_cert.cer
			PrivateKey=file://my_host_cert.key
Change the CLI context back to the default:
System:/CertificateStore/ipsec>ccSystem:/>
Create the modified IPsec tunnel object:
System:/> add Interface IPsecTunnel my_tunnel
			LocalAuthMethod=Certificate
			LocalID=site_local@local.com
			LocalNetwork=if1_net
			LocalEndpoint=if1_ip
			RemoteEndpoint=remote_gw
			RemoteID=site_remote@remote.com
			RemoteNetwork=remote_net
			IPAddress=127.0.0.1
			IKEProposalList=ike_pl
			IPsecProposalList=ipsec_pl
Overview
The Clavister NetShield Firewall supports IKEv2 Configuration Mode (Config Mode) for IPsec operation. Config mode is an extension to IKE that allows the provision of LAN configuration information to remote VPN clients during the IKE negotiation.Config mode dynamically configures IPsec clients with IP addresses and corresponding netmasks, and also exchanges other types of information normally associated with DHCP. The IP address provided to a client can be either be based on a range of predefined static IP addresses defined for Config mode or it can come from DHCP servers via an IPPool object
An IP pool is a cache of IP addresses collected from DHCP servers. Leases for these addresses are automatically renewed by the pool when the lease time is about to expire. IP pools also manage additional information such as DNS and WINS/NBNS, just as an ordinary DHCP server would.
An IPPool object is added as a child to an IPsecTunnel object and a tunnel can only have one pool. If the pool gets its addresses from a DHCP server, the server can either be external or can be internal to cOS Stream.
Config Mode Setup
Config mode is set up with the following steps:The CfgMode property of the IPsecTunnel is set to Server. The value of Server is used when it is cOS Stream that hands out IP addresses.
A single IPPool object is added as a child of the IPsecTunnel. This object specifies the source of the IP addresses. In most cases it will be a DHCP server.
If the IPPool object uses a DHCP server as the source of addresses, the DHCP server must be set up correctly to deliver those addresses. The DHCP server can be an external server but can also be the internal DHCP server in cOS Stream itself.
Setting the CfgMode property of the IPsec tunnel enables config mode and the IPPool object used to supply addresses will always be the object that is a child of the tunnel.
Example 13.6. Enabling Config Mode on an IPsec Tunnel
In this example, config mode will be enabled for an existing IPsecTunnel object called my_tunnel and an IPPool object will be added to the tunnel to define the pool used by config mode.
It is assumed that there is an external DHCP server (specified by the property DHCPServ) with the IP address dhcp_server_ip, which can be reached through the if1 interface.
Command-Line Interface
First, enable config mode on the IPsecTunnel object:
System:/> set Interface IPsecTunnel my_tunnel CfgMode=ServerNext, change the CLI context to be the tunnel:
System:/> cc Interface IPsecTunnel my_tunnelNow, add an IPPool object as a child of the tunnel:
System:/Interface/IPsecTunnel/my_tunnel> add IPPool
			DHCPServ=dhcp_server_ip
			IPFilter=ms_pool_filter
			Iface=if1
			Prefetch=2000
			MaxFree=5000
			MaxClients=10000
Finally, return to the default CLI context:
System:/> cc
The following should be noted with the properties specified for the IP pool:
Prefetching addresses can improve performance since there will not be any waiting time for an IP. The number of prefetched IPs should be adjusted according to the size of the IP pool and expected tunnel setup rate.
The maximum number of free IPs must be equal to or greater than the prefetch property. The pool will start releasing (giving back IPs to the DHCP server) when the number of free clients exceed this threshold value.
An employee who is on the move and who needs to access to a central corporate server from a device over the Internet from different locations is a typical example where a roaming client IPsec connection is required.
IPsec Roaming Client Encryption and Authentication
When an IPsec tunnel is configured for roaming clients, authentication can be performed using either a pre-shared key (PSK) or using certificates and this is configured on the IPsecTunnel object.Additional user authentication with IKEv2 is usually done by a client being asked for a username and password credential combination. IKEv2 handles this using EAP. Setting this up requires that an AuthenticationProfile is created that has its AgentType property set to the value EAP for IKEv2.The profile is then set as the value of the IPsec tunnel's AuthProfile property. An example of doing this can be found in Example 13.7, “Roaming Clients IPsec Setup”.
The AuthenticationProfile could use a local database as its authentication source but it could also use a RADIUS server instead (shown in the example).
Setting Up Certificates
The certificate on the client side must have a common name or subject alternative name that contains an email address, DNS, DN or IP address from the relevant domain. The asterisk * wildcard can be used to allow all trusted certificates. In Example 13.7, “Roaming Clients IPsec Setup”, the domain is example.com so the RemoteID property is assigned a value of *.example.com.In a similar way, the firewall's own certificate must have a common name or subject alternative name that contains the value of the LocalID tunnel property. In Example 13.7, “Roaming Clients IPsec Setup”, this value is roaming-vpn@example.com. The same domain does not need to be used in the LocalID and RemoteID properties if the certificates are trusted CA signed certificates.
Tunnel Establishment Initiation
cOS Stream will not try and initiate tunnel establishment if there are multiple remote endpoints. This will be the case with roaming clients, where the RemoteEndpoint property of the tunnel will either be a network range or all-nets. It is therefore up to the client to initiate tunnel setup.Adding Routes for Roaming Clients Dynamically
Usually, a route should be added to the routing table for each client as it connects. This can be done automatically by enabling the IPsec tunnel property AddRouteToRemoteNet (by default, this is disabled).Only if cOS Stream initiates the tunnel connection would a static route to clients need to be created.
Where clients are initiating IPsec connections, the client will send the initial IKE request to the IP address specified by the LocalEndpoint property. This must be specified.Publishing Client IP Addresses Using Proxy ARP
It is possible to proxy ARP publish the IP addresses of connecting roaming clients on selected or all Ethernet interfaces by setting the ProxyARPInterfaces property of the IPsecTunnel object. This will allow networks on the interfaces specified to communicate with clients.Allowing Clients Internet Access
If roaming clients require Internet access through the IPsec tunnel then the LocalNetwork property of the tunnel should be set to all-nets and the DestinationNetwork of an IP rule that allows traffic to flow would also be changed to all-nets.The Client's Inner and Outer IPs Should Be Different
It is recommended that the inner and outer IP addresses for a roaming client tunnel are different. If they are the same, connections will be dropped by cOS Stream and a log message will be generated.If the IP addresses must be the same, the situation can be corrected by using separate routing tables for the tunnel itself and the traffic the tunnel carries. Alternatively, cOS Stream can allocate a unique IP address to clients from an IP pool using Config Mode.
IKEv1 Roaming Clients
With IKEv1 roaming clients, the IPsecTunnel property IKEVersion must be set to a value of IKEv1 (the default is IKEv2). In addition, cOS Stream must use XAuth for tunnel authentication and this is configured using a number of XAuth related properties on the IPsecTunnel object.Example 13.7. Roaming Clients IPsec Setup
This example describes how to configure an IPsec tunnel at a central firewall for IKEv2 roaming clients connecting to it on the interface if2 for remote access to the internal network 172.16.1.0/24. This protected network is located on the firewall's if3 interface. Certificate authentication will be used and incoming clients must also authenticate using EAP against a RADIUS server with the IP address 172.16.0.10.
It is also required that roaming clients should be reachable through the if1 and if4 interfaces so client addresses must be proxy ARPed on those interfaces.
Command-Line Interface
A. Create a DHCPServerRule to hand out IP addresses to clients:
System:/>cc DHCPServerSystem:/DHCPServer>add DHCPServerRule dhcp_roaming Interface=if2 IPAddressPool=192.168.1.201-192.168.1.254 Netmask=255.255.255.0System:/DHCPServer>ccSystem:/>
B. Define the RADIUS server for EAP authentication:
System:/> add RadiusServer my_radius_server
			IPAddress=172.16.0.10
			SharedSecret=my-shared-radius-secret
C. Create an authentication profile:
System:/> add AuthenticationProfile clients_auth_profile
			LocalUserDB=""
			RemoteServer=my_radius_server
			AgentType=EAP
D. Create the IPsec tunnel:
System:/> add Interface IPsecTunnel my_tunnel
			LocalAuthMethod=Certificate
			RemoteAuthMethod=EAP
			CfgMode=Server
			LocalID=roaming-vpn@example.com
			RemoteID=*@example.com
			AddRouteToRemoteNetwork=True
			LocalNetwork=192.168.0.0/24
			RemoteNetwork=192.168.1.0/24
			LocalEndpoint=172.16.1.1
			RemoteEndpoint=all-nets
			ProxyArpInterfaces=if1,if4
			AuthProfile=clients_auth_profile
Note that RemoteAuthMethod must be set to EAP if the AuthProfile property is set.
E. Add an IP address pool to the tunnel:
System:/>cc Interface IPsecTunnel my_tunnelSystem:/IPsecTunnel/my_tunnel>add IPPool DHCPserv=127.0.01 Iface=core MaxClients=50System:/IPsecTunnel/my_tunnel>ccSystem:/>
Note that the DHCPserv property is not set to the name of an object. Instead, it is set to a network or IP address which matches a DHCP server. In this case, the server is local but it could be an external server.
F. Create an IP policy to allow traffic flow from clients:
System:/>cc RuleSet IPRuleSet mainSystem:/IPRuleSet/main>add IPRule Action=Allow SourceInterface=my_tunnel SourceNetwork=all-nets-ip4 DestinationInterface=if3 DestinationNetwork=172.16.1.0/24 Service=all_services Name=roaming_clients_to_hqSystem:/IPRuleSet/main>ccSystem:/>
Configuring IPsec Roaming Client Software
Depending on the type of client used with IPsec, its configuration might require any of the following changes:Specify the URL or IP address of the Clavister firewall so the client can locate the remote tunnel endpoint.
Specify the pre-shared key (PSK) if one is used for authentication. Alternatively, install certificates if those are required for authentication.
Specify the IKE and IPsec algorithms used so they can agree with the proposal list that cOS Stream will use.
Specify if the client will use config mode.
There are a variety of IPsec client software products available from third parties and also a number of IPsec clients that are already built into certain computing platforms. The network administrator should use the client that is best suited to their needs.