| Home Prev | Next |
This chapter provides details of how to work with cOS Stream's management interfaces.
Management Access Methods
The following methods are available for management access:Command Line Interface (CLI)
The Command Line Interface (CLI) is accessible either locally via a computer's local console port or remotely to an IPv4 or IPv6 address across a network using the Secure Shell (SSH) protocol. It provides fine-grained control over all parameters in cOS Stream.
This feature is described further in Section 2.1.3, The CLI.
SCP
Secure Copy (SCP) is a widely used communication protocol for file transfer. SCP is a complement to the CLI and provides a secure means of file transfer between an external management computer and the firewall across an IP network. Various files used by cOS Stream, such as configuration backups, can be both uploaded and downloaded using SCP.
This feature is described further in Section 2.1.6, Secure Copy.
Note that there exists a wide selection of third part SCP clients for nearly all platforms.
SNMP
A Simple Network Management Protocol (SNMP) client can connect to cOS Stream to get read-only access to system statistics.
This feature is described further in Section 2.1.8, SNMP Monitoring.
Centralized Management
Two solutions are available for centralized firewall management: InCenter and InControl. Both allow the administration of multiple firewalls but differ in deployment and functionality.
Clavister InCenter
Clavister InCenter is a separate software application that runs as a server on an external computer. Through its interfaces, simultaneous management of multiple Clavister NetShield Firewalls is possible using a single unified configuration database. This software is described further in the separate InCenter Administration Guide.
InControl is a separate Clavister software product for the centralized administration of multiple Clavister firewalls.
InControl provides an intuitive graphical client which runs on a standard Windows™ based PC. One or multiple clients communicate with an InControl server running on the same or a different Windows™ based computer. The server acts as a repository for all cOS Stream configuration data and mediates all management commands sent by clients.
This feature is described further in Section 2.1.5, Centralized Management (InControl).
More in-depth information about InControl can be found in the separate InControl Administration Guide.
![[Note]](images/note.png) |
Note: InCenter and InControl Can Not Be Used at the Same Time |
|---|---|
|
It is not possible to configure and use both Centralized Management systems simultaneously. A choice must be made regarding which management system to use. |
By default, cOS Stream provides a default LocalUserDatabase object which can be used to authenticate management access if this method is selected (by default, it is selected). This database contains, at a minimum, one predefined user with the following default credentials:
Username: admin
Password: admin
This account has full administrative read/write privileges to all configuration data and is always the account used for initial SSH login (console access does not require any credentials in the default configuration).
![[Important]](images/important.png) |
Important: Change the default administrator password |
|---|---|
|
For security, it is strongly recommended to change the password for the predefined admin account as soon as possible following the initial configuration of cOS Stream. |
Displaying the Local User Database
When using the CLI, the name of the predefined local user database can be displayed with the command:System:/> show LocalUserDatabase
Name
----------
AdminUsersSystem:/> cc LocalUserDatabase AdminUsersSystem:/LocalUserDatabase/AdminUsers> show
User
Name Groups Comments
----- -------------- --------
admin Administrators <empty>
System:/LocalUserDatabase/AdminUsers>ccSystem:/>
Creating an Auditor Account
Extra user accounts in the local user database can be created as required with arbitrary usernames and passwords. If the group is specified as Administrators then it has full access privileges.If, however, the group is specified as the text string Auditors, the user will only have read-only privileges and will not be able to make configuration alterations. The following commands create an auditor account with a username of audit and a password of audit:
System:/>cc LocalUserDatabase AdminUsersSystem:/LocalUserDatabase/AdminUsers>add User audit Password=audit Groups=Auditors
Linking Logins to the Database
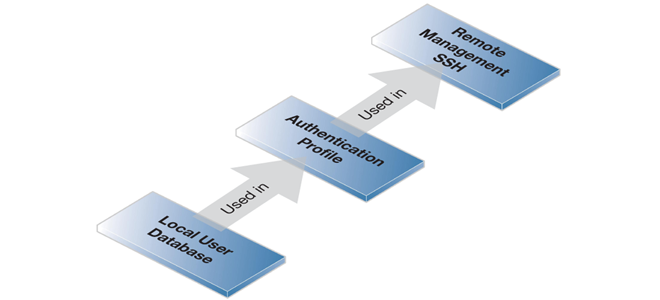
The local user database is referred to during a login because the relevant access object points to an AuthenticationProfile which then points to the database which stores the credentials.For example, SSH logins are controlled by a RemoteMgmtSSH object. This object refers to an AuthenticationProfile object that then refers to the database to be used for authentication.
AuthenticationProfile objects are discussed further in Section 17.1, Authentication Profiles. The diagram below illustrates the relationship between the various components.
The CLI provides a comprehensive set of commands that allow the display and modification of a configuration.
This section only provides a summary for using the CLI. For a complete reference for all CLI commands, see the separate Clavister cOS Stream CLI Reference Guide.
String Delimiters, the Escape Character and Special Characters
When entering CLI commands, literal strings can be enclosed in double quotation mark characters ("..."). For example:add User my-user Password="pass word"
However, to include the double quotation mark itself in a string, it must be preceded by a backslash
(\) which is the CLI escape character:
set User my-user Password="pass\"word"
Other special characters that might be needed are the following:
For example:
set RemoteManagement RemoteMgmtSSH RemoteMgmtSSH Banner="Welcome!\r\n - Type \"help\""
Note that the only other case that requires a backslash escape character is when using the dollar sign ($) in a CLI script when it is not part of a variable such as $1. When used in another context within a CLI script, it must be written as \$. This is discussed further in Section 2.1.4, CLI Scripting.
The CLI is case-sensitive. However, the tab completion feature of the CLI does not require the correct case to perform completion and will alter the typed case if it is required (the tab completion feature is explained later in this section).CLI Access Methods
The CLI is accessible in one of two ways:Remotely through a network connection to an Ethernet interface, using the Secure Shell (SSH) protocol from an SSH client (optionally with public key authentication).
SSH access is controlled by a predefined RemoteMgmtSSH configuration object.
Locally through the firewall's local console. On a Clavister hardware product, direct connection is via the local console port on the unit. In a virtual environment, this is the same as the hypervisor's console.
Local console access is controlled by a predefined ComPortAccess configuration object called COM1.
SSH is a protocol primarily used for secure communication over insecure networks, providing strong authentication and data integrity. SSH clients are freely available for almost all platforms. cOS Stream supports version 2 of the SSH protocol.
A RemoteMgmtSSH rule controls SSH access on the default management interface. A predefined RemoteMgmtSSH rule exists in the default configuration but it is disabled. It can be displayed with the CLI command:
System:/> show RemoteManagement RemoteMgmtSSH

  # Name
  - -------------
o 1 RemoteMgmtSSH
To enable this rule, use the command:
System:/> set RemoteManagement RemoteMgmtSSH RemoteMgmtSSH -enableAll such rules also require their SourceInterface and SourceNetwork properties to be set for any traffic to be accepted:
System:/> set RemoteManagement RemoteMgmtSSH RemoteMgmtSSH
			SourceInterface=if1
			SourceNetwork=if1_net
The following output from a show command now confirms that the rule has all the required properties set and is enabled:
System:/> show RemoteManagement RemoteMgmtSSH

# Name          SourceInterface Source Network
- ------------- --------------- --------------
1 RemoteMgmtSSH if1             if1_net
Authentication for SSH access is controlled by the AuthProfile property of the RemoteMgmtSSH rule. By default this is set to a predefined AuthenticationProfile object called MgmtAuthProfile. This profile points to the predefined local user database which contains a predefined administrator account with the credentials:
The AgentType property of the authentication profile for SSH access should always be set to Basic. All authentication profile properties are explained in Section 17.1, Authentication Profiles.
Processing Multiple RemoteMgmtSSH rules
If there are multiple RemoteMgmtSSH rules, to ensure that the correct rule will match, they should not use overlapping filters. Instead, each rule should only specify the particular interface and network combination that it should trigger on.Authentication Methods for SSH Management Access
The following methods can be used to authenticate the administrator when they try to connect to the cOS Stream using SSH:Authenticating username and password credentials against a local user database in cOS Stream. These databases are described further in Section 2.1.2, The Local User Database.
Authenticating username and password credentials against an external RADIUS database. This feature is described further in Section 2.1.7, RADIUS Management Authentication.
Authenticating using a public/private key pair. Setting this up is described next.
SSH and SCP with Public Key Authentication
As an alternative to using a password when logging in via SSH or when using SCP, it is possible to automatically authenticate the user using public key authentication. This is done by cOS Stream having the public key of a public/private key pair and the SSH or SCP client having the corresponding private key. When the client connects, cOS Stream is then able to authenticate if the connecting user really has the private key in the key pair.Public key authentication is set up with the following steps:
Generate a new public and private key pair as two identity files. Generating identity files can be done with a number of utilities such as the ssh-keygen utility which is part of the OpenSSH suite.
Note that the RSA, ECDSA or DSA algorithms could be used for encryption. However, by default, only RSA or ECDSA are allowed and DSA is not allowed. The algorithms allowed are controlled by a property for each algorithm in the relevant RemoteMgmtSSH object. For example, allowing the DSA algorithm is controlled by the property AllowHostKeyDSA.
Use Secure Copy (SCP) to upload the .pub public key file to the root directory.
Add an SSHClientKey object to the configuration and associate this with the uploaded file. If the uploaded public key file is called my_key.pub, the CLI would be:
System:/> add SSHClientKey my_pub_key
			PublicKey=file://my_key.pub
Associate the new SSHClientKey object with a user in a local database. Note that the local database used will be the one pointed to by the AuthenticationProfile object specified by the AuthProfile property of the triggering RemoteMgmtSSH rule.
In this example, the default administration user admin will be chosen. First, change the CLI context to be the LocalUserDatabase object called AdminUsers:
System:/> cc LocalUserDatabase AdminUsers Now, set the SSHKeys property of the user called Admin:
System:/LocalUserDatabase/AdminUsers> set User admin SSHKeys=my_pub_keyLast, restore the CLI context to the default:
System:/LocalUserDatabase/AdminUsers>ccSystem:/>
In fact, any username could be assigned a public key in this way and not just an administrator.
The SSH or SCP client must be correctly configured to use public key authentication. Typically, this involves placing the public and private key files in a specific folder but this can vary according to the client.
Next, log on using the SSH client but without a password. If public key authentication fails, the SSH client should request the user's password instead. If it succeeds, the password will not be asked for and access will be granted.
The following should be noted about the behavior of SSH authentication using public keys:
If the SSH client attempts public key authentication but it fails because the user does not have an associated key in the database then authentication will revert to using the normal username/password method. These credentials will be looked up according to the method described by the associated AuthenticationProfile.
If public key authentication is successful then no actions specified in the AuthenticationProfile, such as RADIUS lookup, will be taken.
Troubleshooting SSH Access Problems
If the SSH console is timing out when attempting SSH access, there are a number of possible reasons:System:/> sshserver
SSH Server Port Connected clients Status
----------- ---- ----------------- -------
RemoteMgmtSSH 22 1 RunningCheck the configuration of the RemoteMgmtSSH object. If this object is incorrectly specified on initial startup, the SSH server may not run. Check that the RemoteMgmtSSH is enabled and that a valid authentication profile has been specified and that the profile points to a valid database containing a user with the login credentials expected.
For example, the properties of a RemoteMgmtSSH object with the name RemoteMgmtSSH can be displayed using the command:
System:/> show RemoteManagement RemoteMgmtSSH RemoteMgmtSSH
Controlling Direct Console Access to the CLI
The CLI can also be accessed using a console terminal connected directly to a local console port on the firewall. Access through a console port is controlled by a predefined COMPortAccess configuration object which has the name COM1. This can be displayed with the command:show COMPortAccess Port Bps Data bits Parity Stop bits Flow control Rows Cols ---- ------ --------- ------ --------- ------------ ---- ---- COM1 115200 8 None 1 None 40 80
An AuthenticationProfile is associated with the ComPortAccess object to specify authentication. In the default configuration, no profile is specified so there is no username/password pair required for console login. The same profile used by default for SSH could be associated with console access by using the command:
System:/> set COMPortAccess COM1 AuthProfile=MgmtAuthProfile
Basic Object Management Commands
When managing a firewall configuration, the following commands will be used to perform most of the operations for creating, changing and deleting objects:add - Adds an object, such as an IP address or a rule, to a configuration along with a set of mandatory properties for the object.
set - Sets one or more configuration object properties to given values. For example, setting the source interface for a given IP rule.
show - Displays the current values of a particular object or set of configuration objects.
delete - Deletes a specific configuration object.
<command> <object_category> <object_type> <object_name>
For example, to display an IP address object called my_address, the command would be:
System:/> show Address IPAddress my_addressWhen typing commands, the object category can be left out where the command's meaning is unambiguous. For example, the show command above could have been entered as:
System:/> show IPAddress my_addressHowever, tab completion will always assume that the category is included. For example, tab completion would not be able to help complete the above command if the tab is pressed during or after the IPAddress object type.
The same object name could be used within two different categories or types although this is best avoided in order to avoid ambiguity when reading configurations.
|
Note: The terms Category and Context |
|---|---|
|
When describing the CLI, the term object category is also sometimes referred to as the object context. |
A command such as add can also include object properties. To add a new IPAddress object with an IPv4 address of 10.49.02.01, the command would be:
System:/> add Address IPAddress my_address Address=10.49.02.01
Setting the System Name and CLI Prompt
Each firewall can have a unique system name and this name appears in the CLI prompt. The default name is System so the default CLI prompt is the following:System:/> set System Name=my-system1After activating the change, the CLI prompt becomes the following:
my-system1:/>The CLI help command will show all available command options. Typing help followed by a command name will show help information for that command, providing details about the command's function and its options. For example:
System:/> help time
COMMAND
        time (t). Display and set current system time.
		"
"System:/> help helpwill give information about the help command itself.
Configuration Object Help
A second help command that provides information about a particular object type or category of objects is helpconfig. This will provide a list of all the properties of an object. For example:System:/> helpconfig EthernetInterfaceApplying a Single Command to Multiple Objects
It is possible to apply a single set or delete command to multiple objects using the -Range option. However, this option can only be applied where the object is part of a list and therefore has an index number.An example of an object that has an index number is the IPRule object which must be a member of the rule list in an IPRuleSet. Suppose that there are 100 IPRule objects in the main IP rule set. To change the rules with an index number between 65 and 80 (inclusive) so that their LogEnabled property is disabled, the command would be the following:
System:/>cc RuleSet IPRuleSet mainSystem:/IPRuleSet/main>set IPRule -Range=65-80 LogEnabled=No
Instead a more complex range could be specified:
System:/IPRuleSet/main> set IPRule -Range=10,11-15,60-65 LogEnabled=NoDeletion can be specified in the same way:
System:/IPRuleSet/main> delete IPRule -Range=90-100Just like a command console in many versions of Microsoft Windows™, the up and down arrow keys allow the user to move through the list of commands in the CLI command history. For example, pressing the up arrow key once will make the last command executed appear at the current CLI prompt. After a command appears it can be re-executed in its original form or changed first before execution. Remembering, as well as typing commands and their options, can be demanding. The CLI provides a feature called tab completion which means that pressing the tab key during command typing will cause automatic completion of the current part of the command. If completion is not possible then pressing the tab key will provide information about the available options.
For example, consider the following, incomplete command to add a LogReceiver object called my_server to the configuration:
System:/> add LogReceiver LogReceiverSyslog my_receiver
			IPAddress=my_log_server_ip
			LogSeverity=
If the tab character is now entered, a list of available options is displayed for the LogSeverity property:
System:/> add LogReceiver LogReceiverSyslog my_receiver
			IPAddress=my_log_server_ip
			LogSeverity=(tab)
       Type:  String
Description:  Specifies with what severity log events
will be sent to the specified log receivers
    Default:  Emergency,Alert,Critical,Error,Warning,Notice,Information

List of all valid choices:

Name
-----------
<empty>
Debug
Information
Notice
Warning
Error
Critical
Alert
Emergency
Tab Completion Only Displays Allowed Properties
There are some important principles that should be understood when using tab completion for object properties:The properties of an object are either mandatory or optional. When using tab completion, optional properties are not displayed until all mandatory properties have been assigned a value.
An optional property's use can be dependent on the value specified for another property. For example, in an IPsecTunnel object, the optional ProxyARP property can only be used when the AddRouteToRemoteNetwork property has been set to Yes.
The tab completion feature is aware of these dependencies and will not display a property if it is dependent on another property which has not yet been assigned a value. Looking at the IPsecTunnel example again, tab completion will only display the ProxyARP property if the AddRouteToRemoteNetwork property has already been assigned a value of Yes.
Special Characters Used with Tab Completion
When entering the value of an object property, the tab character can be preceded by any of the following special characters:Entering the period "." (period) character before entering tab will insert the current value of the object property.
For example, assume that there is already an object in the address book called my_address and it has the IPv4 address value 203.0.113.10. Now enter the following command:
System:/> set Address IPAddress my_address Address=.(tab)This will cause the current IP address to be displayed:
System:/> set Address IPAddress my_address Address=203.0.113.10
Entering the " * " (asterisk/star) character before entering tab will cause the default property value to be automatically filled in.
System:/> set RemoteManagement RemoteMgmtSSH RemoteMgmtSSH
			LogEnabled=?(tab)
         Type:  Boolean
  Description:  Enable logging.
      Default:  Yes
Current Value:  Yes
Object Categories and Tab Completion
As mentioned above, objects are grouped by type, for example IPAddress. Types themselves are grouped by category. The type IPAddress belongs to the category Address. Categories are used by tab completion when searching for the right object type to use.If a command such as add is entered and then the tab key is pressed, cOS Stream displays all the available categories. By choosing a category and then pressing tab again all the available object types for that category are displayed. Using categories means that there is a simple way to specify what kind of object is being sought and a manageable number of options are displayed after pressing the tab key.
Tab completion and its options are discussed further in the introduction to the separate Clavister NetShield Firewall CLI Reference Guide.
Selecting Object Categories
With some categories, it is necessary to first choose a member of that category with the cc (change category/context) command before individual objects can be manipulated. This is the case, for example, with routes. There can be more than one routing table, so when adding or manipulating a route we first have to use the cc command to identify which routing table we are interested in.Suppose a route is to be added to the routing table main. The first command would be:
System:/>cc RoutingTable mainSystem:/RoutingTable/main>
Notice that the command prompt changes to indicate the current category/context. We can now add the route:
System:/RoutingTable/main> add Route
			Interface=if1
			Network=if1_net
			Name=new_route1
To return to the default CLI context, the command is cc on its own:
System:/RoutingTable/main> ccSystem:/>
The categories that require an initial cc command before object manipulation have a "/" character following their names when displayed by a show command. For example: RoutingTable/.
Specifying Multiple Property Values
Sometimes a command property may need multiple values. For example, some commands use the property AccountingServers and more than one value can be specified for this property. When specifying multiple values, they should be separated by a comma (,) character. For example, if three servers server1, server2, server3 need to be specified then the property assignment in the command would be:AccountingServers=server1,server2,server3
Resetting to the Default Value
Where an optional object property has been changed and the administrator wants to set it back the default value, the special value <empty> can be entered. Consider the following example, where the property RouterID is set back to its default value:IP rules in the main IP rule set have an ordering which is important. When adding using the CLI add command, the default is to add a new rule to the end of a list. When placement at a particular position is crucial, the add command can include the Index= property as an option. Inserting at the first position in a list is specified with Index=1 in an add command, the second position with Index=2 and so on. The naming of some objects is optional and is done with the Name= property in an add command. An object, such as an IP rule, will always have an Index value which indicates its position in the rule list but can optionally be allocated a name as well. Subsequent manipulation of such a rule can be done either by referring to it by its index, that is to say its list position, or by alternatively using the name assigned to it.System:/>add OSPFProcess Name=my_process1 RouterID=ip_ospf1 Added OSPFProcess OSPFSystem:/>set OSPFProcess OSPF1 RouterID=<empty> Updated OSPFProcess OSPF
The cOS Stream CLI Reference Guide lists the options available for each object, including Name= and Index=.
To make reading configurations easier, it is strongly advised to always add unique a unique name to important objects in a configuration. For example, IP rules should always have an appropriate name specified so that their purpose can be immediately understood.
Where the Name property is optional, it can also have duplicates but this is never recommended and can be confusing.
When access to the CLI has been established to cOS Stream through the serial console with a console client or through an Ethernet interface with an SSH client, the administrator will need to log on to the system before being able to execute any CLI commands. This authentication step is needed to ensure that only trusted users can access the system, as well as providing user information for auditing purposes.After SSH communication is established, cOS Stream will respond with a login prompt to pressing the Enter key. Type in the username the login prompt followed by the Enter key. Type the password followed by the Enter key again. After the first startup, cOS Stream will allow administrator login with the username admin and the password admin. This default password should be changed as soon as possible.
If accessing the CLI through a local console connection to the firewall, authentication will only be required if an AuthenticationProfile is explicitly associated with the console's COMPortAccess object.
After a successful logon, the CLI command prompt will appear:
System:/> The default welcome message will also be displayed directly after the logon. This SSH welcome message can be removed with the CLI command:
System:/> set RemoteManagement RemoteMgmtSSH RemoteMgmtSSH Banner=Where ssh is the name of the RemoteMgmtSSH object. To reset the message:
System:/> set RemoteManagement RemoteMgmtSSH RemoteMgmtSSH Banner="Welcome!"When connecting to cOS Stream with SSH, there is a default inactivity timeout of 30 minutes. This may be inconvenient. To increase this timeout to a higher value, the following CLI command can be used:
System:/> set RemoteManagement RemoteMgmtSSH RemoteMgmtSSH
			SessionIdleTime=1000000
Changing the admin User Password
It is recommended to change the default password of the admin account from admin to something else as soon as possible after initial startup. User passwords can be any combination of characters and cannot be greater than 256 characters in length. It is recommended to use only printable characters.To change the password, for example to my-password, the following CLI commands are used. First, change the current CLI context to be the relevant LocalUserDatabase object:
System:/> cc LocalUserDatabase AdminUsersThe password of the admin user can now be changed:
System:/LocalUserDatabase/AdminUsers> set User admin Password="my-password"Finally, return to the default CLI context:
System:/LocalUserDatabase/AdminUsers> cc
Activating and Committing Changes
If any changes are made to the current configuration through the CLI, those changes will not become active until the following command is issued:System:/> activateSystem:/> commitIf the commit command is not issued within 30 seconds (the default time period) then the activated changes are automatically undone and the old configuration restored.
Symbols Indicating Object Status
When configuration objects are displayed with a show command, a symbol to the left of the object's output indicates a change of status that has not yet been committed. Two symbols are mentioned above. The complete list is:
- means the object has been deleted.
o means the object has been disabled.
! means the object has errors.
+ means the object has been newly created.
* means the object has been modified.
Checking Configuration Integrity
After changing a configuration and before issuing the activate and commit commands, it is possible to explicitly check for any problems in a configuration using the command:System:/> show -errorsAll the changes made to a configuration can be shown before activation with the command:
System:/> show -changes
Examining the Configuration Log
Major system events such as deploying a new configuration as well as system starts are recorded in the Configuration Log. This is examined using the cfglog command as shown in the following example:System:/> cfglog -all
Notice vsinit/Configure:1805 2025-11-22 13:53:40
- Beginning system reconfigure. System starting.
Notice vsinit/Configure:1805 2025-11-22 15:59:30
- Beginning system reconfigure. Activating new configuration.
Notice vsinit/Configure:2033 2025-11-22 15:59:31
- Reconfigure completed successfully.The output from this command also shows if cOS Stream is running in demonstration mode, without a valid license.
System Performance Commands
When viewing system performance, the administrator is typically concerned about the CPU utilization on the data plane since overly high CPU usage can affect packet forwarding performance. This is viewed by accessing the statistical values found under /system/cpu/ and this is done using either the CLI or an SNMP client.Using the CLI, the statistics command provides a means to examine individual or groups of values. To see all values for system cpu usage, a wild card can be used as in this example with some typical output:
System:/> statistics -add /system/cpu/*

Name | 2025-11-22 13:36:11              Value  Unit
--------------------------------------  -----  ----
/system/cpu/control_plane_usage         1      %
/system/cpu/cpus/ControlPlane_01/usage  1      %
/system/cpu/cpus/FastPath_01/usage      3      %
/system/cpu/cpus/FastPath_02/usage      11     %
/system/cpu/cpus/FastPath_03/usage      5      %
/system/cpu/cpus/FastPath_04/usage      31     %
/system/cpu/cpus/SlowPath_01/usage      7      %
/system/cpu/cpus/SlowPath_02/usage      3      %
/system/cpu/cpus/SlowPath_03/usage      23     %
/system/cpu/cpus/SlowPath_04/usage      14     %
/system/cpu/fast_path_usage             50     %
/system/cpu/slow_path_usage             47     %
The above output comes from a hypothetical processor with four cores. For each core, the fast path and slow path usage is shown with the total for each path at the bottom. The Control Plane handles configuration management and logging functions. The Slow Path deals with the setup of new flows. The Fast Path deals with packet forwarding functions.
The memory command provides a snapshot of memory utilization.
System:/> memory

	"
	"
  Free:                                   121306 KB
  Total (In listing + free):              135892 KB
The bulk of the above memory usage output has been omitted except for the final two lines. These give a summary of overall memory utilization.
The top command provides details of CPU utilization by control processes only. An example with truncated output is shown below.
System:/> top

Load avg: 0.94, 0.51, 0.35
CPU usage: 24.8%  CPUs: 1
Name          Time   CPU(%)
------------  -----  ------
statd         14:04  6.3
mdpd          12:52  5.1
vsinit        07:17  2.7
		"
		"
The format of this CPU usage summary follows the convention of the same command in UNIX. The Load avg figures are for the last 1, 5 and 15 minutes respectively. This list is ordered by CPU usage, with the most active processes placed at the top.
Multiple Administration Logins
The Clavister NetShield Firewall allows more than one user from the Administrators group to be logged in at the same time and change the configuration simultaneously. A change made by one such user is visible immediately to all others.For example, if one user deletes a configuration object then another user who tries to change it will receive a message to say that the operation is invalid.
After finishing working with the CLI, it is recommended to log out in order to avoid letting anyone getting unauthorized access to the system. This is done with the command:System:/> exit
The currently enabled views can be listed by using the cmdview command with no parameters. For example:
System:/> cmdview
Command view(s) enabled: default
In normal operation the Default view is sufficient. However, some situations may require the use of commands that should be used cautiously and for that reason they are hidden in alternate command "views".
For example, to turn on the Advanced view, enter the command:
System:/> cmdview advancedEntering the Help command will now show that an additional set of commands are available to the administrator in addition to the default set. These additional commands include, for example, ruledb which provides a technically detailed listing of the current IP rules.
Similarly, an extra set of diagnostic commands becomes available with the command:
System:/> cmdview debugThe Debug, Default and Advanced command views all become available if the parameter all is used:
System:/> cmdview all
The original, default command view is returned by using the following command:
System:/> cmdview defaultThe service command view is a special command view that provides access to commands that should be used with extreme caution because they can cause harm to the configuration if used incorrectly. Normally, only qualified support personnel should have access to this view.
For this reason, the service view is protected by an additional one time password (OTP) which must be requested from Clavister support.
To allow the administrator to easily store and execute sets of CLI commands, the Clavister NetShield Firewall provides a feature called CLI scripting. A CLI script is a predefined sequence of CLI commands which can be executed after they are saved to a file and the file is then uploaded to the Clavister NetShield Firewall.
The steps for creating a CLI script are as follows:
Create a text file with a text editor containing a sequential list of CLI commands, one per line.
The recommended convention is for these files to use the file extension .sgs (Security Gateway Script).
Upload the file to the Clavister NetShield Firewall using Secure Copy (SCP). Script files must be stored in a directory under the root called /scripts. SCP uploading is discussed in detail in Section 2.1.6, Secure Copy.
Use the CLI command script -run to run the script file.
The CLI script command is the tool used for script management and execution. The complete syntax of the command is described in the cOS Stream CLI Reference Guide and specific examples of usage are detailed in the following sections. See also Section 2.1.3, The CLI in this manual.
|
Note |
|---|---|
|
Uploaded CLI script files are not held in permanent memory and will disappear after system restarts. |
All CLI Commands are Allowed in Scripts
There are no restrictions on which CLI commands can appear in a script. Any valid command can be used. As mentioned above, the script -run command launches a named script file that has been previously uploaded to the Clavister NetShield Firewall. For example, to execute the script file my_script.sgs which has already been uploaded, the CLI command would be:System:/> script -run my_script.sgs$1, $2, $3, $4......$n
The values substituted for these variable names are specified as a list at the end of the script -run command line. The number n in the variable name indicates the variable value's position in this list. $1 comes first, $2 comes second and so on.
|
Note: The symbol $0 is reserved |
|---|---|
|
Notice that the name of the first variable is $1. The variable $0 is reserved and is always replaced before execution by the name of the script file itself. |
For example, a script called my_script.sgs is to be executed. The IPv4 address 126.12.11.01 is to replace all occurrences of $1 in the script file and the string if1 address is to replace all occurrences of $2.
The file my_script.sgs contains the single CLI command line:
add Address IPAddress if1_ip Address=$1 Comments=$2
To run this script file after uploading to cOS Stream with the given substitutions, the CLI command would be:
> script -run my_script.sgs 126.12.11.01 "if1 address"Notice how the "if1 address" parameter is enclosed in quotes so any spaces can be included.
When the script file runs, the replacement of the variables means that the command becomes:
add Address IPAddress if1_ip Address=126.12.11.01 Comments="if1 address"
Sometimes, there is a requirement to escape certain characters in a command so they are treated as ordinary characters when the command is executed. This is particularly true for the dollar-sign "$" character. Consider the string: "te$t". In order to have the dollar-sign treated as a normal character, it can be escaped in the normal way by using a back-slash "\" character. The string would become "te\$t" and the dollar-sign is no longer treated as special.
Script Validation and Command Ordering
CLI scripts are not, by default, validated and the ordering of the commands does not matter. There can be a reference to a configuration object at the beginning of a script which is only created at the end of the script. Although this might seem illogical, it is done to improve the readability of scripts. If something always has to be created before it is referred to then this can result in a confused and disjointed script file and in long scripts it is often preferable to group together similar CLI commands. If an executing CLI script file encounters an error condition, the default behavior is for the script to terminate. This behavior can be overridden by using the -force option. To run a script file called my_script2.sgs in this way, the CLI command is:System:/> script -run my_script2.sgs -forceSystem:/> script -run my_script2.sgs -verboseScripts Are Lost After Restart
When a script file is uploaded to the Clavister NetShield Firewall, it is kept in temporary memory. If the system restarts then any uploaded scripts will be lost from memory and must be uploaded again before they can run. The script on its own, command without any parameters, lists all the scripts currently available and indicates the size of each script.System:/> script
Name Size
-------------- ----
my_script.sgs 8
my_script2.sgs 10System:/> script -show my_script.sgsCreating Scripts Automatically
When the same configuration objects needs to be copied between multiple Clavister NetShield Firewalls, then one way to do this with the CLI is to create a script file that creates the required objects and then upload to and run the same script on each device.If an installation already has the objects configured that need to be copied, then running the script -create command on that installation provides a way to automatically create the required script file. This script file can then be downloaded to the local management workstation and then uploaded to and executed on other Clavister NetShield Firewalls to duplicate the objects.
For example, suppose the requirement is to create the same set of IPAddress objects on several Clavister NetShield Firewalls that already exist on a single firewall. The administrator would connect to the single firewall with the CLI and issue the command:
System:/> script -create Address IPAddress -filename=new_script.sgsThis creates a script file called new_script_sgs which contains all the CLI commands necessary to create all IPAddress objects in that firewall's configuration. The created file's contents might, for example, be:
add Address IPAddress if1_ip Address=10.6.60.10
add IPAddress if1_net Address=10.6.60.0/24
add IPAddress if1_br Address=10.6.60.255
add IPAddress if1_dns1 Address=141.1.1.1
		"
		"
		"
Note that with the -create option, the output file must be specified with the -filename= parameter. This is the only time that -filename= is used.
The file new_script_sgs can then be downloaded with SCP to the local management workstation computer and then uploaded and executed on other Clavister NetShield Firewalls. The end result is that all units will have the same IPAddress objects in their address book.
In order to preserve any script files created in this way between system restarts, they must downloaded to the local storage of the management workstation using SCP and then uploaded again later.
Objects Excluded from Script Files
Certain aspects of a configuration which are platform dependent cannot have a script file entry created when using the -create option. This is true when the CLI node/object type in the script -create command is one of:These node types are skipped when the script file is created and cOS Stream gives the message No objects of selected category or type.
![[Tip]](images/tip.png) |
Tip: Listing commands at the console |
|---|---|
|
To list the created CLI commands on the console instead of saving them to a file, leave out the -filename= parameter in the script -create command. |
# The following line defines the if1 IPv4 address
add Address IPAddress if1_ip Address=10.6.60.10
Scripts Running Other Scripts
It is possible for one script to run another script. For example, the script my_script.sgs could contain the line:script -run my_script2.sgscOS Stream allows the script file my_script2.sgs to execute another script file and so on. The maximum depth of this script nesting is 5 levels.
In order to allow InControl to connect to cOS Stream for management using the Netcon communication protocol, a Remote Management rule needs to be used.
Example 2.1. Configuring cOS Stream for Centralized Management Using InControl
In this example, there is an InControl server located behind the DMZ interface. To allow the InControl server to connect to cOS Stream, a Pre-shared Key (PSK) and a Remote Management rule is needed.

In the default configuration, a Netcon remote management rule exists but is disabled. This rule must either be enabled and modified or deleted, and a new remote management rule created for Netcon, as only one rule of this type can exist at any given time. For the below example, the method of making modification to the existing rule is used.
Command-Line Interface
First, Generate a new PSK object, note that the size must be 512 bits:
System:/> pskgen NetconPSK -size=512Alternatively, if an existing PSK is already available:
System:/> add PSK NetconPSK Type=HEX PSKHex=568633cd5399c365fc8...Enable the pre-created Remote Management rule.
System:/> set RemoteManagement RemoteMgmtNetcon -enable
As the last step, modify the enabled Remote Management rule to allow Netcon communication from the InControl server located in the DMZ using the chosen PSK.
System:/> set RemoteManagement RemoteMgmtNetcon
				AuthProfile=MgmtAuthProfileNetcon
				Key=NetconPSK
				SourceInterface=DMZ
				SourceNetwork=DMZ_net
				AccessLevel=Admin
This uses the default authentication profile MgmtAuthProfileNetcon. A new profile with custom values can also be used:
System:/> add AuthenticationProfile NetconAuth AgentType=PSKOnce deployed, the InControl server located in the DMZ is now allowed to connect to the firewall using the Netcon protocol for centralized management.
For more in-depth information about InControl see the the separate InControl Administration Guide.
To upload and download files to or from the Clavister NetShield Firewall, the Secure Copy (SCP) protocol can be used. SCP is based on the SSH protocol and many freely available SCP clients exist for almost all platforms. The command line examples given below are based on the most common command format found with SCP client software. Some SCP clients might use different syntax.
SCP Command Format
SCP command syntax is straightforward for most console based clients. The basic command used here is scp followed by the source and destination for the file transfer.Upload is performed with the command:
> scp <local_filename> <destination_firewall>
Download is done with the command:
> scp <source_firewall> <local_filename>
The source or destination Clavister NetShield Firewall is specified using the format:
<user_name>@<firewall_ip_address>:<filepath>For example:
admin@10.62.11.10:config.bkpThe <user_name> must be a defined user belonging to the administrator user group.
|
Note: SCP examples do not show the password prompt |
|---|---|
|
SCP will normally prompt for the user password after the command line but that prompt is not shown in the examples given in this document. |
Examples of SCP Uploading and Downloading
In some cases, a file is located in the system root. In other cases, it is located within a particular folder. All backup files are located in the root folder.Uploading/Downloading Backup Files
If an administrator username is admin1 and the IPv4 address of the Clavister NetShield Firewall is 10.5.62.11 then to upload a configuration backup file called config.bkp from the local disk, the SCP command would be:
> scp config.bkp admin1@10.5.62.11:.
To download a configuration backup to the current local directory, the command would be:
> scp admin1@10.5.62.11:config.bkp .
Uploading Firmware or License Files
If an administrator username is admin1 and the IPv4 address of the Clavister NetShield Firewall is 10.5.62.11 then to upload a license file called 1111-2222-3333-4444.lic from the local disk, the SCP command would be:
> scp 1111-2222-3333-4444.lic admin1@10.5.62.11:.
The same syntax can be used for uploading firmware files. The following license activation or firmware upgrade CLI command will prompt cOS Stream to search for files ending in either .lic or .upg in the root directory.
Uploading Certificate Files
The following command lines show how a typical SCP utility might upload a host certificate consisting of the two files called cert-1.cer and cert-1.key to a firewall which has the management IP address 192.168.3.1:
> scp C:\cert-1.cer admin@192.168.3.1:
> scp C:\cert-1.key admin@192.168.3.1:In each case, the uploaded file will retain its original file name.
Uploaded certificate files are stored in volatile memory and must be associated with a Certificate object to become a non-volatile part of the configuration. Doing this is described in Section 16.1, Configuring Certificates.
> scp admin@192.168.3.1:*.mib .
To download all the downloadable files:
> scp admin@192.168.3.1:* .
Wildcards can also be used when uploading. For example, to upload all the backup files
in the current directory:
> scp *.bkp admin@192.168.3.1:.
For system management tasks in the default configuration, the administrator logs in to the CLI via SSH using a username and password that are checked against the credentials stored in a local database.
An alternative to using a local database is to have cOS Stream perform authentication of the entered credentials against an external RADIUS server. This is done by changing the properties of the AuthenticationProfile object assigned to the RemoteManagementSSH object used for CLI access via SSH. The option exists to use either a local database or a RADIUS server as the authentication source, or a combination of both. If a combination is selected, the administrator can then select which source to try first.
![[Caution]](images/caution.png) |
Caution: RADIUS is ignored with public key authentication |
|---|---|
|
If cOS Stream is able to use public key authentication when an SSH client connects then RADIUS authentication will not also be attempted even though it might be configured in an associated AuthenticationProfile object. |
Configuration Steps
Configuring the AuthenticationProfile for RADIUS authentication consists of the following steps:If only RADIUS is to be used then set the LocalUserDB property to have no value:
LocalUserDB=""Otherwise, leave this property set to be the database that will be used with RADIUS authentication.
Set the RemoteServer property of the AuthenticationProfile object to be a RadiusServer object that already exists in the configuration:
RemoteServer=my_radius_server1More than one server can be specified:
RemoteServer=my_radius_server1,my_radius_server2See Section 17.2, RADIUS Authentication for how to define a RadiusServer object.
Set the RemoteLoadBalance property of the AuthenticationProfile object to specify how to behave if more than one RADIUS server is specified for the RemoteServer property. The available options are the following:
None - This is the default value and means that the first server in a list will always be tried first. If it does not respond then the second will be tried, and so on. This choice ensures that the first server is always the preferred one and any other in the list are backups.
RoundRobin - The first query goes to the first server in the list, the next query goes to next server, and so on until the list is exhausted and the next query goes to the first server in the list again. This option provides the best balancing of the load across all servers.
TryAll - The authentication request is sent to all RADIUS servers. If any one of the servers replies and authenticates the user then other replies are ignored. This option can provide the fastest authentication since the fastest server in the list of servers will respond first.
Select the AuthOrder property to be one of the following:
LocalLast - The local database is only queried if none of the configured RADIUS servers responds to an authentication request. If no RADIUS servers are configured then only the local database is used. This is the default value of the property.
LocalFirst - The login credentials are first looked up in the local user database. If not found in the local database, the configured RADIUS servers are queried.
RADIUS Servers Must Be Correctly Configured
For RADIUS authentication to work, any RADIUS servers being used must be correctly configured to return the group membership of a user as a vendor specific attribute. The Clavister specific settings for this attribute are as follows:Vendor-ID - 5089.
Vendor-assigned attribute number - 1.
Attribute format - String.
Attribute value - Clavister-User-Group.
The Login Message Changes for a Group Mismatch
Once set up, the login actions taken by the administrator are the same as with non-RADIUS authentication and there is usually no indication in the CLI that RADIUS is being used for authentication.However, there is one exception. When the user credentials are correct but the group name returned by the RADIUS server does not match a valid group (it is not Administrators or Auditors) the CLI will display the following message:
Access denied.
Generated Log Event Messages
Log messages indicate a successful or unsuccessful login by the administrator. With RADIUS management authentication, all the related messages belong to the AUTHSYS log category and can include the following parameter values:The event parameter indicates the type of event.
The usergroups parameter is the group membership allowed by the authenticating RADIUS server.
The user parameter is the username used for login.
The userdb parameter will show the name of the LocalUserDatabase object or the RadiusServer object being used for authentication.
The ip parameter is the IP of the client computer that the user is trying to login from.
The types of log event messages that cOS Stream might generate are as follows:
Successful RADIUS Authentication
A successful login using a RADIUS server with the user being part of the Administrators group.
 AUTHSYS: prio=notice id=00000 event=user_logged_in
 userid=33 user=jdoe ip=192.168.1.1 profile=MgmtAuthProfile agent=Basic
 userdb=RadiusServer1 usergroups="Administrators" action=none
Successful Local Database Authentication
A successful login using the local database called AdminUsers with the user being part of the Administrators group. In this case, the usedb parameter will change.
AUTHSYS: prio=notice id=00000 event=user_logged_in
 userid=32 user=admin ip=192.168.1.1 profile=MgmtAuthProfile agent=Basic
 userdb=AdminUsers usergroups="Administrators" action=none
Insufficient Access Rights
The user entered a correct username and password but the group name returned by the RADIUS server was neither Administrators or Auditors.
 AUTHSYS: prio=warning id=00000 event=received_radius_access-reject_message
 userid=33 user=jdoe ip=192.168.1.1 profile=MgmtAuthProfile
 agent=Basic userdb=RadiusServer1 action=none
Servers Unreachable
All configured RADIUS servers were unreachable and a timeout condition occurred.
 AUTHSYS: prio=warning id=00000 event=authentication_source_did_not_respond
 userid=33 user=jdoe ip=192.168.1.1 profile=MgmtAuthProfile
 agent=Basic userdb=RadiusServer1 action=none
Use the Local Console as a Fallback Option
It is possible that the administrator could be locked out from logging on via the CLI over SSH because a RADIUS server will not authenticate the entered credentials and authentication using a local database is not enabled either. In such cases, the local console port on the Clavister NetShield Firewall can still be used for management access. However, if the password has been set for the local console then that password must still be given to get CLI management access (note that the local console password is totally separate from other management passwords).Example 2.2. Enabling RADIUS Management Authentication
This example will change the current default rule for CLI SSH management access so that authentication is only performed using two RADIUS servers. It is assumed that the RADIUS server objects are already defined in the configuration and have the names my_radius_auth1 and my_radius_auth2. The authentication load will be shared between the two servers.
The authentication order will be set to LocalLast. The local database will never be used so it will be set to be null. Multiple logins will not be allowed.
Command-Line Interface
First, create an AuthenticationProfile object:
System:/> add AuthenticationProfile my_mgmt_auth_profile
			LocalUserDB=""
			RemoteServer=my_radius_auth1,my_radius_auth2
			RemoteLoadBalance=RoundRobin
			AuthOrder=LocalLast
			MultipleLogins=AllowOne
Now, use this profile with the default RemoteMgmtSSH object:
System:/> set RemoteManagement RemoteMgmtSSH RemoteMgmtSSH
			AuthProfile=my_mgmt_auth_profile
Overview
Simple Network Management Protocol (SNMP) is a standardized protocol for management of network devices. Any SNMP compliant client can connect to a network device which supports the SNMP protocol to query it for system status. cOS Stream allows such access by an SNMP client and a large range of statistical values to be queried. By default, SNMP access is not permitted and a suitable remote management rule must be configured to allow it.Supported SNMP Versions
cOS Stream supports the following SNMP versions:
This section discussed overall MIB file support and setting up version 1 or 2c access. SNMPv3 access is described in Section 2.1.9, SNMPv3 Polling.
Supported Request Operations
These are the supported SNMP request operations:
A Management Information Base (MIB) file is a database, in the form of a text file, which defines the parameters on a network device that an SNMP client can make queries for.
An SNMP client connecting to cOS Stream can use two different types of MIB files:
The Clavister provided MIB files.
These are CLAVISTER-STREAM.mib and CLAVISTER-SMI.mib. These are needed for accessing the proprietary Clavister firewall statistical values.
Supported Standard MIBs.
cOS Stream supports a subset of the statistical values defined in standard MIBs to provide a common set of values applicable across different network equipment manufacturers. These MIB files are freely available on the Internet. For details on what is supported, see the separate Statistics Reference Guide.
> scp admin@192.168.1.17:/*.mib .
The selected MIB file should be transferred to the hard disk of the workstation that will run the SNMP client so it can be imported by the client software. When the SNMP client runs, the MIB files are read and they tell the client which values can be queried.
MIB Entries
Each entry in the MIB includes a textual explanation of what the value is and a complete list is not reproduced in this guide. A typical MIB file entry for the total number of packets transmitted by an interface appears as follows:IfPktsTotCnt OBJECT-TYPE
SYNTAX Counter32
MAX-ACCESS read-only
STATUS current
DESCRIPTION
"Total number of packets transmitted by the interface"
::= { clvIfStatsEntry 10 }
All statistical values that can be accessed by SNMP are listed in the separate Statistics Reference Guide which provides all available information for each. This includes the description of the values together with the MIB OID, MIB name and MIB type.
Setting Up Version 1 or 2c SNMP Access
Version 1 or 2c SNMP access is enabled by creating RemoteMgmtSNMP rules with filters matching traffic for the SNMP requests that should be allowed. This is done using these filtering properties:SourceInterface - The interface on which SNMP requests will arrive.
SourceNetwork - The IP address or network from which SNMP requests will come.
To ensure that the correct RemoteMgmtSNMP object triggers, different objects should not use overlapping filters. Instead, each object should specify a unique source interface and network combination. In addition, the source interface and network filters of RemoteMgmtSNMP and RemoteMgmtSNMP3 objects should also not overlap.
In addition to the filter parameters above, each RemoteMgmtSNMP rule also needs to have these two properties configured:
Name - A symbolic name for the rule.
GetCommunity - The SNMP community string to use for traffic matching this particular RemoteMgmtSNMP rule.
Other optional properties for the RemoteMgmtSNMP rule can be found in the separate CLI Reference Guide.
Both SNMP Versions 1 and 2c use the SNMP community string as a way for the client and server to "authenticate" each other. It should however be noted that this provides no security as the string is transmitted in plain text. Instead, it limits the chances of clients accidentally connecting to the wrong server. For this purpose, it is advised to choose a community string that identifies the particular firewall. That way, the risk that a client accidentally connects to the IP of the wrong firewall is minimized.Example 2.3. Enabling SNMP Version 1 or 2c Monitoring
This example enables SNMP access through the internal lan interface from the network mgmt-net using the community string "my-community-string".
Command-Line Interface
System:/> add RemoteManagement RemoteMgmtSNMP my_snmp
			SourceInterface=lan
			SourceNetwork=mgmt-net
			GetCommunity=my-community-string
IP Rules are not Required with SNMP
Any type of SNMP access does not require any IP rules to be defined to allow SNMP related traffic to flow. Such traffic is automatically allowed by cOS Stream.Security Concerns with Version 1 and 2c
It should be noted that SNMP Version 1 or 2c communication has no built-in security. All request and response data, including the community string, will be sent as plain text over a network. This is clearly insecure if a remote client is communicating over the public Internet. If this is the case, it is advisable to have remote access take place over an encrypted VPN tunnel or similarly secure means of communication.However, SNMPv3 polling can provide both encryption and authentication and this is described in the next section.
cOS Stream supports SNMPv3 polling by an external SNMPv3 client with an IPv4 or IPv6 address. SNMPv3 differs from the earlier SNMP versions in that it can provide both encryption and/or authentication.
The SNMPv3 polling feature is enabled by creating one or more RemoteMgmtSNMP3 objects in the firewall configuration. The mandatory properties for this object type will filter the incoming client requests and they are the following:SourceInterface - The interface on which SNMPv3 client requests will arrive.
SourceNetwork - The IP address or network from which client SNMPv3 requests will come.
LocalUserDB - The local database to use for authentication. This must be specified, regardless of the security options used. This is because the SNMPv3 client must specify a user which is present in a local user database. The user does not need administrator or auditor privileges.
Note that the passwords used for SNMPv3 authentication must be at least 8 characters long.
PrivacyPassword - This must be specified if the SecurityLevel is not set and left at the default value of AuthPriv. This value must be at least 8 characters long.
All the available properties are listed under the RemoteMgmtSNMP3 object entry in the separate CLI Reference Guide.
To ensure that the correct RemoteMgmtSNMP3 object triggers, different objects should not use overlapping filters. Instead, each object should specify a unique source interface and network combination. In addition, the source interface and network filters of RemoteMgmtSNMP and RemoteMgmtSNMP3 objects should also not overlap.
SecurityLevel Property Options
The SecurityLevel property of a RemoteMgmtSNMP3 object determines the type of security used. One of the following values can be chosen:AuthPriv - This is the default setting. It enables both authentication and encryption.
AuthNoPriv - This enables authentication using the local user database but disables encryption.
NoAuthNoPriv - This disables both authentication and encryption.
SNMPv3 Encryption
When enabled, the AES-CFB algorithm is used by cOS Stream for encryption of SNMPv3 traffic and the value of the PrivacyPassword property is used as the key.SNMPv3 Authentication
When enabled, authentication is always performed against the local user database specified by the LocalUserDatabase property. The password is not sent in clear text but instead a cryptographic hash of the password is sent.By default, the algorithm used for creating the hash of the password is HMAC-SHA1-96. This can be changed by setting the property AuthenticationMethod to the alternative value of HMAC-MD5-96. However, HMAC-SHA1-96 is the recommended setting for strong security.
Note that SNMPv3 polling with authentication enabled will cease to function if the reboot counter has reached its maximum value. The reboot counter and how it is reset is explained further in Section 20.5, SNMP Traps.
A single RemoteMgmtSNMP3 object will allow multiple SNMPv3 clients to connect at the same time. Similarly, multiple RemoteMgmtSNMP3 objects with different interface and source network property values will allow multiple SNMPv3 clients to connect at the same time.However, it is important that the SourceNetwork property for multiple RemoteMgmtSNMP3 objects do not have IP addresses assigned to them which overlap. If overlapping occurs, the behavior will be unpredictable.
Example 2.4. Setting Up SNMPv3 Polling
This example creates a RemoteMgmtSNMP3 object to allow SNMPv3 polling of the cOS Stream from an external SNMPv3 client on the network if1_net assigned to the if1 interface. A request limit will be imposed of 20 SNMPv3 client requests per second.
The user will be authenticated against the local database AdminUsers. The password mysecretpassword needs to be specified because the default value of the SecurityLevel property is AuthPriv.
Command-Line Interface
System:/> add RemoteManagement RemoteMgmtSNMP3 my-snmp3-rule
			SourceInterface=if1
			SourceNetwork=if1_net
			LocalUserDB=AdminUsers
			PrivacyPassword=mysecretpassword
			RequestLimit=20