| Home Prev | Next |
The KVM Console
When cOS Core starts, KVM will display a console which represents the console that is normally directly connected to the local console port of a physical firewall. This console is accessed by using VNC to connect to the IP address and port previously specified when running the script prepare.sh.This console displays output from cOS Core exactly as it would be displayed with a non-virtual firewall. It will show the initial startup sequence output and this can be interrupted, if required, by key presses in order to enter the boot menu. After startup, the KVM console can be used to issue CLI commands to configure cOS Core further and this is described in Section 6.4, Manual CLI Setup.
![[Tip]](images/tip.png) |
Tip: Changing focus back from the KVM console |
|---|---|
| KVM will keep focus in the console window after clicking it. Use the key combination Ctrl-Alt to release this focus. |
The Default Virtual Ethernet Interfaces
By default, the standard cOS Core installation provides three virtual Ethernet interfaces. To function, these virtual NICs must be mapped to the correct bridge or physical Ethernet interface by changing the Source device property for the interface using Virtual Machine Manager (virt-manager). Doing this is described in Chapter 4, Configuring Virtual Machines. The Device model property will remain as the default value of virtiocOS Core assigns the following default logical names to the virtual interfaces:
Interface names: Ifn. For example, the first interface is If1.
IP address objects: Ifn_ip. For example, the first address object is If1_ip.
Netmask IP objects: Ifn_net. For example, the first netmask is If1_net.
Connecting to the Virtual Firewall
By default, cOS Core enables a DHCP client on all the Ethernet interfaces so they can receive an IP address from a suitably configured external DHCP server. If DHCP is not used, an IP address must be assigned to the management interface manually and doing this is described in Section 6.4, Manual CLI Setup. Once assigned, this IP address can be used for a network connection using the cOS Core CLI over SSH or using the cOS Core WebUI over HTTPS.The management computer running the web browser or SSH client can be one of the following:
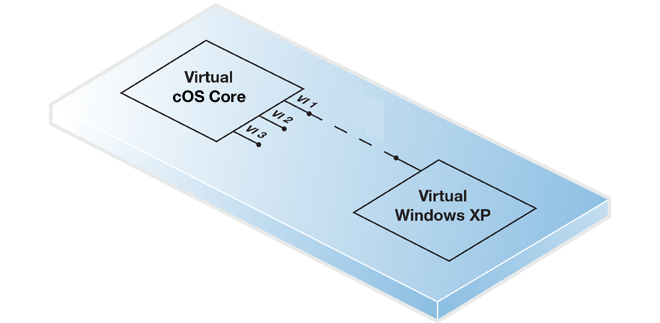
A virtual management computer running under the same KVM host.
In this case, a Linux or Open vSwitch bridge can be used to connect the virtual Ethernet interface with a virtual Ethernet interface on the virtual management computer. The virtual computer might be, for example, a Windows installation as shown below.
For this option to function, KVM must be configured so that the virtual Ethernet interface for both cOS Core and the management computer are on the same bridge.
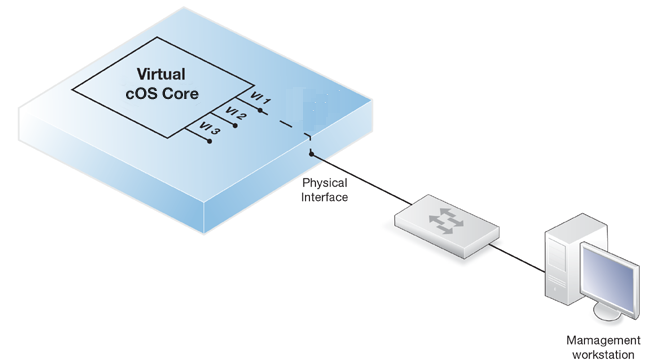
A physically separate management computer.
In this case, a macvtap adapter can be configured to connect the virtual Ethernet interface to a physical interface. Physical connection is then made between that physical interface and an interface on a physically separate management computer.
In both the above cases, the real or virtual management computer needs its connecting Ethernet interface configured with an IP address on the same network as the cOS Core interface. Once this is done, the management computer and the firewall can communicate and initial cOS Core setup can then be performed in exactly the same way as a non-virtual firewall. This is described next in Chapter 6, Configuring cOS Core.
Setup with Multiple Virtual Firewalls
When there are multiple virtual machines running cOS Core under one KVM host, the IP address of the management virtual Ethernet interface must be different for the different virtual machines if administration is to be done through the Web Interface or an SSL client.The recommended way to change the management interface IP address is to enter CLI commands into the cOS Core console which is displayed by KVM after cOS Core starts. The commands to do this for the If1 interface are the following:
By default, a DHCP client is enabled on all interfaces so this must be first disabled:
Device:/> set Interface Ethernet If1 DHCPEnabled=NoSet the IP address of the default management interface If1_ip. In this example, it will be set to 10.0.0.1:
Device:/> set Address IP4Address InterfaceAddresses/If1_ip
			Address=10.0.0.1
Now set the network of the interface. This object has the name If1_net.
Device:/> set Address IP4Address InterfaceAddresses/If1_net
			Address=10.0.0.0/24
Check that the management access rules allow traffic on If1 from the desired source address using the following command:
Device:/> show RemoteManagementIf the admin password has not been changed earlier to a strong password and strong passwords are enabled (by default, they are) then activating configuration changes will not be allowed by cOS Core. One solution is to change the admin password to a strong one, for example:
Device:/>cc LocalUserDatabase AdminUsersDevice:/AdminUsers>set User admin Password=Mynew*pass99
Alternatively, turn off strong passwords with the following command:
Device:/> set Settings MiscSettings EnforceStrongPasswords=NoThe cOS Core configuration changes can now be activated:
Device:/> activateFollowing activation, the changes must be committed permanently within 30 seconds using the commit command otherwise the system will revert back to the original configuration and all changes will be lost. This acts as a check by cOS Core that the administrator has not been locked out by any change:
Device:/> commit