| Home Prev | Next |
In some circumstances, it may be necessary to reset the NetWall 6000 Series appliance to the state it was in when it left the factory and before it was delivered to a customer. This process is known as a reset to factory defaults or simply a factory reset.
![[Caution]](images/caution.png) |
Caution: cOS Core upgrades and current configuration are lost |
|---|---|
|
Resetting to defaults means that the default cOS Core configuration will be restored as well as the original version of cOS Core that the product left the factory with. The will mean the following:
|
With the NetWall 6000 Series, a reset can be done in one of the following ways:
Using the Web Interface
A reset is possible through a web browser over a network connection using the cOS Core Web Interface (WebUI). The steps to do this are the following:
Open a web browser and enter the IP address of the management interface. The cOS Core web interface login dialog should be displayed. Connecting with a browser is described further in Section 3.4, Management Computer Connection.
Log into cOS Core as an administrator.
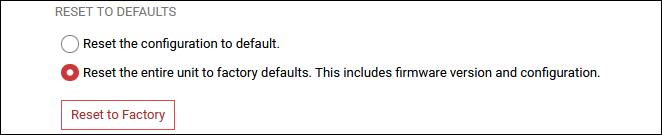
Go to: Status > Maintenance > Device Reset > Reset to Factory
Select the option: Reset the entire unit to factory defaults.
Press the Reset button.
Note that this will reset all the IP addresses on Ethernet interfaces to their defaults which might mean that the network connection will be lost.
Using the CLI
The cOS Core CLI can be used by connecting to one of the NetWall 6000 Series's Ethernet interfaces using an SSH client over a network. A reset is performed by entering the reset -unit command twice in succession:
Device:/>reset -factorydefaultDevice:/>reset -factorydefault
Entering the command twice is a safeguard against accidental use. Note that this will reset all the IP addresses on Ethernet interfaces to their defaults which may mean that the SSH connection will be lost.
Using the Boot Menu
The boot menu can be accessed through the local CLI console by repeatedly pressing the Esc key while cOS Core is starting up. The resetting of Ethernet interface IP addresses will not affect the local console connection. The complete procedure is performed with the following steps:
Make sure a separate management computer running as a console is attached to the local console port of the NetWall 6000 Series.
Power up the NetWall 6000 Series unit. This may require a restart if the hardware is already powered up.
As console output appears, repeatedly press the Esc key before cOS Core has fully started.
The boot menu will now be displayed on the console.
Choose the Reset system to factory default option.
Boot menu options are described further in Section 4.5, The Boot Menu and in the separate cOS Core Administration Guide.
Performing a Reset Manually
The 6000 Series can be reset manually with the following steps:
The progress of the reset can be followed using a local console connection. If that is required, open a console display window connected to the NetWall 6000 Series local console port.
While the unit is powered up, push in the recessed reset button on the unit with a suitable pointed tool and keep it pushed in. An opened paper-clip could be used for this.
The button can be found above the power LED.
Continue holding the button in for at least 10 seconds. The status LED will blink and when the blinking stops the reset is being performed.
If a console was connected in step 1, the console output will indicate that the hardware has successfully been reset to its factory defaults.
After completion of the reset, the NetWall 6000 Series unit can now be set up again as though it had never been previously configured.
|
Caution: Local console login credentials will be reset |
|---|---|
|
The local console login credentials will be reset to the default values of username admin and password admin. Changing the cOS Core admin user password as soon as possible is recommended. |