| Home Prev | Next |
This section describes connecting power. As soon as power is applied, the NetWall 6000 Series will boot-up and cOS Core will start.
![[Important]](images/important.png) |
Important: Review the safety information |
|---|---|
|
Before connecting power, please review the electrical safety information found in Chapter 10, Safety Precautions. |
As standard, the 6000 Series is delivered with only a single PSU and the second PSU slot is occupied by a dummy slot filler. The filler is necessary so the PSU alarm is not activated. A second PSU must be ordered separately. The 6000 Series can operate with just one PSU installed and a second can be added if required. When two PSUs are installed, the 6000 Series runs using power from only one of the PSUs and the other delivers power only in the case of a failure by the primary unit. Installing and swapping PSUs is discussed further in Chapter 5, PSU Replacement.
Connecting AC Power
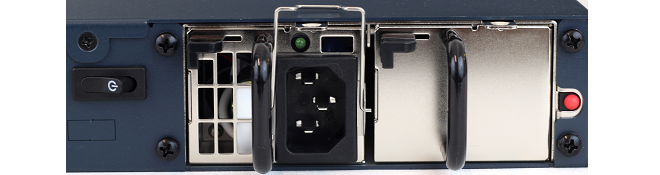
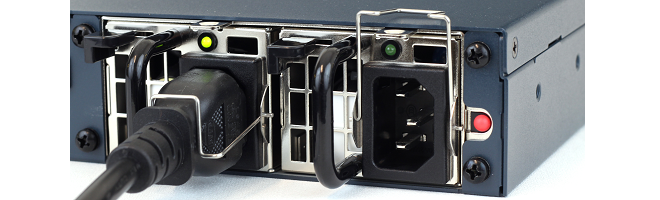
To connect power, follow these steps:There is a hinged silver metal plug retaining bracket on the PSU. This should be lifted up before inserting the power cable. Once the power cable is plugged in, it should be moved back over the plug to prevent it slipping out.
Plug the other end of the power cord into a grounded power outlet.
If a second PSU is to be used for redundancy, the dummy PSU should be removed and the actual PSU should be inserted in its place. The procedure for inserting the power cable should then be repeated for this second PSU.
Power is controlled by the rocker switch to the left of the PSU slots. To switch on, depress the switch and then immediately release it. A green LED on each PSU will illuminate to show that the PSU has power and is functioning correctly.
To switch off, hold the switch depressed for at least 5 seconds.
The 6000 Series will boot up as soon as power is applied and cOS Core will start. The progress of the process can be seen on a CLI console connected to the local console port.
After a brief period of time, cOS Core will be fully initialized and the NetWall 6000 Series is then ready for configuration using a direct console connection or via a network connection to the default management Ethernet interface.
Initial cOS Core configuration is described in Chapter 4, cOS Core Configuration.
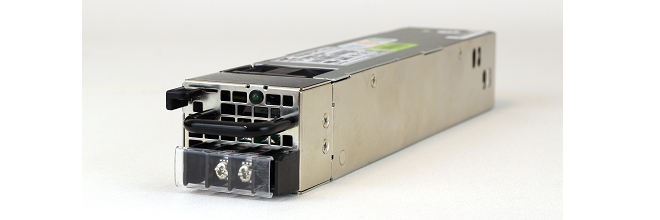
Connecting DC Power
The option exists to fit a DC PSU into the NetWall 6000 Series which can be connected to a DC power source. If required, a second DC PSU can be installed for redundancy. Make sure any AC PSU that is already installed is removed.A NetWall 6000 Series PSU has a single DC input supporting +/- 48VDC and return feed. A dedicated circuit breaker supporting the labeled current requirements is needed for each PSU if two are installed.
It is common that DC power is routed through DC power distribution panels on each rack in a typical site, and using battery backups providing 48 VDC. These might be located at the top of each rack in which the NetWall 6000 Series is to be installed. Two pairs of suitable cables connected to each set of terminal studs on the power distribution panel are required.
Make sure to connect the input and return feed to the correct power distribution feed since there is no standard coloring scheme for DC power cables. The 6000 Series appliance must be connected to earth ground during operation. Connect a cable to an earth ground from the cabinet or other suitable grounding point to the chassis by fastening a U-type lug to the end of the ground wire and fasten it to the chassis with the power supply retaining screw.
|
Important |
|---|---|
|
The power feed ground and chassis ground must be connected to the same earth point at an installation site. |
The following procedure is required for connecting power to a PSU:
Connect the 6000 Series appliance to an earth ground with the following steps:
Ensure a suitably qualified electrician has correctly installed the wiring.
Connect one end of a suitable cable to the chassis ground point.
Connect the other end of the cable to an earth ground. For example, to the rack cabinet in which the 6000 Series appliance is installed.
Connect suitable DC cables to the first PSU with the following steps:
Make sure that the voltage from all DC power source cables is 0V before and during installation. Take precautions so that power cannot accidentally be restored during installation.
Ensure a suitably qualified electrician has correctly installed all power connections.
Connect the 6000 Series DC power connector cable U-type lugs to the power distribution panel:
Fasten the positive (yellow) cable lug to the "+" distribution panel.
Fasten the black (negative) cable lug to the "-" distribution panel.
Connect the DC power cable to the DC terminal port on the PSU.
Repeat the previous 2 steps for a second DC PSU, if it is installed.
The DC distribution panel should now be powered on and then the following checks performed:
Verify that the first PSU's LED is illuminated.
If a second DC PSU is installed, power on the second power distribution.
Verify the second PSU's LED is illuminated.
Verify cOS Core startup.
Restarting the 6000 Series
In order to restart the 6000 Series hardware manually, the On/Off rocker switch should be held in and then released. This will restart the 6000 Series and reinitialize cOS Core so that it boots up again. This process can also be initiated through cOS Core. For example, using the CLI shutdown command. |
Important: Consider power surge protection |
|---|---|
|
It is recommended to consider the purchase and use of a separate surge protection unit from a third party for the power connection to the NetWall 6000 Series hardware. This is to ensure that the appliance is protected from damage by sudden external electrical power surges through the power cable. Surge protection is particularly important in locations where there is a heightened risk of lightning strikes and/or power grid spikes. Any surge protection unit should be installed exactly according to the manufacturer's instructions since correct installation of such units is vital for them to be effective. |