| Home Prev | Next |
This section describes the steps needed for configuring a cOS Core firewall to connect with the NetEye Cloud service.
The user interface used to configure a firewall can be either the WebUI or CLI (command line interface). The WebUI is recommended for simplicity. Both methods are described in this section.
A Summary of cOS Core Setup Steps
The setup that must be performed locally on a cOS Core firewall consists of the following steps:Make sure that cOS Core already has Internet access and that a public DNS server is configured. This is required to resolve the FQDN of the NetEye cloud instance.
Create a new FQDN Address object which contains the FQDN of the NetEye cloud instance. This FQDN comes from the NetEye connection parameters specified in the relevant MyClavister account.
Create a new PSK object which contains the shared secret key to use with the IPsec tunnel. This key also comes from the NetEye parameters in the relevant MyClavister account.
Create a new LAN to LAN VPN object in the cOS Core configuration. This is the IPsec tunnel that will connect to the NetEye cloud instance and transport data between the firewall and NetEye.
Create a new Routing Table. This will be used to route traffic to NetEye.
Add a route to the new routing table which routes all-nets traffic on the IPsec tunnel.
Create a Policy-based Routing Rule that triggers on the target HTTP/HTTPS traffic and uses the new routing table for forward traffic and the original client routing table (usually the main table) for return traffic.
Create an IP policy that allows traffic to flow from the clients into the IPsec tunnel.
After the above steps are completed, the changes should be activated and the configuration saved.
Configuration of cOS Core can be performed using any of the management interfaces. The following sections describe in detail the setup using either the WebUI and CLI.
This section describes how to use the cOS Core WebUI to set up communication with the NetEye Cloud. It is assumed that the HTTP/HTTPS clients are located on the network called lan_net which is connected to the firewall Ethernet interface called lan.
A. Configure an FQDN Address Object for the Tunnel Endpoint
The IPsec tunnel endpoint of the NetEye Cloud instance is specified as an FQDN in the relevant MyClavister account. For example, the FQDN might be 1010.ne.clavister.net. This must be configured in cOS Core as an FQDN Address object. This is done by selecting Objects > Address Book > Add > FQDN Address in the WebUI.Specify the FQDN for NetEye connection using a suitable name. Note that the FQDN used below is just an example and every customer will have a unique FQDN.
B. Configure an IPsec Tunnel
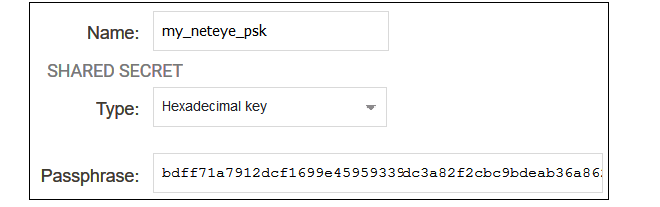
Before configuring the IPsec tunnel itself, a Pre-shared Key object must first be created that contains the pre-shared key value for the tunnel. To create this, select Objects > Key Ring > Add > Pre-Shared Key in the WebUI.The dialog for the pre-shared key can then be filled in, as shown in the example below. The name can be any suitable text. The key type must be set to the value Hexadecimal key. The key value should be copied from the NetEye parameter list in the relevant MyClavister account and pasted into the Passphrase field.
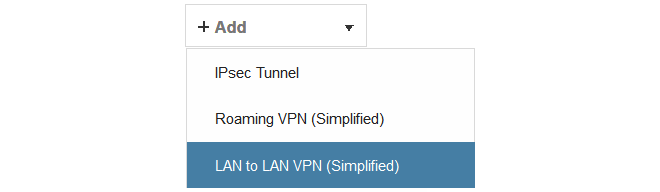
To configure the IPsec tunnel, select Network > Interfaces and VPN > IPsec > Add > LAN to LAN VPN in the WebUi.
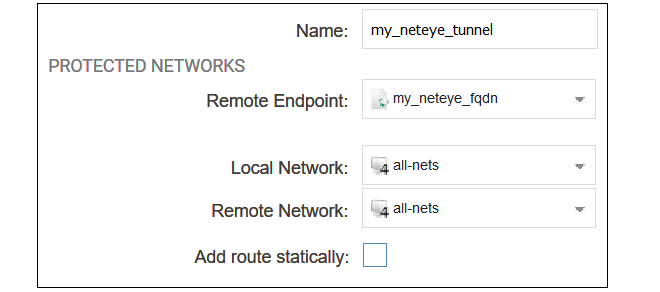
The first part of the dialog for a new tunnel can then be filled in, as shown in the example below.
The following values must be entered:
Name - Any suitable name for the tunnel object.
Remote Endpoint - This is the FQDN address object created earlier which contains the FQDN of the NetEye instance. This will be resolved using DNS to an IPv4 address so the cOS Core must have a DNS server configured.
Local Network - Set this to all-nets.
Remote Network - Set this to all-nets.
Add route statically - This option should be disabled since the route will be added manually.
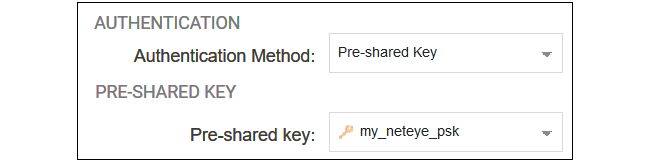
The second part of the dialog specifies the authentication used for the tunnel. The method should be set to Pre-shared Key and the value of the key should be set to the pre-shared key object created previously.
C. Create a New Routing Table
Select Network > Routing > Routing Tables > Add > Routing Table in the WebUI.Give the new table a suitable name and leave the Ordering property at the default value.
D. Add an all-nets Route
Add a route to the new routing table by selecting the table in the WebUI and then selecting Add > Route IPv4.The Network should be set to all-nets and the Interface should be set to the IPsec tunnel name.
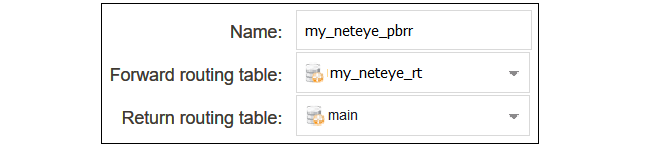
E. Configure a Policy-based Routing Rule
A Policy-based Routing Rule is required so that the target traffic will use the new routing table and the all-nets route it contains for routing. To do this, select Network > Routing > Policy-based Routing Rules > Add > Routing Rule in the WebUI.Enter a suitable name for the routing rule and set the forward routing table to the table created above. The return routing table should be set to the original routing table used to reach clients and this will normally be the main routing table.
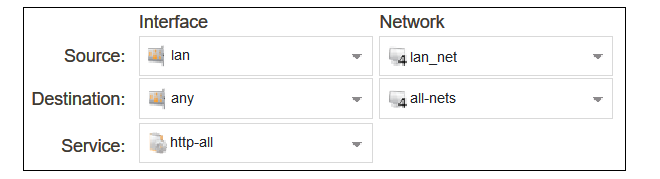
For the routing rule filter, specify a destination of all-nets for the network and any for the interfaces. The source network and interface should be the relevant values for the location of the clients (in this example, lan_net and lan). The service should be set to the targeted traffic, in this case the predefined service object http-all which includes both HTTP and HTTPS using the standard port numbers.
Note that if non-standard HTTP/HTTPS port numbers are used then a custom service object would need to be first created and then used with the routing rule instead of http-all.
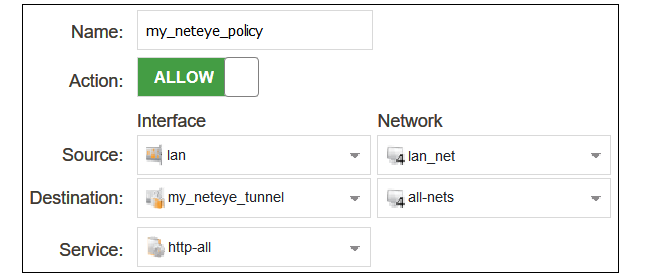
F. Configure an IP Policy
An IP Policy object must be added to allow traffic to flow through the tunnel. Select Policies > Firewalling > Main IP Rules > Add > IP Policy in the WebUI.Enter values into the new IP policy dialog. The destination interface should be the name of the IPsec tunnel object created earlier and the destination network should be set to all-nets. The source network and interface should be the relevant values for the location of the clients.The service can be set to http-all to allow only HTTP and HTTPS traffic.
The source destination and source interface could be made more restrictive if traffic from only certain users is to be allowed into the tunnel. The service can be set to all-services to allow all traffic. Non-HTTP/HTTPS traffic will pass through NetEye without any security processing being applied.
The changed cOS Core configuration can now be activated and committed. It is assumed that an IP policy already exists which will allow non-NetEye client traffic to flow directly to the Internet.