| Home Prev | Next |
High Availability (HA) is a feature in firewalls that allows two nodes to form an HA pair. If one node in the pair should fail then the other node will automatically take over the failed node's functions with minimal disruption to traffic flows. InCenter can be used to manage an HA pair as a single HA Pair object.
The above diagram illustrates an HA pair consisting of two nodes connected together by a sync interface connection and with the pair under InCenter control.
Methods of Adding HA Pairs
One of the following two methods can be used to get an HA pair that is under InCenter control:An existing HA pair can be imported into InCenter.
Two standalone nodes which are not part of an HA pair can be imported into InCenter and an HAPair object can be created with them within InCenter.
These two methods are described in the sections that follow.
This section describes how to create an HAPair object in InCenter from two nodes. There are two possible scenarios which will be covered:
The two nodes are standalone and not already part of an HA pair.
The two nodes are already part of an HA pair outside of InCenter.
In either case, the adding process begins by adding both nodes into InCenter as standalone nodes in the normal way. Assuming that this has been done, the procedures for creating an HAPair object for these nodes are described in the subsections that follow.
The ID Defaults to 1
The ID of an HA pair created in this way always defaults to a value of 1. However, the ID can be set to as specific value by specifying it as a property of the HAPair object at the beginning of the procedure.An Existing HA Pair Can Function During the Import Process
Like importing a standalone node into InCenter, an existing HA pair can continue to function with live traffic during the import process into InCenter. Once an HAPair is created in InCenter, the status of cluster can be found using the status command followed by the HAPair name:admin@InCenter:/> status my-hapair
Similarly, the status of a single member of the cluster can be shown by using the name of the individual node instead of the hapair name. The status command is discussed further with example output in Section 4.6, Viewing Node Status.
Creating an HA Pair from Stand Alone Nodes
This section describes how to create an HAPair object from two standalone nodes using the CLI. Assume that two standalone nodes called my-node1 and my-node2 have already been imported into InCenter. The following steps are used to create a functioning HA pair using these two nodes as the primary and secondary:Create a new HAPair object that includes the two nodes:
admin@InCenter:/> add HAPair
			Name=my-hapair
			NodeType=NetWall
			PrimaryNode=my-node1
			SecondaryNode=my-node2
Note that the NodeType property must be specified. The NodeType would be set to NetShield for NetShield nodes.
For NetWall nodes:
Set the Sync interface on each HA member.
admin@InCenter:/> cc HAMemberNode my-ha-mem1
admin@InCenter:/my-ha-mem1> set HighAvailability SyncIface=if1
admin@InCenter:/my-ha-mem1> cc
admin@InCenter:/> cc HAMemberNode my-ha-mem2
admin@InCenter:/my-ha-mem2> set HighAvailability SyncIface=if1
For NetShield nodes:
Set the Sync interface for the pair.
admin@InCenter:/> cc HAPair my-hapair
admin@InCenter:/my-hapair> set EthernetInterface if2 HAType=Sync
Updated EthernetInterface if2
The shared and private IP addresses of the management interface must be entered. Assume that the management interface is If1 for NetWall and if1 for NetShield, the shared IP address is 10.6.15.88 and the private IPs for each unit are to be 10.6.15.87 and 10.6.15.89. The following are example commands to set these addresses.
For NetWall nodes:
admin@InCenter:/> cc HAPair my-hapair
admin@InCenter:/my-hapair> set IP4Address InterfaceAddresses/If1_ip
			Address=10.6.15.88
Updated IP4Address InterfaceAddresses/If1_ip
admin@InCenter:/my-hapair> add IP4HAAddress
			Name=If1_private_ip
			Address:0=10.6.15.87
			Address:1=10.6.15.89
Added IP4HAAddress If1_private_ip
admin@InCenter:/my-hapair> set Ethernet If1
			IP=InterfaceAddresses/If1_ip
			PrivateIP=If1_privateip
Updated Ethernet If1
For NetShield nodes:
admin@InCenter:/> cc HAPair my-hapair
admin@InCenter:/my-hapair> set IPAddress if1_ip
			Address=10.6.15.88
Updated IPAddress if1_ip
admin@InCenter:/my-hapair> add IPAddress
			Name=private_0
			Address=10.6.15.87
Added IPAddress private_0
admin@InCenter:/my-hapair> add IPAddress
			Name=private_1
			Address=10.6.15.89
Added IPAddress private_1
admin@InCenter:/my-hapair> set EthernetInterface if1
			PrivateIP:0=private_0
			PrivateIP:1=private_1
Updated EthernetAddress if1
An activate and commit command sequence should now be entered to save the changes.
The shared and private IP addresses of the other interfaces (including the Sync interface) can now be set in the same way as in the previous step.
Importing an Existing HA Pair
The following steps should be followed to bring an HA pair under InCenter control using the CLI:Add the firewalls as individual nodes in InCenter. Doing this is described in Section 7.1, Adding Nodes with the CLI for cOS Stream and Section 6.2.3, Adding NetWall Nodes with the CLI for cOS Core. The nodes in the HA pair will be treated as being standalone, even though they are part of a functioning HA pair.
Add the HA pair to InCenter by creating a new HAPair object using the add HAPair CLI command. Assuming that the names of the two nodes already imported are my-node1 (the currently active node in the pair) and my-node2 (the currently passive node in the pair). Then the CLI command would be:
admin@InCenter:/> add HAPair
			Name=my-hapair
			NodeType=NetWall
			PrimaryNode=my-node1
			SecondaryNode=my-node2
			ClusterID=2
Enter activate and commit commands to save the changes.
Viewing HA Pair Status in the CLI
Once an HAPair is created in InCenter, the status of pair can be shown using the status command followed by the HAPair name:admin@InCenter:/> status my-hapair
Similarly, the status of a single member of the pair can be shown by using the name of the individual node
instead of the hapair name. The status command is discussed
further with example output in Section 4.6, Viewing Node Status.
This section describes how to create an HAPair using the WebUI. The same procedure is used, regardless if the nodes are already part of an HA pair or not. The WebUI detects if there is an existing pair and alters the setup steps accordingly.
The steps to add an HAPair object with the WebUI are as follows:
Add the two nodes as standalone nodes into InCenter. Doing this is described in Section 7.2, Adding Nodes with the WebUI. This must be done even if the nodes are already in an existing HA pair.
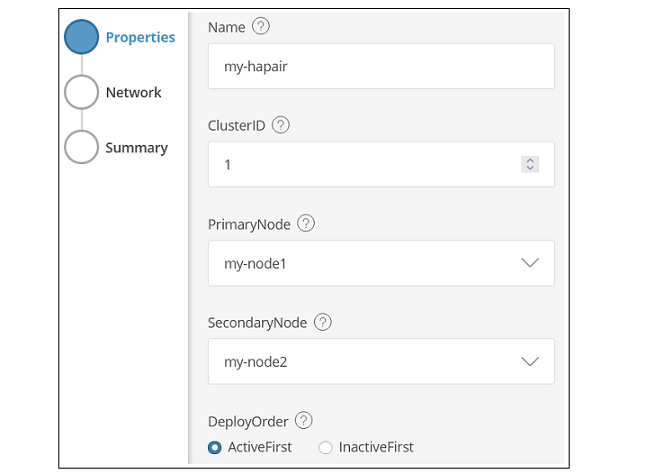
Start the new HA pair wizard by selecting HAPair from the Add menu.
Properties
Specify the nodes that are to be part of the HA pair.
The ID specified will replace the ID of an existing HA pair.
Network
If the nodes are not part of an existing pair then additional information will be required to set up the pair.
If the nodes are already part of an existing pair then this will be indicated by the wizard and the existing network values will be used.
The final step displays a summary of the HA pair that will be created.
When the Done button is pressed, an HAPair object is created with any required import and activation also being performed. Previously standalone nodes will be combined into an HA pair while an existing HA pair will be imported.