| Home Prev | Next |
The EasyAccess server can act as a proxy between a RADIUS client and an NFS server in order to perform MS-CHAPv2 authentication.
The steps for setting up EasyAccess as an MS-CHAPv2 proxy are the following:
A. Deploy the RADIUS Proxy Module
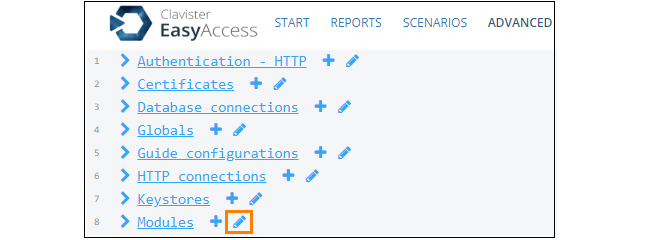
The first step is to add the RADIUS proxy module to EasyAccess. To do this, open the EasyAccess WebUI, select the Advanced tab and then select the Modules option.The following JSON block can now be inserted at any suitable location.
{
"id":"mschap-radius-proxy-module",
"name":"com.phenixidentity~phenix-radius-proxy",
"enabled":"true",
"config":
{
}
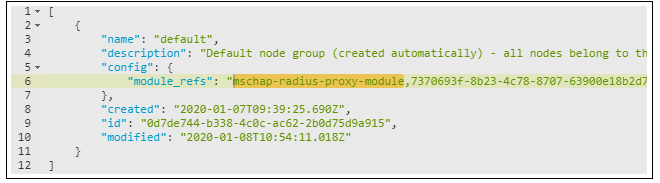
}The above module now needs a reference to it in the default EasyAccess node group. From the Advanced tab menu, select Node_Groups.
Add the value the module id value of mschap-radius-proxy-module to the module_refs list, as shown below.
B. Add the Proxy Connection
The connection to the NFS server providing MS-CHAPv2 authentication will now be defined. From the Advanced tab menu, select RADIUS proxy connections.Now, add the following JSON within the square brackets, substituting in the relevant values for the IP address and port numbers.
{
  "id":"my-mschap-radius-connection",
  "description":"My RADIUS proxy connection",
  "config": {
    "port":"1820",
    "server_host":"192.168.98.165",
    "server_port":"1812"
  }
}
The properties specified in the JSON above have the following meanings:
C. Add the RADIUS Authenticator
From the Advanced tab menu, select Authentication - RADIUS proxy.Now add the following JSON within the square brackets.
{
  "id":"my-auth-radius-proxy",
  "name":"OneTouchAuthenticator",
  "description":"My RADIUS proxy authenticator",
  "config": {
    "radius_proxy_config":"my-mschap-radius-connection",
    "pipeID":"MyUserLookupWithLDAP",
    "selector":""
  }
}
The properties specified in the JSON above have the following meanings:
id - A logical name for this authenticator.
name - The authenticator type. Only OneTouch is supported.
description - A description of this authenticator.
radius_proxy_config - The ID of the connection added in B.
pipeID - The ID of the execution pipe that will be defined in the next step.
selector - This is optional and specifies any selectors to be sent as attributes. For example: 44=onetouch. Selectors are not relevant to NetWall devices since cOS Core does not send them.
D. Add the Execution Pipe for Authentication
From the Advanced tab menu, select Pipes.Now, add the following JSON in any suitable location.
{
  "id": "MyUserLookupWithLDAP",
  "description": "Verify that user exists in LDAP",
  "valves": [
    {
      "name": "LDAPSearchValve",
      "config": {
        "connection_ref": "Your connection LDAP connection REF",
        "base_dn": "dc=Your,dc=domain",
        "scope": "SUB",
        "size_limit": "0",
        "filter_template": "sAMAccountName={{request.username}}"
      }
    },
    {
      "name": "FlowFailValve",
      "config": {
        "message":"User does not exist",
        "exec_if_expr":"flow.items().isEmpty()"
      }
    }
  ]
}
The FlowFailValve could stop execution based on any suitable condition. In the above, execution fails if the user is not found. However, this could also be set up so execution fails if, for example, the user has a specific attribute value.