| Home Prev | Next |
This section describes how to set up EasyAccess to redirect SAML authentication requests when a user is already authenticated for a browser session. This is needed, for example, by the SSO setup described in Section 6.2, SSO Setup and when using the MyApps feature described in Section 6.5, MyApps Setup. It is assumed that a first federation scenario has already been created and redirection is required for that scenario. That first scenario will be referred to in this section as the primary scenario.
The setup steps for redirection are the following:
A. Get the ID of the Primary Scenario's Identity Provider
The id property value of the primary scenario's identity provider will be needed in this setup so this must first be retrieved by opening the advanced editor in the WebUI and selecting the pen next to the SAML 2 Identity providers option.The primary identity provider can now be located and the id property value noted. An example of how the primary identity provider will appear in the editor is shown below.
{
  "id": "f1dab3a5-02a0-43c6-afef-9d8e39323eb3",
  "alias": "",
  "name": "SAML IDP",
  "keystore": "714e6ce2-31ca-49cc-baae-ce134d9ea2ad",
  "entityID": "my-federation-scenario",
  "requireSigned": "false",
  "postSSOURL": "https://example.com/saml/authenticate/samldispatch",
  "created": "2019-11-15T11:20:18.983Z",
  "modified": "2019-11-18T12:48:13.510Z"
}
In addition, the postSSOURL value must be changed to a special URL, as in the above, which has the form:
https://<server-url>/saml/authenticate/<dispatch-alias>
When service providers redirect to this URL, EasyAccess processing will be performed by a special SAML Dispatch authenticator which will be defined later in this section. The <dispatch-alias> in the above URL is the alias name of this authenticator.
B. Set up a New Federation Scenario
Set up a new federation scenario with basic username and password authentication. This will be referred to as the secondary scenario and its purpose is to provide a new authenticator that will only be used when a user is already authenticated. The Entity ID and Post SSO URL values in this new scenario should both be different from the primary scenario.Any key store can be configured in this new scenario since its identity provider will not be used. All SAML metadata is also the same as for the primary scenario so this too needs no further action.
C. Modify the Execution Flow of the Secondary Scenario
The initial valve list for this secondary scenario should be configured like the primary scenario and will include the same AuthnRequestDecoder and the same multiple AssertionProvider valves as the primary. However, there are some differences in the execution flow, which are described next:Remove the InputParameterExistValidatorValve and LDAPBindValve in order to turn off password checking.
Insert a FlowFailValve after the initial LockoutCheckValve so that the flow will fail if the user is not already authenticated. The JSON for the default FlowFailValve is the following:
{
  "name": "FlowFailValve",
  "config": {
    "message":"User does not exist",
    "skip_if_expr":"request.get('authenticatedrequest').equals('true')"
  }
}
For each AssertionProvider, change the targetEntityID property to be the ID value of the primary scenario identity provider, which was obtained in step A. Below is the JSON for an example AssertionProvider.
{
  "name": "AssertionProvider",
  "enabled": "true",
  "config": {
    "targetEntityID": "f1dab3a5-02a0-43c6-afef-9d8e39323eb3",
    "nameIDAttribute": "sAMAccountName",
    "additionalAttributes": "userid,mail,givenName",
    "exec_if_expr": "flow.property('issuer').equals('MyExampleSP')"
  }
},
The resulting execution flow for the secondary scenario should now be the following:
B. Add a SAML Dispatcher
An entry point must be created for all SAML requests. There is a specific EasyAccess authenticator type for this purpose called Dispatch. This type is not part of any scenario so it must be created separately. This object must exist to redirect processing to the correct authenticator depending on if the user is already authenticated or not.To create this, select the Advanced tab and click the pen icon besides the Authentication - HTTP option.
Next, add the following authenticator JSON definition anywhere. The idpID value must be set to the ID of the primary scenario's identity provider, obtained in step A. Note that the alias value (in this example, "samldispatch") needs to be appended to the authenticator's postSSOURL property, and this is also discussed in step A.
{
  "alias": "samldispatch",
  "name": "Dispatch",
  "configuration": {
    "idpID": "f1dab3a5-02a0-43c6-afef-9d8e39323eb3",
    "mapping": [
      {
        "!request.getParameter('authenticatedrequest').equals('true')",
        "authenticator": "1eacbcd4-29d8-4f60-b532-4bc9a91f14c2"
      },
      {
        "request.getParameter('authenticatedrequest').equals('true')",
        "authenticator": "c07e52b9-67e0-481b-948e-6a867962ab2b"
      }
    ]
  }
}
The respective authenticator properties in the above JSON must be set to the ID or alias for the primary scenario authenticator and secondary scenario authenticator. These values can also be found by opening the advanced editor, choosing the Authentication - HTTP option and then finding the authenticator.
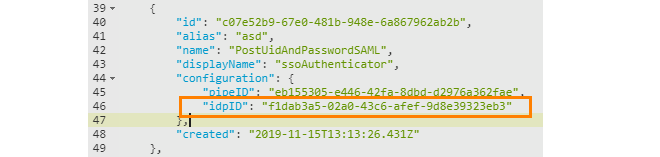
D. Change the idpID Property of the Secondary Scenario Authenticator
The idpID value of the secondary scenario authenticator needs to be the same as the primary scenario authenticator so they point to the same identity provider (the identity provider created with the secondary scenario will not be used).To do this, go to the advanced editor and click the pen icon next to Authentication - HTTP. Search for the secondary scenario's authenticator and change the idpID value to be the primary scenario's identity provider ID (this was obtained in step A). Below, is an example of doing this, with the idpID line highlighted.
Redirection setup is now complete.