| Home Prev | Next |
Overview
Single Root I/O Virtualization (SR-IOV) is a specification that can allow direct access to an external PCI Ethernet interface by cOS Core running under VMware ESXi 5.1 or later. It is only available on Intel based hardware.The direct access provided by SR-IOV can give dramatically higher traffic throughput capability for a virtual Clavister NetWall Firewall since it circumvents the overhead involved with normal virtual interfaces. A disadvantage of using SR-IOV is the static nature of configurations that use it.
![[Important]](images/important.png) |
Important: SR-IOV consumes an entire core |
|---|---|
| When SR-IOV is enabled, cOS Core will consume virtually all the resources of the processor core on which it runs. This is true even if cOS Core has no traffic load. The reason for this is that SR-IOV uses continuous interface polling to check for new traffic. |
SR-IOV Interfaces for cOS Core
By default, cOS Core provides three virtual Ethernet ports with the logical cOS Core names I1, I2 and I3. The setup procedure described in this section adds hardware PCI Ethernet ports as additional interfaces with logical cOS Core names I4, I5 and so on.Once the setup is complete, only traffic routed through these additional ports will benefit from the throughput increases provided by SR-IOV.
Prerequisites for SR-IOV
In order to make use of SR-IOV with cOS Core under VMware ESXi, the following is required:Set up of the hardware platform for virtualization is not discussed further here. For details on this subject refer to the Intel document entitled: Using Intel Ethernet and the PCI-SIG Single Root I/O Virtualization (SR-IOV) and Sharing Specification on Red Hat Enterprise Linux .
Adding SR-IOV Interfaces
The following are the steps for SR-IOV interface setup with cOS Core:


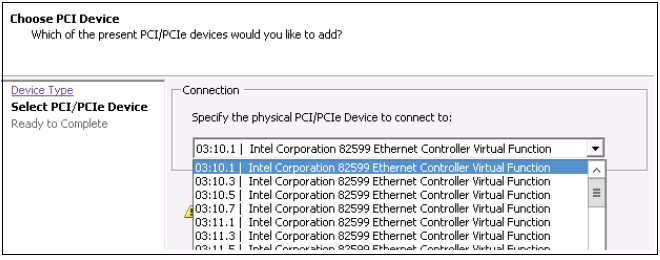
Device:/> pciscan -cfgupdateDevice:/>activateDevice:/>commit
![[Note]](images/note.png) |
Note: Do not preassign the SR-IOV MAC address |
|---|---|
| For any usage of SR-IOV interfaces with cOS Core, the MAC address should not be preassigned by the hypervisor so that it is fixed. This will prevent cOS Core from controlling the MAC address which can be needed in certain circumstances. |
Achieving Maximum Throughput
Once the SR-IOV interfaces exist as logical interfaces in cOS Core they can used for both receiving and sending in traffic as well as being part of rule sets and other cOS Core objects.On order to reach much higher throughput speeds, traffic must both enter and leave the firewall via SR-IOV interfaces. Having the traffic enter or leave on a normal interface will create a bottleneck, reducing throughput back to non-SR-IOV speeds.
Features Not Supported by SR-IOV Interfaces
The following cOS Core features are not supported by SR-IOV interfaces: