| Home Prev | Next |
The cOS Core installation package for Hyper-V can be downloaded by logging into the relevant MyClavister account. Packages contain a predefined cOS Core virtual machine image file which is imported into VMware to create the virtual firewall. The Hyper-V packages available for download are:
The 32 bit version should be used only if resource usage must be kept to a minimum. Otherwise, the 64 bit version is recommended, particularly where maximum performance is required. Some cOS Core features may also not be available in the 32 bit version.
The choice of virtual machine image is discussed further in an article in the Clavister Knowledge Base at the following link:
https://kb.clavister.com/336143546
Memory Requirements
All cOS Core image files for virtual environments have a predefined memory allocation. This is the minimum amount of memory required for cOS Core to run and it should never be reduced. This default allocation may need to be increased depending on the cOS Core license purchased and the number of connections/tunnels that will be open simultaneously. The minimum memory recommended memory allocation is:The highest possible memory allocation for cOS Core is:
Any available memory above these limits will not be used by cOS Core.
If the allocated memory is insufficient during operation, cOS Core will output console messages indicating this while trying to reduce the number of open connections/tunnels. Eventually, cOS Core will enter safe mode where only management access is possible.
Requirements for AI Use
To use the AI functionality in cOS Core (version 15.00 and up), the license must include support for AI. The standard license does not allow administrators to configure AI functionality by default. In addition, there are requirements for platform and CPU:32 bit x86 : Not supported
64 bit x86: Minimum number of cores: 4
Alternative Methods for Virtual Machine Creation
Virtual machine creation for Hyper-V can be done in one of the following ways:Using Microsoft Hyper-V Manager. This is described in Section 3.1, Using Hyper-V Manager.
Using Microsoft Power Shell using a script. This is described in Section 3.2, Using PowerShell.
Common Setup Steps
Both the above methods follow the same common steps:Set up at least one vSwitch. More can be configured if required.
Configure the cOS Core virtual machine.
Connect at least one network adapter. The Legacy Network Adapter is not supported.
If required, enable MAC address spoofing (this is required for VLAN filtering).
If VLAN filtering is required, follow the additional steps described in Section 3.3, Using VLANs.
Power on the cOS Core virtual machine.
Configure cOS Core.
![[Important]](images/important.png) |
Important: Enable MAC address spoofing with an HA cluster |
|---|---|
|
For a virtual firewall to function correctly as part of a cOS Core High Availability (HA) cluster, the Hyper-V network adapter option Enable MAC address spoofing must be enabled for both the virtual machines that make up the cluster. This allows the shared MAC address required by cOS Core HA to function. By default, Hyper-V will not allow the generation of network traffic with a MAC address other than the address that it has assigned to network adapters. |
This section describes using Hype-V Manager to create a cOS Core virtual machine.
The steps are as follows:
Create at least one vSwitch
Select Action > Virtual Switch Manager. Under Create Virtual Switch, select the vSwitch type and press Create virtual switch.
Configure the cOS Core virtual machine
To create a virtual machine, go to Action > New > Virtual Machine. The new virtual machine wizard will start and the following should be entered:
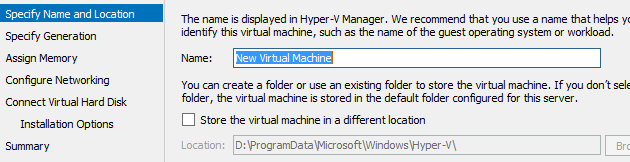
Click Next in the first wizard step to create a custom configuration.

Enter a name for the virtual machine and select the location of the cOS Core VHD file if different from the default.
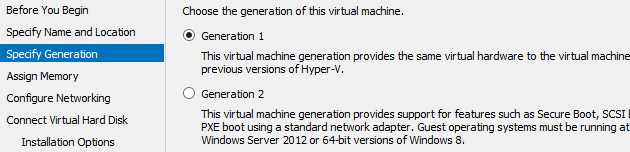
Select Generation 1 because the file will be VHD.
Set the Startup Memory to be between 512 and 4096 MBytes depending on the expected system load. Dynamic allocation should not be enabled.

For Networking, select a previously configured vSwitch.

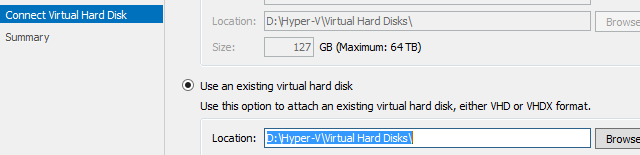
Under Virtual Hard Disk, press Use an existing hard disk and browse to the cOS Core VHD file.
Check that a single CPU is assigned
Assign a single CPU to the virtual machine:
Select Processor and check that the Number of virtual processors is set to 1.

Connect a network adapter
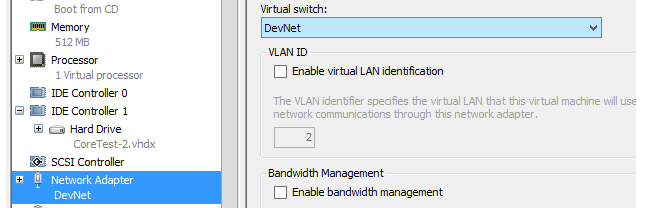
Connect at least one network adapter by going to Settings > Hardware > Add Hardware and selecting the network type.
Always choose Network Adapter as the type.

Also choose a previously defined vSwitch to associate with this adapter.
Note that the Legacy Network Adapter is not supported. SR-IOV is also not supported.
Enable MAC address spoofing if required
If required, select Advanced Settings then select Enable MAC address spoofing and Apply. VLAN filtering will require spoofing to be enabled. Further details about setting up VLAN filtering can be found in Section 3.3, Using VLANs.
Power on the virtual machine
Select the created virtual machine from the list and choose Action > Start.
Configure cOS Core
Go to Chapter 5, Configuring cOS Core for details on how to connect to and configure cOS Core.