| Home Prev | Next |
Replacing W50 Modules
The W50 device allows the on-site replacement of both the fan and the power supply modules. Performing these replacements is discussed in the following sections.The W50 can be fitted with dual hot-swappable Power Supply Units (PSUs), both of which are capable of supplying power to the W50. The W50 can operate correctly with only one PSU but that configuration provides no redundancy.
As standard, the W50 is delivered with only a single PSU fitted and the second PSU slot is occupied by a dummy slot filler. The second PSU should be ordered as a separate spare part. A second PSU is fitted into the second PSU slot after taking out the dummy slot filler. Each PSU module is secured by a lock which is internal to the PSU and the lock is opened with a black locking switch on the PSU. There is also a silver metal hinged retaining cage on each PSU which is used for preventing the power cable from slipping out.
With two PSUs installed, only one of the PSUs is active and supplying power. If the active PSU fails then the other PSU will become active with no disruption to traffic throughput. The failed PSU can then be replaced with a new PSU and this can be done while the W50 is powered up.
Symptoms of PSU Failure
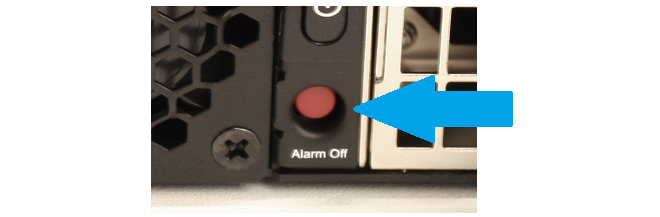
If two PSUs are fitted to provide redundancy and there is a single PSU failure, an audible alarm will be heard coming from the appliance. This alarm can be switched off by pressing the red button located to the left of the PSUs and marked Alarm Off. This button is indicated on the image shown below.
In normal operation there is a green LED light that is illuminated on the back of each PSU. This LED will not be illuminated if its PSU has failed. The LED position is indicated on the image shown below.

Monitoring PSU Status with cOS Core Hardware Monitoring
The current PSU status and therefore failure can be detected by using the cOS Core Hardware Monitoring feature and this is fully described in the separate cOS Core Administration Guide. This feature can confirm for the administrator that a PSU has failed and which PSU it is.Steps for Swapping a PSU (AC Power)
To swap a PSU, use the following steps:If the metal retaining cage is covering the PSU's power supply cord connector, push this upwards and fully back.
Remove the power supply cord from the PSU.
Push the PSU's locking lever to one side and pull the PSU out.
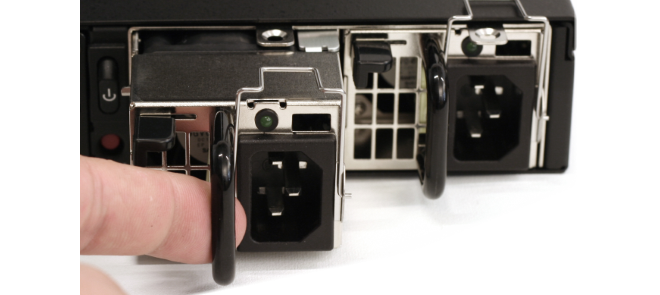
Insert the new PSU, making sure that it is locked securely in place.
Reinsert the power cord into the new PSU and apply power. The green status LED on the PSU should illuminate and cOS Core hardware monitoring should also indicate the presence and positive status of the new PSU.
Move the PSU's hinged metal retaining cage back so that it covers the cable connector to prevent it slipping out.
![[Note]](images/note.png) |
Note: Having a spare PSU available on-site |
|---|---|
|
Having a spare PSU on-site and available will mean no delay if a replacement is required. These can be ordered from your Clavister sales representative. |