Table of Contents
![[Note]](images/note.png) |
Note: This document is also available in other formats |
|---|---|
|
A PDF version of this document along with all current and older documentation in PDF format can be found at https://my.clavister.com. It is also available in a framed HTML version. |
This guide covers replacement of Clavister NetWall hardware in a number of different scenarios. Replacement is usually required as a result of a hardware failure or because of a need to upgrade hardware capabilities.
The aim of the procedures described is to have the cOS Core version as well as the cOS Core configuration from the old hardware unit replicated on the replacement unit.
Cold Standby or Manual Replacement
Clavister offers a Cold Standby Replacement service where Clavister can send an identical hardware unit to replace an existing standalone unit that has failed (this is not applicable to cluster hardware. This service is described in Chapter 2, Cold Standby Service.The other chapters in this guide describe the manual replacement procedure when not using the cold standby service.
Relevant Software Versions
The procedures described in the document are applicable for 9.nn versions of CorePlus or 10.nn versions of cOS Core or later. They are not applicable to Clavister software earlier than CorePlus 9.nn.In its descriptions, this document will only refer to cOS Core but the same procedures can be applied to CorePlus.
Replacement Hardware Assumptions
It is assumed that the replacement hardware is a unit that has the original "factory default" settings. This may be brand new hardware from the factory but it might also be older hardware that has been manually reset to its factory defaults. In either case, it is important that the hardware is capable of running the required cOS Core version.Mapping Old Interface Names to New Interfaces Names
If the new hardware is different from the old hardware it replaces, there are two conditions that can occur:- The interface names of the new hardware differ from the names in the old hardware.
- The new hardware can have a lesser or greater number of interfaces than the old.
There are two ways to map the interfaces in the old configuration to the interfaces in the new configuration:
-
Use the Hardware Migration Wizard Tool
The Hardware Migration Wizard is downloadable from the https://my.clavister.com website as a separate, standalone software tool. It is applicable to all Clavister hardware models and helps to automate the process of mapping old to new interfaces. It is fully described in Appendix A, Wizard Interface Mapping.
The wizard works by taking a backup of the old configuration as input and creating a new backup file as output with the desired interface mapping between old and new hardware. Using the wizard is the recommended method of mapping interfaces.
Note: The wizard is also integrated into InControl The wizard is also integrated into InControl so that interface reassignment can be done while setting up a replacement firewall in InControl. This is discussed further in the Dissimilar Hardware Replacement chapter of the separate InControl Administration Guide.
-
Reassign Interfaces Manually
As an alternative to the wizard, the mapping of interfaces can be done manually after uploading a configuration backup from the old system to the new hardware but before activating it. This is described in Appendix B, Manually Mapping Interfaces.
Standalone and Cluster Replacement
There are two other important types of replacement scenario covered:-
Replacement of a Clavister hardware unit that is "standalone" which means it is a single hardware unit that is not part of a cOS Core high availability (HA) cluster. The replacement hardware may also have a different number of interfaces with different logical names.
-
Replacement of one of the two identical hardware units in a cOS Core high availability cluster with another identical hardware unit.
Attempts at replacement of one cluster node with hardware that is not identical is never recommended as it presents complex technical and operational issues when two hardware models are mixed. If different replacement hardware must be used, it is recommended to change both cluster units to the same, new hardware model.
Replacement Using the InControl Zero Touch Feature
The Zero Touch feature in the Clavister InControl product provides a simple way to replace hardware with an identical model, providing that the old hardware was already under InControl management. The feature can automatically install the correct license, cOS Core version and old cOS Core configuration in the replacement unit. However, only certain hardware models can make use of this feature. This topic is discussed further in the Zero Touch chapter of the separate InControl Administration Guide.Replacing Non-Clavister Hardware
Although this publication has been written on the assumption that a Clavister hardware product is being replaced, the procedures described could be adapted to situations where a non-Clavister hardware platform that is running cOS Core needs to be replaced.Common Steps in All Replacement Procedures
There are a number of key steps which are common to all manual replacement procedures (where InControl is not used). The following list summarizes these:-
The old hardware unit must be physically swapped out and the new hardware powered on.
-
The new hardware's default management interface IP and network should be changed if this is required. (Described in Appendix C, Management Interface Setup).
-
The cOS Core version running on the new unit may have to be changed if required. This is best done by uploading a full system backup (not just a configuration backup) taken from the old hardware if one is available.
-
The configuration backup from the old hardware is uploaded to the new hardware.
If the new hardware model differs from the old hardware and has different interface names then a mapping of the old to the new names will need to be done in one of two ways:
-
The Hardware Migration Wizard is first used to convert the configuration backup from the old hardware to a new backup file before uploading to the new hardware. Interface reassignment is performed in the wizard. (Described in Appendix A, Wizard Interface Mapping).
-
Or the configuration backup from the old hardware is first uploaded to the new hardware. Any interface reassignment is then done manually using CLI commands before the uploaded configuration is activated. (Described in Appendix B, Manually Mapping Interfaces).
-
-
Lastly, a new license needs to be installed on the new hardware.
Determining the Service Tag and Serial Number Through InControl
Sometimes the Service Tag and Serial Number for a hardware appliance are needed for the replacement procedure. Normally, these are found written on the unit.However, sometimes these details are required for a remote unit that is not easily accessible. Provided the hardware in question is under centralized control by the Clavister InControl management software, this information can be found in the tooltip window that is displayed when mousing over the firewall in InControl's Firewalls tab. Below is a screenshot showing an example of this.

Before discussing the detailed procedures for replacing hardware, it is important to be aware of the option of the Clavister Cold Standby (CSB) Service.
If the CSB service is not applicable to the hardware replacement being undertaken then this chapter can be skipped and the relevant selection from the succeeding chapters should be referenced instead.
CSB Service Overview
To ensure the rapid replacement of faulty hardware, the Clavister customer can take advantage of the Cold Standby Service. This allows the purchase of an identical piece of Clavister hardware at a discounted price which is then kept on-site to quickly replace a faulty unit and also provides a simple procedure to transfer the cOS Core license of the faulty unit to the replacement.Before a CSB replacement unit is powered-up for the first time, the user must log into the Clavister website and inform the Clavister system that the CSB unit will be used by entering the CSB Service Tag. This makes the license on the CSB unit valid so that it can run as a replacement when it is started and with the same license constraints as before.
The faulty unit is then sent back to Clavister and a new CSB unit is sent back in its place. The original faulty unit is not returned.
|
Note: A support agreement is required for the CSB service |
|---|---|
|
The CSB service is only available to customers that have a current Clavister support agreement. Not all support agreements provide the CSB option and the Clavister website should be consulted for details about the agreements available. License transfer from the faulty unit to the CSB unit is not possible without the appropriate support agreement being in place. |
Cold Standby Replacement Steps
In summary, the replacement steps with a CSB unit are the following:-
Assuming that a CSB unit is available on-site and the original unit has failed, log into the relevant MyClavister account at:
Note that if the old unit being replaced is still functioning enough to communicate with the Clavister license server then it may still perform its periodic license check and mistakenly download the license for the unit that will replace it. That new license will not be valid so the old unit will enter lockdown and any remaining traffic filtering capability will be impaired.
For this reason, it is usually best to also disconnect the old hardware at this point.
-
Go to the Help Desk section of MyClavister and choose the Cold Standby Swap option to bring up the page for entering details about the swap.
-
Select the correct Product and License values for the faulty unit.
-
Enter the Cold Standby Service tag. This can be found on the replacement CSB unit. A summary of the proposed swap will be displayed.
-
Press the Perform Cold Standby Swap button to confirm the swap.
-
At this point, the replacement CSB unit can now be physically connected and switched on.
-
Restore a previous system backup to the CSB unit and install the newly generated license which is available from the MyClavister account on the Clavister website. This is described further in Chapter 3, Standalone & Identical.
For certain hardware models the process can be simplified using InControl, providing that the old hardware was under InControl management. This is also discussed in Chapter 3, Standalone & Identical.
-
Send back the faulty unit following standard RMA guidelines. These can be found in the Warranty section of the relevant Getting Started Guide for the hardware model.
-
As soon as the faulty unit is received, Clavister will send back a new CSB unit which can then be stored as a new standby.
Further Notes on the CSB Service and CSB Usage
Note the following about the CSB service and the usage of CSB hardware units:-
The CSB service is only available if the customer has a current support agreement.
-
CSB hardware is usually an exact match for the hardware unit it is intended to replace. If a new CSB unit has to be supplied and the hardware type has become end-of-life, Clavister will provide the closest possible match from its current hardware products.
-
A CSB unit cannot be used as the slave node in an HA cluster.
-
One CSB unit could be kept as a replacement for any one of a number of identical hardware units that the customer has. In other words, it need not be a replacement for just one specific piece of hardware. The only requirement is that the model type of the CSB unit should be the same (or very similar for discontinued models) as the unit it is replacing.
-
A CSB unit is not intended to used as a normal functioning firewall until it is needed as a replacement for a faulty unit.
However, an on-site CSB unit could be used as a normal, non-replacement unit (for example, if there was an urgent need for an extra firewall) provided that an upgrade to a non-CSB unit is purchased first. A Clavister sales office should be contacted to request this change of purpose.
The CSB process is also discussed in a Clavister Knowledge Base article at the following link:
https://kb.clavister.com/332435773
Note that this Knowledge Base article also provides a link to an explanatory video for the cold standby swapping process.
This chapter looks at the case where a single standalone hardware unit is to be replaced with another, identical unit. In this case, there is no need to perform any reassignment of the interfaces.
![[Caution]](images/caution.png) |
Caution: The E80B is not an identical replacement for the E80A |
|---|---|
|
When replacing an older E80A unit with a newer E80B unit, the interface names are different so this should not be treated as replacement with an identical unit. Instead, this should be regarded as replacement with dissimilar hardware. Performing E80A replacement is discussed further in a Clavister Knowledge Base (KB) article which can be found at the external link: https://kb.clavister.com/324739069 |
![[Important]](images/important.png) |
Important: Reassign a cold standby license before start up |
|---|---|
|
If the replacement hardware is a Clavister Cold Standby (CSB) unit then the license reassignment must be performed by logging in to the Clavister website before powering up the CSB unit for the first time. Doing this is described further in Chapter 2, Cold Standby Service. |
There are two methods for replacing identical hardware:
-
Using InControl
For certain Clavister hardware models, the Zero Touch feature in the Clavister InControl product provides a simple way to replace hardware with an identical model. This assumes that the old hardware was already under InControl management.
The feature can automatically install the correct license, cOS Core version and old cOS Core configuration in the replacement unit. This topic is discussed further in the Zero Touch chapter of the separate InControl Administration Guide, where a list of the supported hardware models can also be found.
-
Manually, without InControl
This method uses the manual administration techniques common to other types of replacement. The rest of this section will describe this method in detail.
Manual Replacement Without Using InControl
With manual replacement, all that is required is to is to take the configuration backup from the old hardware and upload it to the new hardware. The full procedure is as follows:-
Attach the cables to the new hardware unit in exactly the same way they were attached to the old.
-
Apply power to the new unit so that cOS Core starts.
-
The new hardware unit will have the default IP address on its default management Ethernet interface. If required, change this to the address used by the old unit. This is described in:
-
As described in the Getting Started Guide for the hardware model, attach an external computer to the new unit's default management Ethernet interface over a network.
-
Using a web browser on the external computer, log on to the new unit via the cOS Core Web Interface. The default username and password is always admin and admin.
-
If there is a backup of the configuration from the old hardware available, upload it by selecting the Web Interface menu option:
Maintenance > Backup
If no backup is available, skip the remaining steps.
-
Finally, activate and commit the configuration by selecting the Web Interface menu option:
Configuration > Save
-
The MAC addresses of the Ethernet interfaces on the new hardware will be different from the old unit so the cOS Core license from the old hardware will no longer be valid. A new license from the Clavister must be installed. This can be done in one of the following ways:
-
Automatically through the Web Interface by going to Status > Maintenance > License.
-
Automatically through the CLI with the command:
Device:/>license -activate -request -username=myname -password=pswd -
Manually by first downloading a new license from the Clavister website then uploading it either through the Web Interface or with SCP. This will require the information written on the label attached to the hardware. With some older Clavister hardware models, this is the only option.
Note that for hardware released from the 4th quarter of 2021 (for example, the 100, 500 and 6000 Series) licenses will be a subscription based Security as a Service (SECaaS) licenses. Installation of a SECaaS license requires that cOS Core is configured with both Internet access and a public DNS server.
-
If No Backup is Available
If no backup is available, the default cOS Core configuration must be manually configured until it matches the configuration of the old hardware unit. This must be done object by object, and rule by rule.This is time consuming and emphasizes the importance of regular configuration backups. It is also recommended to take at least one full system backup once a Clavister NetWall Firewall becomes live. This makes it easier to restore the original cOS Core version on new hardware that may have a different default version.
This chapter looks at the case where a single standalone hardware unit is to be replaced with another non-identical unit that has more Ethernet interfaces than the original unit.
The replacement procedure is as follows:
-
Attach the cables to the new hardware unit in the same way they were attached to the old, leaving the extra interfaces unused for the time being.
-
Apply power to the new unit so that cOS Core starts.
-
The new hardware unit will have the default IP address on its default management Ethernet interface. If required, change this to the address used by the old unit. This is described in:
-
As described in the Getting Started Guide for the hardware model, attach an external computer to the new unit's default management Ethernet interface over a network.
-
Using a web browser on the external computer, log on to the new unit via the cOS Core Web Interface. The default username and password is always admin and admin.
-
If there is a backup of the configuration from the old hardware available, the interfaces of the old hardware configuration can be mapped to the interfaces of the new hardware by using the Hardware Replacement Wizard. This is described in:
Appendix A, Wizard Interface Mapping
The converted backup file created by the wizard can then be uploaded to the new hardware by selecting the Web Interface menu option:
Maintenance > Backup
If interface mapping is to be done manually instead of using the wizard, the original backup should be uploaded to the new hardware. Before activating the configuration, follow the procedure described in Appendix B, Manually Mapping Interfaces.
If no configuration backup from the old hardware is available, the remaining steps should be skipped.
-
Finally, activate and commit the configuration by selecting the Web Interface menu option:
Configuration > Save
-
The MAC addresses of the Ethernet interfaces on the new hardware will be different from the old unit so the cOS Core license from the old hardware will no longer be valid. A new license from the Clavister must be installed. This can be done in one of the following ways:
-
Automatically through the Web Interface by going to Status > Maintenance > License.
-
Automatically through the CLI with the command:
Device:/>license -activate -request -username=myname -password=pswd -
Manually by first downloading a new license from the Clavister website then uploading it either through the Web Interface or with SCP. This will require the information written on the label attached to the hardware. With some older Clavister hardware models, this is the only option.
Note that for hardware released from the 4th quarter of 2021 (for example, the 100, 500 and 6000 Series) licenses will be a subscription based Security as a Service (SECaaS) licenses. Installation of a SECaaS license requires that cOS Core is configured with both Internet access and a public DNS server.
-
If No Backup is Available
If no backup is available, the default cOS Core configuration must be manually configured until it matches the configuration of the old hardware unit. This must be done object by object, and rule by rule.This is time consuming and emphasizes the importance of regular configuration backups. It is also recommended to take at least one full system backup once a Clavister NetWall Firewall becomes live. This makes it easier to restore the original cOS Core version on new hardware that may have a different default version.
This chapter looks at the case where a single standalone hardware unit is to be replaced with another non-identical unit that has fewer Ethernet interfaces than the original unit.
The replacement procedure is as follows:
-
Attach the cables to the new hardware unit in exactly the same way they were attached to the old except for the interfaces that no longer exist.
-
Apply power to the new unit so that cOS Core starts.
-
The new hardware unit will have the default IP address on its default management Ethernet interface. If required, change this to the address used by the old unit. This is described in:
-
As described in the Getting Started Guide for the hardware model, attach an external computer to the new unit's default management Ethernet interface over a network.
-
Using a web browser on the external computer, log on to the new unit via the cOS Core Web Interface. The default username and password is always admin and admin.
-
If there is a backup of the configuration from the old hardware available, the interfaces of the old hardware configuration can be mapped to the interfaces of the new hardware by using the Hardware Replacement Wizard. This is described in:
Appendix A, Wizard Interface Mapping
The converted backup file created by the wizard can then be uploaded to the new hardware by selecting the Web Interface menu option:
Maintenance > Backup
If interface mapping is to be done manually instead of using the wizard, the original backup should be uploaded to the new hardware. Before activating the configuration, follow the procedure described in Appendix B, Manually Mapping Interfaces.
If no configuration backup from the old hardware is available, the remaining steps should be skipped.
|
Important: The wizard leaves unmapped interface references |
|---|---|
|
If the wizard was used to map old to new interface names, it removes the interfaces that are extra and not mapped. However, it does not remove any references to these interfaces in the new configuration's objects and rules. The references to the removed interfaces will cause errors when trying to save and activate the configuration and they must be removed or changed manually before continuing. |
-
Finally, activate and commit the configuration by selecting the Web Interface menu option:
Configuration > Save
-
The MAC addresses of the Ethernet interfaces on the new hardware will be different from the old unit so the cOS Core license from the old hardware will no longer be valid. A new license from the Clavister must be installed. This can be done in one of the following ways:
-
Automatically through the Web Interface by going to Status > Maintenance > License.
-
Automatically through the CLI with the command:
Device:/>license -activate -request -username=myname -password=pswd -
Manually by first downloading a new license from the Clavister website then uploading it either through the Web Interface or with SCP. This will require the information written on the label attached to the hardware. With some older Clavister hardware models, this is the only option.
Note that for hardware released from the 4th quarter of 2021 (for example, the 100, 500 and 6000 Series) licenses will be a subscription based Security as a Service (SECaaS) licenses. Installation of a SECaaS license requires that cOS Core is configured with both Internet access and a public DNS server.
-
If No Backup is Available
If no backup is available, the default cOS Core configuration must be manually configured until it matches the configuration of the old hardware unit. This must be done object by object, and rule by rule.This is time consuming and emphasizes the importance of regular configuration backups. It is also recommended to take at least one full system backup once a Clavister NetWall Firewall becomes live. This makes it easier to restore the original cOS Core version on new hardware that may have a different default version.
Configuration references to interfaces that are not reassigned must be manually changed to refer to interfaces that have been reassigned.
This chapter looks at the case where one of the peers in a High Availability (HA) cluster needs to be replaced with another, identical hardware unit. No reassignment of the interfaces is required.
It is assumed that one of the hardware units in the cluster is still functioning correctly and that unit will be referred to as FW1. The hardware unit that is being removed from the cluster will be referred to as FW2_Old and the new, replacement unit will be referred to as FW2_New.
The replacement procedure is as follows:
-
Using the Web Interface, login to FW1.
-
Select the menu option Maintenance > Backup and download a configuration backup to the local management workstation disk.
-
Assuming that FW2_Old has been disconnected and removed, reconnect FW2_New to the same cables in the same way.
-
Apply power to FW2_New and wait for cOS Core to start.
-
The new unit FW2_New will have the default IP address on its default management Ethernet interface. If required, change this to the address used in SWG_Old. This is described in:
-
Login to FW2_New using the Web Interface. The default username and password is always admin and admin.
-
On the first page of the Web Interface check the version of cOS Core that is running. Verify that this is the same version that is running on FW1.
If the cOS Core versions are different, they must be made the same. This is done by downloading the correct upgrade package from the Clavister website and applying it by selecting the Web Interface menu option Maintenance > Upgrade.
Do not try to upload a full system backup (configuration plus cOS Core) to dissimilar hardware. This will cause the configuration to be automatically activated and the hardware restarted, with the possibility that cOS Core becomes unreachable.
-
In the Web Interface for FW2_New, select the menu option Maintenance > Backup and select the Restore option. Upload the configuration backup created previously from FW1.
Note: DO NOT ACTIVATE THIS CONFIGURATION YET.
-
Since the uploaded configuration is a mirror of FW1, its status of master or slave must be reversed so that FW2_New becomes correspondingly either slave or master.
This is done in the Web Interface by selecting the navigation tree option System > High Availability and changing the setting Node Type.
-
At this point the FW2_New can be activated and committed. In the Web Interface this is done by selecting the menu option Configuration > Save.
-
Since the configuration from FW1 has been uploaded to FW2_New, the device name for both will now be the same. This must be changed for FW2_New using the CLI. For example, if the correct device name should be cluster_slave, the CLI command would be:
Device:/>set Device Name=cluster_slave -
The MAC addresses of the Ethernet interfaces on the new hardware will be different from the old unit so the cOS Core license from the old hardware will no longer be valid. A new license from the Clavister must be installed. This can be done in one of the following ways:
-
Automatically through the Web Interface by going to Status > Maintenance > License.
-
Automatically through the CLI with the command:
Device:/>license -activate -request -username=myname -password=pswd -
Manually by first downloading a new license from the Clavister website then uploading it either through the Web Interface or with SCP. This will require the information written on the label attached to the hardware. With some older Clavister hardware models, this is the only option.
Note that for hardware released from the 4th quarter of 2021 (for example, the 100, 500 and 6000 Series) licenses will be a subscription based Security as a Service (SECaaS) licenses. Installation of a SECaaS license requires that cOS Core is configured with both Internet access and a public DNS server.
-
Connectivity checks should now be made to confirm that the cluster is functioning correctly.
Cluster Replacement with Non-identical Hardware
It is recommended to never try to replace a peer in a high availability cluster with hardware that is not the same as the other peer.Although such replacement could be done in extreme circumstances, there are many technical problems involved in configuring the replacement hardware plus complex operational issues. For this reason, such replacement is not discussed further in this document.
The Hardware Migration Wizard is a separate, standalone software tool that can run on a Windows based computer which facilitates the conversion of a cOS Core configuration from one hardware product to another.
The wizard can also be used when moving a cOS Core configuration from a virtual environment to a Clavister hardware product. However, it cannot be used to move a configuration from a hardware product to a virtual environment.
The wizard is also discussed in a Clavister Knowledge Base article at the following link:
https://kb.clavister.com/324735782
The wizard can be downloaded by logging into the relevant account at https://my.clavister.com and going to Downloads > Tools & Utilities.
![[Tip]](images/tip.png) |
Tip: The wizard is also integrated into InControl |
|---|---|
|
The wizard is integrated into InControl so that interface reassignment can also be done while setting up a replacement firewall in InControl. This is discussed further in the Dissimilar Hardware Replacement chapter of the separate InControl Administration Guide. |
The wizard does not require access to the new firewall while running since its only purpose is to convert a configuration backup file from the old hardware to a backup file for the new hardware.
|
Note: The wizard is only for replacement with different hardware |
|---|---|
|
The wizard is not used when the old and new hardware models are identical. In such cases, the original configuration from the old hardware requires no conversion and can be uploaded as is. Use the wizard only when the new hardware is different from the old hardware and interface reassignment is required. |
The executable file for the wizard has the name: HardwareMigrationWizard_vn.m.exe where n.m indicates the version number of the tool.
The wizard is used as part of a three stage process:
-
Stage A. Take a backup file of the old hardware's configuration.
-
Stage B. Process this backup file with the wizard.
-
Stage C. Upload the new backup file created by the wizard to the new hardware.
If the backup file of Stage A is not available, the wizard cannot be used and the configuration must be manually recontructed, piece by piece, on the new hardware.
Providing a backup file is available, Stage B, running the wizard is possible. This is described next.
Initial Step: Wizard Startup
When the wizard is started, some introductory text is displayed.

Wizard Step 1. Select a backup file for conversion
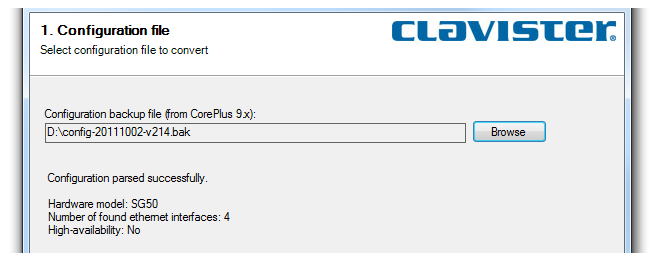
A configuration backup file from the old hardware is selected. This file is parsed by the wizard and a summary of its contents is shown.
Wizard Step 2. Select the target hardware model
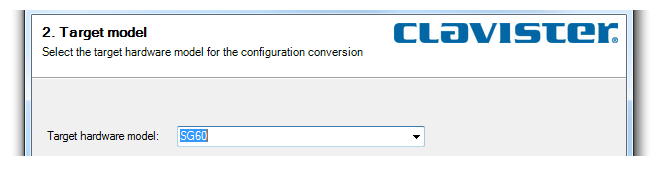
A simple drop-down box presents all the possible target hardware models that the wizard can convert the configuration to. One should be selected.
Wizard Step 3. Map the interfaces
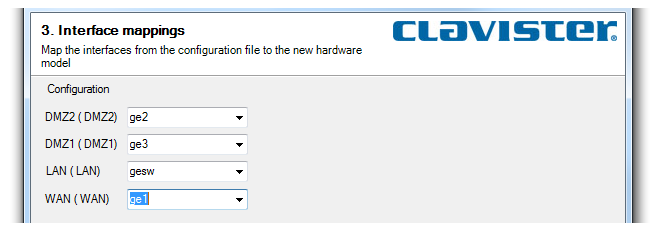
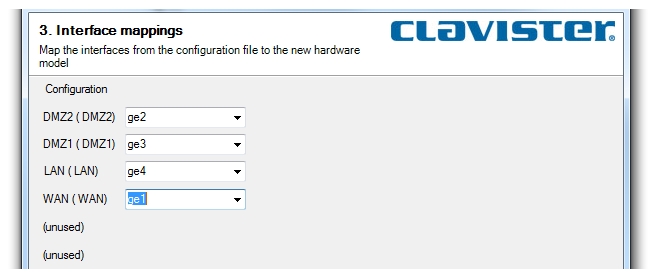
The wizard presents a list of the original interface names for the old hardware on the left side and a drop-down box to select the new interface name for the new hardware on the right. The wizard's Next button will not be enabled until the required selections are made.There are three possibilities for this step:
-
Possibility 1: The new hardware has the same number of interfaces as the old hardware.
Here, a one-to-one mapping is possible between the old and new hardware models.
-
Possibility 2: The new hardware has MORE interfaces than the old hardware.
Here, all interfaces can be mapped. The text (unused) in the interface list for the old hardware indicates that there are more available interfaces on the new hardware than can be mapped.
-
Possibility 3: The new hardware has LESS interfaces than the old hardware.
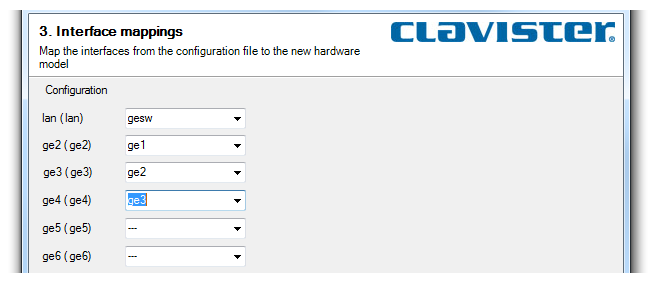
Here, not all interfaces can be mapped. Those that are not will be disabled. In the example shown below, the new hardware has only four interfaces compared with the six interfaces of the old hardware. The decision has been made to not map the ge5 and ge6 interfaces of the old hardware.
Wizard Step 4. Save to a backup file
The converted configuration is save to the specified configuration backup file. This is the file that will be later uploaded to the replacement hardware.
Wizard Step 5. Finish
The final step confirms that the conversion has been done successfully.
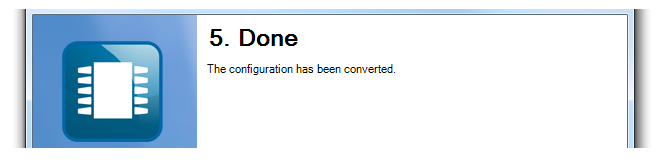
At this point the new backup and ready for uploading to the new hardware.
Fewer Interfaces Will Give Configuration Errors
When the new hardware has fewer interfaces than the old, the extra, unmapped interfaces are removed.However, any references to the unmapped interfaces are not removed or changed and this will cause errors when the new attempting to save and activate the new configuration. The Web Interface screenshot below shows a typical error message.
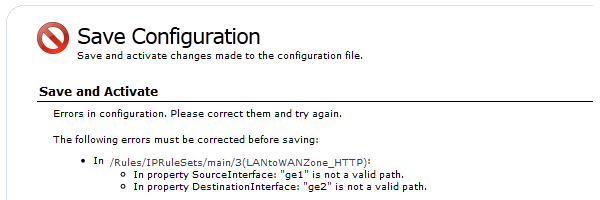
The above message indicates that the IP rule Allow_PING refers to two interfaces, ge1 and ge2, that were not mapped to new interfaces and were removed by the wizard.
The solution is either to manually remove this IP rule or change the interfaces to ones that do exist.
When a cOS Core configuration backup file is taken from one Clavister hardware unit and then uploaded to dissimilar hardware, there is usually a mismatch between the Ethernet interface names in the old hardware's configuration and the default cOS Core interface names on the new hardware.
|
Note: This section is not relevant if the wizard is used |
|---|---|
|
The Hardware Migration Wizard resolves the issue of interface mapping and this section should only be consulted if hardware replacement is completely done manually, without the use of the wizard. |
Any mismatch issues must be resolved before the uploaded configuration is activated and committed on the new hardware unit.
To do this, a connection is made to the CLI on the new hardware from an external computer. This is done either via a network connection to the default management Ethernet interface using an SSH client, or via a serial console port connection using console emulation software. More detail about making these connections can be found in the documentation for each Clavister hardware model.
Once CLI access is established, the following CLI command is entered:
Device:/> show EthernetDeviceSome typical output from this command in a hardware replacement secenario is shown below:
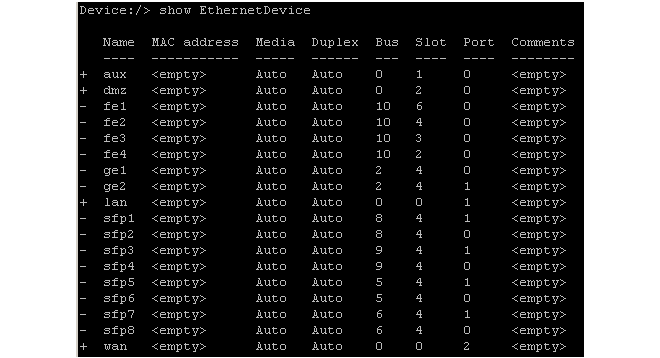
In the listing shown above, the uploaded configuration from the old hardware used the interface names lan, dmz, aux and wan, and these are marked in the listing with a plus ("+") sign at the left.
The remaining interfaces, with a minus ("-") sign next to them, are the interfaces detected by cOS Core in the new hardware but which do not exist in the uploaded configuration. If the configuration is activated at this point, nothing will work correctly since the configuration refers to interface names that don't exist on the new hardware.
To solve this interface mismatch problem, it is necessary to assign each logical configuration name to a unique physical interface. This is done by setting the bus, slot, port and driver of each logical configuration interface (in this example, lan, dmz, aux and wan) to be the values listed for one of the new hardware's physical interfaces.
It is up to the administrator to decide which configuration interface will be assigned to which physical interface. For example, it could be decided that the physical interface fe1 in the listing above will perform the function of the lan interface in the uploaded configuration. To make this assignment, the CLI command is:
Device:/> set EthernetDevice lan
			EthernetDriver=E1000EthernetPCIDriver
			PCIBus=10
			PCISlot=6
			PCIPort=0
Most of the parameter values used in this command come from the show EthernetDevice output shown above.
The correct EthernetDriver to use can be found by using the show EthernetDevice <if-name> command. For example, to find out the correct driver for the interface fe1, the CLI command is:
Device:/> show EthernetDevice fe1

        Property  Value
 ---------------  ----------------------
           Name:  fe1
 EthernetDriver:  E1000EthernetPCIDriver
         PCIBus:  10
        PCISlot:  6
        PCIPort:  0
		"
		"
|
Tip: Use CLI tab completion |
|---|---|
|
The cOS Core CLI provides tab completion so that pressing the tab key can auto-complete the option or show the complete list of possible parameter values. This is particularly useful when specifying the EthernetDriver parameter. |
One interface in the uploaded configuration can map to one and only one physical interface.
This process is then repeated with different parameters to achieve all the required reassignments. The configuration is finally activated to complete the process. After activation, the reallocated interfaces (the interface fe1 in the above example) will disappear from the interface list and be replaced by the configuration interface (the interface lan in the above example).
If the Number of Physical Interfaces has Decreased
Sometimes, the number of available physical interfaces is less than the interfaces in the configuration. In this case, it is not possible to map more than one interface in the configuration to the same physical interface and this is stated above.The best way to deal with the extra interfaces in the configuration is to change them so they become one of those assigned to a physical interface.
If the Number of Physical Interfaces has Increased
Any unused interfaces in the new hardware (those not used in reassignment) will disappear from the interface list and will not appear in the configuration. If it is required that unused interfaces are included in the configuration then Clavister support should be contacted to resolve this issue (a copy of the configuration will be required).Renaming Reassigned Ports
It can be convenient to keep the logical interface names used in an older configuration. However, it can also be confusing since the names printed over physical interfaces on Clavister hardware units will no longer match the logical names.Once interface reassignment has been done and the configuration activated, the logical names of interfaces can be changed with the CLI command set Interface Ethernet Name=. For example, if the physical interface fe1 had become the logical interface lan after reassignment, it is possible to change lan back to fe1 with the CLI command:
Device:/> set Interface Ethernet lan Name=fe1
|
Tip: Changing interface names can be done with other interfaces |
|---|---|
|
The CLI does not need to be used to change the interface name. The Web Interface or InControl can also be used to perform this operation. |
When the name of an interface is changed, cOS Core also automatically changes all references to the interface. However, the address book IP object entries associated with an interface will not be changed and will need to altered separately if this is required.
Although the logical interface name in the configuration is changed in this way, the underlying physical Ethernet interface name remains unchanged. CLI commands, such as ifstat, which are only concerned with physical interfaces will still show the original physical interface names even though the logical name has been changed.
When cOS Core is started for the first time on a Clavister hardware appliance that has factory defaults, the first Ethernet interface on the unit becomes the default management interface and it is automatically assigned the IP address 192.168.1.1 in the network 192.168.1.0/24.
The external management workstation computer that connects to this interface may already have its connecting Ethernet interface configured for a different network. The workstation can be reconfigured to be on the 192.168.1.0/24 network but it is often preferable to instead change the IP address and network of the interface on the Clavister NetWall Firewall.
To do this, administrator access to the cOS Core Command Line Interface (CLI) is required. This is done by connecting a computer running terminal emulation software to the serial console port of the new hardware unit via an RS232 cable. Details about making this connection can be found in the Getting Started Guide for each Clavister hardware model.
|
Note: New hardware does not require a console password |
|---|---|
|
For new hardware, no password will be required for CLI access through the serial console port. However, setting a console password later is recommended for better security. |
Once CLI access is obtained, the IP address and network of the default management Ethernet interface can be changed. For example, if the IP address of the interface if1 is to be set to 168.190.1.1 the CLI commands would be:
Device:/> set Address IP4Address InterfaceAddresses/if1_ip
			Address=168.190.1.1
Followed by a similar command to set the network:
Device:/> set Address IP4Address InterfaceAddresses/if1_net
			Address=168.190.1.0/24
|
Note: Clavister hardware uses a folder for IP addresses |
|---|---|
|
The address object names in the above CLI commands are qualified with the folder name InterfaceAddresses. On most Clavister hardware, this folder is always used to store all interface related address objects. |
After the IP address objects are changed, the new configuration must be activated with the CLI commands:
Device:/>activateDevice:/>commit