| Home Prev | Next |
Installation Overview
On-premises NetEye can be installed in one of the following two ways:As software running in an on-premises virtual environment (either VMware or KVM).
As an on-premises Clavister hardware appliance.
On-Premises NetEye installations are Clavister managed. This means that after initial installation and connection to the Internet, Clavister will directly configure the NetEye configuration remotely. The on-premises administrator makes changes to the NetEye configuration through the MyClavister web interface and these changes are then remotely applied to NetEye over the Internet. This includes uploading certificate files to allow SSL inspection.
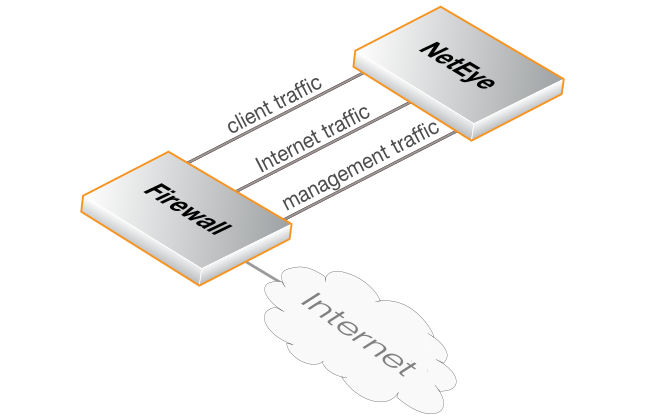
NetEye Ethernet Interfaces
In both types of on-premises installation, NetEye provides the following three Ethernet interfaces:An interface for client HTTP/HTTPS traffic.
An interface for Internet traffic.
An interface for management traffic. This includes going to and coming from the Internet as well as including NetEye log messages going to Clavister InCenter. InCenter is used to monitor NetEye activity and the InCenter receiver can be an on-premises installation or may be a Clavister InCenter Cloud service instance.
The NetEye interfaces are normally connected to a single Clavister firewall. It is also possible to have a single NetEye installation process the client traffic coming from multiple firewalls, but this scenario requires a special routing setup and is beyond the scope of this guide.
It is possible to have NetEye Internet traffic share a firewall interface with NetEye management traffic by going through a switch. However, client traffic going to NetEye must have a dedicated interface on the firewall.
The diagram below illustrates the three NetEye interfaces connected to three interfaces on a single NetWall firewall.
A Summary of NetEye Setup Steps
The following list is a summary of setup steps for a NetEye installation:Either install NetEye in a suitable virtual environment (VMware or KVM) or physically install a dedicated Clavister NetEye hardware appliance.
Create a MyClavister account through the Clavister website if one does not already exist.
Purchase a license for On-Premises NetEye.
An email will be sent by Clavister with the required registration codes.
Log into the MyClavister account and register the NetEye license details using the registration codes from the email.
Within 72 hours a second email from Clavister will confirm that NetEye remote management is operational.
Access the MyClavister account again and change any NetEye options as well as uploading the certificates required for SSL inspection.
Locally configure cOS Core firewalls to send and receive traffic from NetEye.
NetEye SSL Inspection Requires a CA Root Certificate
For NetEye SSL inspection to function, NetEye must generate host certificates to send back to clients that are signed by a CA root certificate. As described later in this section, the public and private key files of such a root certificate must be uploaded into the MyClavister system (and optionally a certificate chain file).Typically, the root certificate is self-generated. If that is the case then it should be noted that the public key of this root certificate needs to be installed on any connecting client so the host certificates sent by NetEye can be authenticated.
All the interactions with the MyClavister system are described in detail next.
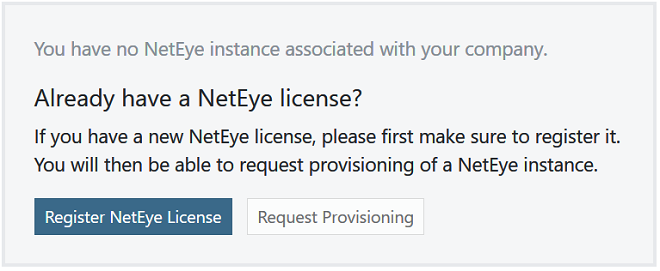
A. Registering the NetEye License
After purchasing the NetEye product, an email will be sent by Clavister that contains codes that must be entered into the MyClavister system to initiate the NetEye setup process in MyClavister.After logging into MyClavister, choose the NetEye option from the left hand navigation menu. The dialog below will appear and the Register NetEye License option should be pressed.
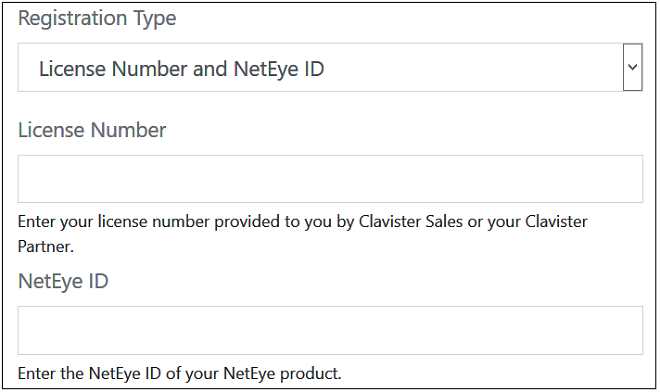
The license registration dialog for NetEye should appear next (shown below). This dialog should be filled in with the license number and NetEye ID found in the PDF attached to the email received following purchase of NetEye.
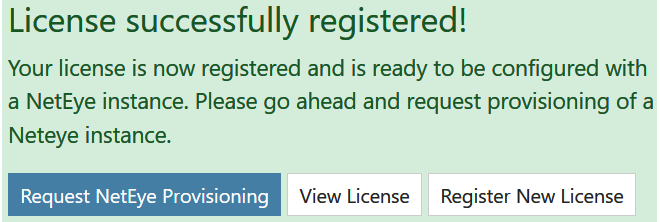
After pressing the Register License button, the license dialog will close and a message indicating successful registration is presented, as shown next.
B. Requesting Provisioning
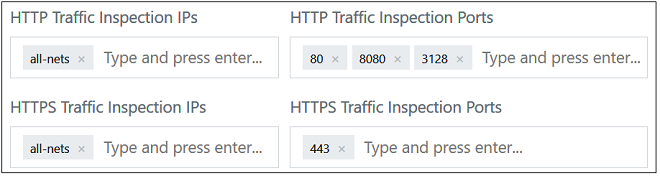
Following registration, the Request Provisioning button should be pressed to begin the process of initiating NetEye management using MyClavister.This will open up a dialog for entering the required parameters for NetEye. The administrator can change the default settings if required. For example, the screenshot below shows the default IPs and port numbers for traffic that NetEye will scan for threats. These can be changed according to requirements (only IPv4 is supported).
For SSL inspection to work, the public and private key of a CA certificate must be uploaded. The CA certificate will usually be self-generated and will be used by NetEye to create host certificates that are sent back to clients. The CA bundle is an optional chain between the CA root and the host.
Note that the clients themselves must have the public key of the CA certificate installed so they can authenticate the host certificates that they receive from NetEye.
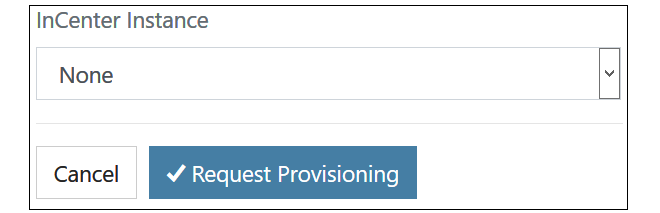
The final part of the NetEye parameter setup is associating NetEye with an InCenter cloud instance. An existing instance, if there is one, can be selected from a drop-down box, or the provisioning of a new InCenter Cloud instance can be requested.
After requesting provisioning, Clavister will initiate the remote management setup process. This can take up to 72 hours. A pending request will be indicated by a yellow Pending label next to the license entry in the license list.
An email will be received when remote management is ready. This will be indicated in MyClavister by the green Provisioned label appearing next to the license in the NetEye license list.
C. Changing the NetEye Configuration
Some details of the NetEye instance configuration can be changed at any time by the customer using the MyClavister system. For example, the port numbers of the traffic processed may be changed. However, it should be noted that there may be a delay between the change being made in the MyClavister system and the change being made in NetEye.