Table of Contents
![[Note]](images/note.png) |
Note: This document is also available in other formats |
|---|---|
|
A PDF version of this document along with all current and older documentation in PDF format can be found at https://my.clavister.com. It is also available in a framed HTML version. |
The InControl SDK is an operating system and hardware platform independent toolset that allows third parties to create custom clients applications which can manage and configure NetWall firewalls via InControl. This is illustrated in the diagram below.
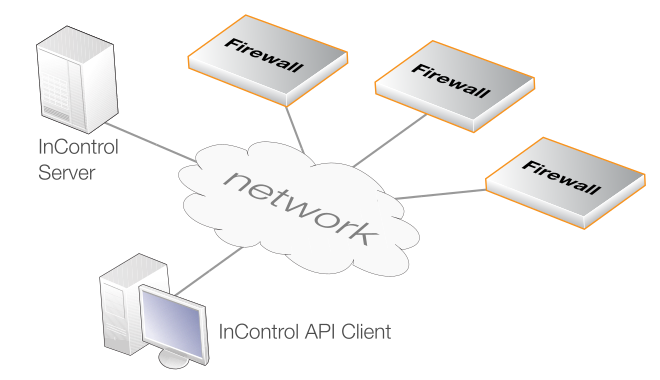
The custom client applications achieve this by making use of the InControl Application Programming Interface (API) to communicate with the InControl server. This API is the central component of the SDK.
The complete SDK is included in the Clavister InControl installation package and contains the following:
- This PDF guide.
- The complete InControl API reference description in Windows Help format.
The InControl API functions are already built into the InControl server and there is no need for additional binaries when installing InControl itself.
The Purpose of the InControl API
The InControl API provides the ability to create applications for managing and configuring one or a number of NetWall firewalls. Applications can be written using any one of a number of programming languages and can run on a variety of computing platforms.Client applications don't communicate directly with firewalls but instead interact with an InControl Server running on the same or a different computer. The server maintains a central database containing the configurations of connected firewall and mediates all communications between clients and individual gateways.
The InControl server performs the same functions that it does with the standard Clavister InControl client. However, the Clavister client is replaced with a non-Clavister client which is written using the API.
The API Implementation
The InControl API implementation is based on the Microsoft Windows Communication Foundation (WCF) which makes use of Simple Object Access Protocol (SOAP) to pass objects between a WCF Service and a WCF Client. With the InControl API, the InControl server provides the WCF Service function and the application written with the API acts as the WCF Client.This guide is not designed to be an introduction to WCF programming and it is therefore recommended to refer to other sources for an in-depth understanding of general WCF principles. This guide will assume that the reader understands basic WCF concepts.
![[Important]](images/important.png) |
Important: Check if SOAP 1.1 or SOAP 1.2 is used |
|---|---|
|
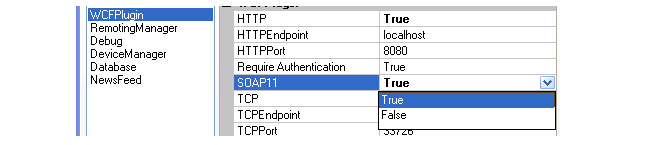
The InControl API uses SOAP to communicate with the server. By default, the InControl server expects and listens for SOAP version 1.2 requests. When SOAP version 1.1 is used, it must be explicitly enabled in the InControl server control dialog by selecting WCFPlugin and setting the value for SOAP11 to true. Versions 1.1 and 1.2 cannot be used at the same time.
|
InControl Server Setup and Licensing
Basic installation and administration of the InControl server is not discussed in this manual. This can be found in the separate InControl Administration Guide. InControl API based applications can run on either the same PC as the server or on a different computer.The InControl server comes as standard with the API capability. The InControl API is disabled by default, and needs to be enabled in the InControl server configuration file before any access to the API is possible.
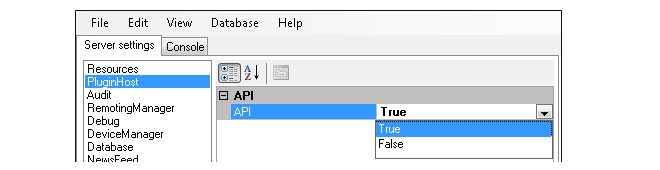
To enable usage of the InControl API, open the InControl server control settings dialog and in the PluginHost settings, set the value for API to be True
Protecting he API Port is Recommended
To help avoid unauthorized access to the InControl API, it is recommended to restrict access to the API port (TCP 33726) to trusted API clients only.The Capabilities of the InControl API
Applications that make use of the API are capable of the same range of functions that the standard InControl client is capable of. That is, they may check out, examine, edit and check in the configurations of any firewall reachable via the InControl server.API Reference Materials
Although programming examples are discussed in this guide, the full API reference documentation is not included. This is provided in a more convenient Windows Help format as a separate file in the InControl SDK package.Compatible Development and Runtime Environments
The InControl API is not dependent on any operating system or hardware platform. It is based on the Microsoft Windows Communication Foundation (WCF) API for the .NET framework. Therefore, any environment capable of supporting this standard can be used for application development or runtime execution using the API. All code examples included in this document and with the InControl SDK are written using the C Sharp (C#) programming language.A description with screenshots for setting up the InControl API with Microsoft's Visual Studio development environment can be found in Appendix A, Visual Studio Setup.
This chapter starts examining coding examples which make use of the InControl API.
Similarities with the CLI
A useful principle to remember is that programming with the InControl API is very similar to constructing cOS Core Command Line Interface (CLI) commands. The two are similar since they both interact with the Configuration Engine which is the cOS Core subsystem that deals with the management of cOS Core configurations.Similarities to the CLI will be discussed further in this guide and example CLI commands will sometimes be given following InControl API based code in order to highlight the similarities. The CLI Reference Guide can be an extremely useful reference document when programming with the API since it lists all possible API parameter options.
A key difference between using the CLI and the InControl API is that an equivalent to the "cc" (change context/category) command does not need to be used to change the current context to be a particular object such as the main IP rule set when editing IP rules. Instead, the InControl API uses a more direct way of referring to a particular configuration object.
A Simple Example
A simple first example of API based source code can be found below. This example, like others used throughout this guide, is written in the C Sharp (C#) language and assumes that the development environment is setup accordingly with references to the WCF service (see Appendix A, Visual Studio Setup).The example's assumptions are:
-
Communication between the client and the InControl server in the example is achieved using HTTP/SOAP and this is the recommended method. Connection using the alternative of net.tcp is explained later.
-
Authentication is always required by the server and the required credentials for this example are assumed to be:
Username: MyUsername
Password: MyPasswordThe credentials must match those of a user defined in the InControl server user database. The permissions defined for that user will be the permissions given to the API client.
-
The URL for the InControl server is assumed to be:
http://icserver.mycompany.com:8080/InControlThe port number must be specified otherwise it will default to the standard HTTP port number. Port 8080 is the InControl server's default listening port.
// Define the address for the connection

EndpointAddress epa =
   new EndpointAddress("http://icserver.mycompany.com:8080/InControl");

// Create the binding

WSHttpBinding wsHttpBinding = new WSHttpBinding(SecurityMode.Message);
wsHttpBinding.Security.Message.ClientCredentialType =
		MessageCredentialType.Windows;
wsHttpBinding.Security.Message.EstablishSecurityContext = true;

// Get the security element for adding the parameter requirements

BindingElementCollection bec = wsHttpBinding.CreateBindingElements();
SecurityBindingElement sbe = bec.Find<SecurityBindingElement>();
if (sbe == null) {
  throw new InvalidOperationException("No SecurityBindingElement found!");
}

// Add the parameter requirements

sbe.EndpointSupportingTokenParameters.SignedEncrypted.Add(
		new UserNameSecurityTokenParameters());

// Create the binding

CustomBinding cb = new CustomBinding(bec);

// Create the client

ChannelFactory<InControl_API.IRemoteServer> cf =
		new ChannelFactory<InControl_API.IRemoteServer>(cb, epa);

// Specify the client credentials

cf.Credentials.UserName.UserName = "MyUsername";
cf.Credentials.UserName.Password = "MyPassword";

// Retrieve the server object

IRemoteServer server = cf.CreateChannel();

// Increase the timeout to 3 seconds from the default of 1
// This may be required by the "DeployConfiguration" function

((IContextChannel)server).OperationTimeout = new TimeSpan(0, 3, 0);

// Get the root domain which contains all defined security gateways

Domain global = server.get_Root();

// Assume there is a device in the root domain called 'sgwStockholm'
// Get this security gateway

Device sgwStockholm =
	server.GetConfigObjectByName(global, "sgwStockholm") as Device;

// Check out this security gateway

server.CheckOutConfiguration(sgwStockholm);

// Get the latest configuration for this gateway

Configuration cfg = server.GetLatestConfiguration(sgwStockholm);

// Add a new IP rule
// Start by setting the properties of the rule

Dictionary<string, string> properties = new Dictionary<string, string>();

properties.Add("Action", "NAT");
properties.Add("SourceInterface", "lan");
properties.Add("SourceNetwork", "lannet");
properties.Add("DestinationInterface", "wan");
properties.Add("DestinationNetwork","all-nets");
properties.Add("Service", "http-outbound");
properties.Add("LogEnabled", "True");
properties.Add("Comments", "Allow and NAT HTTP traffic from LAN to WAN");

// Get the main IPRuleSet folder for adding nodes
// Note how the rule set identifier is constructed

Node folder = server.GetRootNode(cfg);

// Add the IP Rule as a child node to this folder

server.AddChildNode(folder, "IPRule", "NAT_HTTP", properties);

// Check in the new configuration

server.CheckInConfiguration(cfg,
		"Added IP rule allowing NAT LAN to WAN HTTP traffic");

// Deploy and activate the new configuration on the security gateway

server.DeployConfiguration(sgwStockholm);

// Finished so close the connection to the InControl server

(server as IClientChannel).Close();
|
Note |
|---|---|
|
Error handling try and catch blocks are not explicitly shown in these code examples. However, they should be used and follow normal error handling practices to catch any errors. |
Connection Using net.tcp
An alternative to using HTTP/SOAP is to use net.tcp as the connection protocol. Assuming that the URL for the server is net.tcp://localhost:33726/InControl, the connection code up until getting the IRemoteServer object instance is as follows:// Define the address for the connection EndpointAddress epa = new EndpointAddress("net.tcp://localhost:33726/InControl"); // Create the binding NetTcpBinding netTcpBinding = new NetTcpBinding(SecurityMode.Message); netTcpBinding.Security.Message.ClientCredentialType = MessageCredentialType.Windows; // Get the security element for adding the parameter requirements BindingElementCollection bec = netTcpBinding.CreateBindingElements(); SecurityBindingElement sbe = bec.Find<SecurityBindingElement>(); if (sbe == null) { throw new InvalidOperationException("No SecurityBindingElement found!"); } // Add the parameter requirements sbe.EndpointSupportingTokenParameters.SignedEncrypted.Add( new UserNameSecurityTokenParameters()); // Create the binding CustomBinding cb = new CustomBinding(bec); // Create the client ChannelFactory<InControl_API.IRemoteServer> cf = new ChannelFactory<InControl_API.IRemoteServer>(cb, epa); // Specify the client credentials cf.Credentials.UserName.UserName = "MyUsername"; cf.Credentials.UserName.Password = "MyPassword"; // Retrieve the server object IRemoteServer server = cf.CreateChannel(); // Increase the timeout if required for deployment ((IContextChannel)cf).OperationTimeout = new TimeSpan(0, 3, 0);
The above code is identical to the HTTP/SOAP code from adding the parameter requirements onwards.
Reasons for using and Not Using net.tcp
There are a number of reasons for using and not using net.tcp instead of HTTP/SOAP :- net.tcp will not function over the public Internet and is therefore only suitable for connection via a private network.
- net.tcp can offer better performance than HTTP/SOAP.
- Even in a private network, some network equipment may not allow net.tcp communication and HTTP/SOAP is the only viable option.
Adding a Security Gateway
The simplest case when adding a security gateway is adding a single standalone gateway below the global domain object. To make the following examples concise, it will be assumed that an IRemoteServer server object with the name server has already been retrieved.// Assume the security keys for all gateways are the following: String keys="DBC2A65220E2D3753149EDED524FC1A140CDA6810FA68E2A78F4FC1A1"; // First, get the global domain object Domain global = server.get_Root(); // Add the security gateway called MySGW Guid sgwId = server.AddSecurityGateway("MySGW", global.Id, "192.168.1.222", 999, keys, "Add gateway via API");
Deleting a Security Gateway
Deletion of a gateway is done in a similar way to deleting any other object.// Get the object for the device Device mySGW = server.GetConfigObjectById(null, sgwId) as Device; // Delete the object server.DeleteConfigObject(mySGW, true);
Adding a High Availability Cluster
The procedure to add an HA cluster involves first adding the cluster object and then adding the gateways to that.// Get the root object for the global domain Domain global = server.get_Root(); // Add a cluster under the root object Guid clusterId = server.AddCluster("MyCluster", global.Id, 0, 0, "Add Cluster via API"); // Add the cluster master Guid master = server.AddSecurityGateway("cluster_master", clusterId, "192.168.1.123", 999, keys, "Add master via API"); // Add the cluster slave Guid master = server.AddSecurityGateway("cluster_slave", clusterId, "192.168.1.124", 999, keys, "Add slave via API");
Deleting a High Availability Cluster
In order to delete an HA cluster, the individual gateways must first be deleted and then the cluster itself is deleted.// Delete the cluster master Device master_device = server.GetConfigObjectById(null,masterId) as Device; server.DeleteConfigObject(master_device, true); // Delete the cluster slave Device master_device = server.GetConfigObjectById(null,slaveId) as Device; server.DeleteConfigObject(master_device, true); // Delete the cluster itself Cluster myCluster = server.GetConfigObjectById(null,clusterId) as Cluster; server.DeleteConfigObject(myCluster, true);
This chapter discusses how to obtain and check out a cOS Core configuration in preparation for editing.
It is useful at this point to look at the relationships between the classes involved in obtaining a cOS Core configuration.

The C# code to retrieve a Configuration object is as follows:
Domain global = server.get_Root();

Device sgwStockholm =
	server.GetConfigObjectByName(global, "sgwStockholm") as Device;

server.CheckOutConfiguration(sgwStockholm);

Configuration cfg = server.GetLatestConfiguration(sgwStockholm);
Let us now break the steps in this code down.
Checking Out Gateways
Once the Configuration object is obtained we can perform a check out of the firewall in order to start editing the configuration. This is a suggested ordering and the check out of the gateway could be done before obtaining the configuration. |
Note |
|---|---|
|
Checking out a firewall is not necessary if the operations performed on the configuration only involve reading the configuration's contents. If modifications are to be made then the firewall has to be checked out. |
-
Get the root domain of the server which will provide the methods to access individual
firewalls:
Domain global = server.get_Root();
-
Assuming that there is a NetWall firewall in the root domain named sgwStockholm,
get the Device object for this gateway:
Device sgwStockholm =
	server.GetConfigObjectByName(root, "sgwStockholm") as Device;
At this point the application is able to read configuration information but cannot change it until a check out operation is performed. -
Check out this firewall by invoking the CheckOutConfiguration method
of the Device class.
server.CheckOutConfiguration(sgwStockholm);
After the checkout, the application will have exclusive access to the firewall's configuration and no other client will be able to check it out.
Checking back in the firewall is discussed in Chapter 5, Check In and Deployment.
Opening a Configuration
Before we can work with a configuration we must obtain a specific version, usually the latest, as a Configuration object instance. To get the latest version we would use the code:Configuration cfg = server.GetLatestConfiguration(sgw);This code retrieves the latest version of the specific firewall's configuration. The InControl server maintains a database of past versions and it is also possible to get a list of all available versions and select a particular version.
Enumerating Domains and Gateways
Sometimes, the name of a gateway may not be known beforehand. In that case, it is useful to be able to enumerate all the objects under the global domain. This is done by first obtaining the global domain, as was done above:Domain global = server.get_Root();Next, obtain an array of all the child objects under the global domain:
System.Guid[] children = GetConfigObjectChildIds(global.Id);Now it is possible to go through the array of all the children:
foreach(Guid g in children)
	{ConfigObject object = server.GetConfigObjectById(global, g)
		"
		"
	}
Each instance of object could be either a domain or gateway.
To determine if object is a gateway in this loop, use the boolean expression:
if (object is Device)....Similarly, to determine if object is a domain, use the expression:
if (object is Domain)....To determine if an object has a particular name, for example My_GW, use the expression:
if (object.Name == "My_GW")....
This chapter looks at example InControl API based code for performing typical editing operations on a cOS Core configuration. Assuming that we have checked out a configuration, we will examine how typical editing operations can be performed on a cOS Core configuration.
Adding an IP Rule
Let us first look at how a new IP rule is defined and examine in more depth some of the code used in the code example at the beginning of Chapter 2, Starting Coding.IP rules define what traffic is allowed or dropped as it enters the firewall through a particular interface (the source interface) and exits another interface (the destination interface), and that comes from a particular network (the source network) going to a particular network (the destination network).
In this example, taken from the code example in the previous chapter, we will allow traffic from the network lannet which is connected to the lan interface to flow to the Internet. The Internet is connected to the wan interface and the destination network is all-nets (in other words, any network).
The required IP rule can be summarized as follows:
| Action | Src Interface | Src Network | Dest Interface | Dest Network | Service |
|---|---|---|---|---|---|
| NAT | lan | lannet | wan | all-nets | http-outbound |
The code to add this rule is:
Dictionary<string, string> properties = new Dictionary<string, string>();

properties.Add("Action", "NAT");
properties.Add("SourceInterface", "lan");
properties.Add("SourceNetwork", "lannet");
properties.Add("DestinationInterface", "wan");
properties.Add("DestinationNetwork", "all-nets");
properties.Add("Service","http-outbound");
properties.Add("LogEnabled","True");
properties.Add("Comments", "Allow/NAT HTTP traffic from LAN to WAN");

Node folder = server.GetRootNode(cfg);

server.AddChildNode(folder, "IPRule", "Example_Drop_Rule", properties);
Breaking the code down, let us examine the individual statements:
-
First, create a new Dictionary object called properties:
properties = new Dictionary<string,string>();
- We now add the various parameters to this Dictionary object instance starting with a comment:
-
Define the source interface. In this case it is any network:
properties.Add("SourceInterface", "lan");The parameter name SourceInterface and all possible parameters for the rule can be found under IPrule in the cOS Core CLI Reference Guide. -
Define the source network. In this example it is all-nets
which means it can be any network:
properties.Add("SourceNetwork", "lannet"); -
Define the destination interface. This could be a physical interface or perhaps a VPN tunnel
(which is treated like a physical interface). In this example we will use an interface
called wan which might be connected to the public Internet:
properties.Add("DestinationInterface", "wan"); -
Specify the destination network:
properties.Add("DestinationNetwork", "all-nets"); -
Then specify the service:
properties.Add("Service","http-outbound"); -
Enable logging on this rule so that a log message can be generated when it triggers:
properties.Add("LogEnabled","true"); -
As the last property, add a comment to say what the rule does:
properties.Add("Comments", "Allow/NAT HTTP traffic from LAN to WAN"); -
In preparation for adding the rule, get the Node instance which is
the main IP rule set.
Node folder = server.GetRootNode(cfg);
Notice how we specify the rule set by using the suffix IPRuleSet to qualify the name. If we wanted to add a new IP rule set called, for example User-rules, we would use the code:Node new_ruleset = server.AddChildNode(root, "IPRuleSet", "User-rules", null);
-
Finally, add this rule to the default main rule set:
server.AddChildNode(folder, "IPRule", "NAT_HTTP", properties);
The NAT_HTTP parameter will be the symbolic name of the rule used in the configuration.
The equivalent CLI command would be:
Device:/> add IPRule Action=NAT
			SourceInterface=lan
			SourceNetwork=lannet
			DestinationInterface=wan
			DestinationNetwork=all-nets
			Service=http-outbound
			LogEnabled=True
			Name=NAT_HTTP
Again, we can see that referring to the CLI command can provide us with the correct parameters that need to be specified when using the InControl API.
Adding an IP4 Address Folder
Let us assume we need to create a new folder called InternalServersFolder to collect together in one place a group of IP4 addresses which are all related to internal servers. We can create the folder with the following code:Dictionary<string, string> properties = new Dictionary<string, string>(); Node folder = server.AddChildNode(server.GetRootNode(cfg), "AddressFolder","InternalServersFolder", properties);The Node object called folder can now be used in the next step when we add an address to it.
Let us move on to one of the more common operations performed with cOS Core configurations which is manipulating the Address Book. This is where all the symbolic names for IP addresses that cOS Core uses are defined along with their associated IP addresses. Some default address book objects are defined by cOS Core, others may have to be added.
Adding an IP4 Address Object
Next, let us first look at how we add a new IP4 address object to the configuration's address book. Let us assume we want to add a new IP for a web server with the symbolic name webserver_ip and an IP address 10.53.95.1.Dictionary<string,string> properties = new Dictionary<string,string>(); properties["Address"] = "10.53.95.1"; properties["Comments"] = "Web Server Address"; server.AddChildNode(folder, "IP4Address", "webserver_ip", properties);
Let us examine the individual lines in this code:
-
First, define a new Dictionary object called properties
Dictionary<string,string> properties = new Dictionary<string,string>();
-
Next, define the Address field of the object:
properties["Address"] = "10.53.95.1";
-
Then the Comments field:
properties["Comments"] = "Web Server Address";
-
Finally, we perform the add itself.
server.AddChildNode(folder, "IP4Address", "webserver_ip", properties);
Here, we use the Node object called folder which was defined at the beginning of this chapter.
Let us now examine how this would be done through the CLI to see the similarity:
Device:/> add Address IP4Address webserver_ip
			Address=10.53.95.1
			Comments="Web Server Address"
![[Tip]](images/tip.png) |
Tip |
|---|---|
|
Thinking about how an operation would be performed with the CLI can often provide a framework for understanding how to do the same operation using the InControl API. |
Changing Configuration Settings
Let us now look at changing some existing configuration settings. In this example, we will change the current values of the settings TCPSequenceNumbers and TCPAllowReopen. The code to do this is:Dictionary<string, string> properties = new Dictionary<string, string>();
properties.Add("TCPSequenceNumbers", "Ignore");
properties.Add("TCPAllowReopen", "True");
Node folder = server.GetNode(cfg, "TCPSettings");
server.SetNodeProperties(folder, properties);
Let us look at the individual operations in this code:
-
First, create a Dictionary object called properties:
Dictionary<string, string> properties = new Dictionary<string,string>();
-
Add the pairs of setting names and values which are to be set:
properties.Add("TCPSequenceNumbers", "Ignore"); properties.Add("TCPAllowReopen", "True"); -
Now get the Node object where these settings are found,
in this case TCPSettings:
Node folder = server.GetNode(cfg, "TCPSettings");
-
Apply the new properties to this node:
server.SetNodeProperties(folder, properties);
In this example, the CLI Reference Guide can once again give us the correct naming for the Node object and its individual settings. TCP Settings is listed as a node (or object) name in the guide and all related settings are listed in that section of the guide.
Listing Configuration Items
To list out the contents of a particular node we can use the following code to enumerate the values and then display them on the console as a list.foreach(KeyValuePair<string,string> item in server.GetNodeProperties(node))
{
Console.WriteLine(item.Key + ":\t" + item.Value);
}
Deleting Configuration Items
Deleting a node in the configuration is simple:Server.DeleteNode(node)
The Attribute Value and Deleting Related Objects
An Attribute value can be assigned to configuration objects so that all items with a particular value can be deleted at once. For example, the code above to add an IP rule could become:properties = new Dictionary<string,string>();
properties.Add("Attribute", "user_A");
properties.Add("SourceInterface", "any");
"
"
server.AddChildNode(incoming, "IPRule", "Example_Drop_Rule", properties);
Where the string user_A will be assigned as the Attribute
for all configuration objects related to this user.
|
Note |
|---|---|
|
The Attribute value is not definable with the CLI. The InControl API must be used. |
Usage with Security as a Service
A special addition has been made to the InControl API for usage with the Security as a Service (SECaas) feature. Service providers who are building portals using the InControl API may need to force a firewall to search for an updated SECaas license. This is done as shown below.// The server object is first retrieved Domain global = server.get_Root(); // Then the gateway SecurityGateway sgw = server.GetConfigObjectByName(global, "MySGW") as SecurityGateway; // Finally, the license download is triggered server.TriggerSECaaSLicenseDownload(sgw);
This chapter shows how changes made to an edited configuration can be saved and then activated.
As discussed in Chapter 3, Opening Configurations, configurations need to be checked out for editing. After editing is complete, the new configuration needs to be validated (accepted) and then checked back in and/or deployed to the firewall.
The code example found in Chapter 2, Starting Coding achieves this with the code lines:
// Validate that the new configuration does not contain any errors

server.AcceptConfigurationChanges(configuration)

// Check in the new configuration

server.CheckInConfiguration(cfg,
		"Added IP rule allowing NAT LAN to WAN HTTP traffic");

// Activate the new configuration on the Security Gateway

server.DeployConfiguration(sgwStockholm);
Accepting Configuration Changes
Before a check-in can be performed the configuration needs to be accepted by invoking the AcceptConfigurationChanges method on the Server object with the: configuration as a parameter.server.AcceptConfigurationChanges(configuration)This process validates the configuration and ensures it does not contain any errors.
Check In
A check in is a simple operation which is performed by invoking the CheckInConfiguration method on the Server object with the: configuration as a parameter.server.CheckInConfiguration(cfg, "Added IP rule allowing NAT LAN to WAN HTTP traffic");The string parameter Example is a comment for the check in.
Deployment
Checking in a configuration does not mean that the changes made will come into effect on the Clavister Next Generation Firewall. It is necessary to deploy a configuration for it to become the active configuration on the firewall. Deployment is done with the following code:server.DeployConfiguration(sgwStockholm);Notice that the configuration is not the parameter for the DeployConfiguration method but the Device object instance is used instead. In other words, the deployment is done for the firewall and the most recent version of the configuration is deployed.
Whenever using the API on a platform that is not Microsoft Windows™ or if not using .NET™, security between the API and the InControl server must be secured using SSL.
To set up SSL communication, the following steps need to be performed on the Windows computer that is running the InControl server:
-
Configure the InControl server:
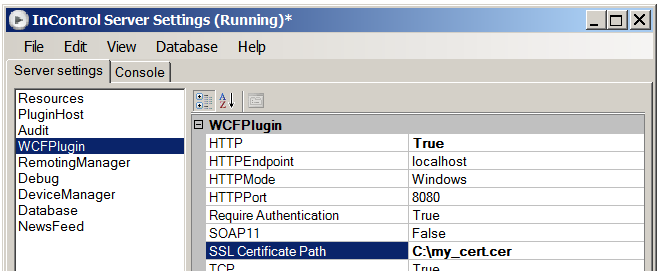
- Open the InControl server management interface and set the HTTPMode to be SSL.
- As shown in the example screenshot below, set the Certificate Path to be the certificate's public key (.cer) file.
- Restart the InControl server.
-
Install the certificate with the private key to the machine key store:
-
Open a Windows console and enter the command:
> mmcThis will open up the interface of the Windows mmc utility.
-
Select the menu option: File > Add/Remove Snap-in...
-
Double click Certificates to start a wizard.
-
Choose Computer account in the wizard and press Next.
-
Choose Local computer and press Finish to close the wizard.
-
Right-click Personal in the mmc navigation tree and choose All Tasks > Import...
-
A wizard will open which allows the relevant .pfx file for the certificate to be imported.
-
-
Register the port to use with the certificate
-
Still in mmc, double click the imported certificate and this will open a new dialog to display the certificate's properties.
-
Select the Details tab and find the Thumbprint value.
-
Copy and paste the thumbprint value into a text editor, close the dialog and close mmc.
-
Remove the spaces from the thumbprint in the text editor. For example, an original thumbprint would like this:
93 05 7a 88 15 c6 4f ce 82 2f fa 91 16 52 28 78 bc 53 64 17
After editing, this thumbprint becomes: 93057a8815c64fce822ffa9116522878bc536417
-
Choose an arbitrary and unique CLSID. This is an 128-bit number, expressed in hexadecimal. An example CLSID that could be used for this purpose is:
d1f6aa3a-a814-4373-a316-4f43d00ecb1e
-
Issue the following Windows netsh console command with the thumbprint and CLSID inserted in the relevant position to register port number 443:
 > netsh http add sslcert ipport=0.0.0.0:443
		certhash=<thumbprint_without_spaces>
		appid={<CLSID>}
Note that the CLSID must be contained in curly brackets. Here is the same command with inserted values:
 > netsh http add sslcert ipport=0.0.0.0:443
		certhash=93057a8815c64fce822ffa9116522878bc536417
		appid={d1f6aa3a-a814-4373-a316-4f43d00ecb1e}
-
SSL communication between the API and the InControl server is now possible based on the imported certificate for security.
SSL Client Setup Code Example
Below is a code example that illustrates how to set up a WCF client that uses HTTPS.// Define the address for the connection EndpointAddress epa = new EndpointAddress("https://icserver.example.com:443/InControl"); //Create the bindings var bindings = new BindingElementCollection(); var rsbe = new ReliableSessionBindingElement(); bindings.Add(item: rsbe); var htbe = new HttpsTransportBindingElement(); htbe.AuthenticationScheme = AuthenticationSchemes.Basic; bindings.Add(item: htbe); Binding reliableSessionOverHttps = new CustomBinding(bindingElementsInTopDownChannelStackOrder: bindings); // Create the client ChannelFactory<IRemoteServer> cf = new ChannelFactory<IRemoteServer>(binding: reliableSessionOverHttps, remoteAddress: epa); // Specify the client credentials cf.Credentials.UserName.UserName = "MyUsername"; cf.Credentials.UserName.Password = "MyPassword"; // Retrieve the server object IRemoteServer server = cf.CreateChannel(); // Increase the timeout if required for deployment ((IContextChannel)server).OperationTimeout = new TimeSpan(0, 3, 0);
A common development environment that may be used to create source code with the InControl API is Microsoft Visual Studio. This appendix discusses how to set up Visual Studio when working with the InControl API.
The steps for Visual Studio setup are as follows:
-
Create a new Visual Studio project for code development. In this case we select a Windows Forms Application.

- Make sure the InControl server is running, is accessible and has an InControl server license that has the InControl API option enabled.
-
Add the InControl API as a Service in the project. Do this by selecting the Add Service Reference option after right clicking the References tree node.

-
In the Add Service Reference dialog, specify the full URL address of the InControl API. The address is constructed in the form net.tcp://localhost:33726/InControl.API where localhost should be substituted with the relevant IP address or hostname of the InControl server The Namespace to use is called InControl.API.
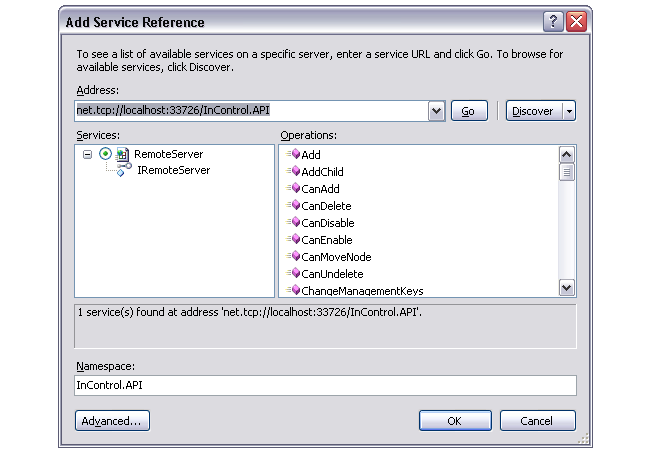
- Visual Studio will contact the InControl server and download the relevant Web Service Definition Language (WSDL) file which describes the API.
-
Make sure references to the new namespace and the System.ServiceModel is added in your source files according to the screenshot below.

A scripting language like Perl poses further challenges to using the API because of the data type mappings. This section provides an example of setting up the initial connection using the API with the Perl language.
This example assumes the following settings in the InControl server interface:
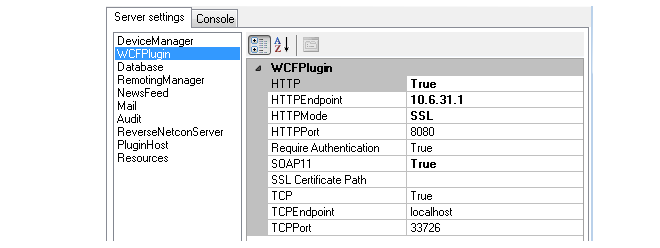
The Perl code required to set up the initial connection to this server using the the API would be the following:
my $ws_url = "http://example.com:8080/InControl?wsdl";
my $ws_uri = 'www.example.com/incontrol';
my $xmlns =
  'http://schemas.datacontract.org/2004/07/Clavister.InControl.API.WCF';

my $soap = SOAP::Lite
-> uri( $ws_uri)
-> on_action(sub{sprintf '%s/IRemoteServer/%s', @_})
-> proxy($ws_url);

$soap->readable('true');

# setup the HTTP Basic Auth parameters
BEGIN {
 sub SOAP::Transport::HTTP::Client::get_basic_credentials
 { return $username => $password; }
}