| Home Prev | Next |
Once a node is defined to InCenter, it is possible to change that node's configuration.
To edit a node configuration in the CLI, the CLI context must be changed to be that of the target node by using the cc command. For example, to change the CLI context to be the node called my-node1, the following command would be entered:
admin@InCenter:/> cc StandaloneNode my-node1
admin@InCenter:/my-node1>
The CLI prompt changes to indicate the context has become my-node1 and a valid InCenter command can now be entered to change the configuration of my-node1.
Assume that a new IPv4 address book object called my-address1 is to be added to the node's configuration. The following InCenter CLI command would be used to do this:
admin@InCenter:/my-node1> add IPAddress
			Name=my-address1
			Address=192.0.2.1
Added IPAddress my-address1
admin@InCenter:/my-node1>
New and Old Values Are Visible Before Activating
When using the show command, the old and new values for most objects will be displayed before the changes are activated. For example, suppose that the IP address of the object my-address1 is changed with the following command:admin@InCenter:/my-node1> set IPAddress my-address1
Address=203.0.113.3A show command before activating the change will now display the old and new values:
admin@InCenter:/my-node1> show IPAddress my-address1
Property                     Value           Original
---------------------------  --------------  -----------
                      Name:  my-address1
             ActiveAddress:  0.0.0.0
                   Address:  192.0.2.1       203.0.113.3
      NoDefinedCredentials:  No
            UserAuthGroups:  <empty>
                  Comments:  <empty>
Once this change is activated, the original value is lost and only the Value column would be displayed.
Configuration Changes are Stored Temporarily Until Activated
After making changes, there is a choice as to when an activate with its associated commit command is issued. Further changes on other nodes can be performed before deployment. All undeployed changes will be kept in non-volatile memory and will be retained across any type of system restart. Only the reject command will delete all pending changes.If an activate/commit command sequence is entered at the top level CLI context, all undeployed changes for all nodes will be saved in the InCenter database and deployed. However, selective activation is also possible. If the active command sequence is entered in the CLI context for a particular node then only the changes pending for that node will be deployed. This is explained further in Section 4.5, Selective Activate.
If the activate and commit operations are performed in the current node context, the command sequence would look like the following:
admin@InCenter:/my-node1> activate
Activate successful
admin@InCenter:/my-node1> commit
Committed
The address object my-address1 has now been added to both the firewall configuration of node my-node1 as well as the copy of that configuration held by the InCenter database.
Returning to the Default CLI Context
To return to the original, default CLI context, the command is cc on its own.admin@InCenter:/my-node1> cc
admin@InCenter:/>![[Note]](images/note.png) |
Note: The default or root CLI context |
|---|---|
|
The default CLI context is also sometimes referred to as the root context. |
Knowing What Has Been Modified and Discarding Changes with Reject
The following command will show a summary of undeployed configuration changes:admin@InCenter:/> show -changesTo discard all undeployed changes, use the following command in the default CLI context:
admin@InCenter:/> rejectWhen the reject command is used in the CLI context for a StandaloneNode, HAPair or HAMemberNode, all pending changes for that context are discarded. For example, to reject all pending changes for the StandaloneNode called my-node1 the command would be the following:
admin@InCenter:/> cc StandaloneNode my-node1
admin@InCenter:/my-node1> reject
When performing a reject operation on an HAPair, the changes are rejected for both the contained HAMemberNode objects.
Note that if the CLI context is an HAMember then the reject command will discard any changes made to its parent HAPair object as well as the other HAMember object in the pair.
Using Reject Command Options
As stated above, the reject command on its own will reject all pending changes for the context in which it is used. However, it is possible to use the -all option to reject all pending changes for the entire system, regardless of the CLI context in which the command is used:admin@InCenter:/> cc StandaloneNode my-node1 admin@InCenter:/my-node1> reject -all
The reject operation can also be applied to a specific configuration object. For example, if all the changes made to the IPAddress object called my-ip1 on node my-node1 are to be rejected then the command would be the following:
admin@InCenter:/> cc StandaloneNode my-node1
admin@InCenter:/my-node1> reject IPAddress my-ip1
If the reject operation is applied to an object with child objects, by default, the child objects will be unaffected. To change this default behavior so that changes to all child objects (and any children below them) are rejected, the -recursive option must be used.
Note that the reject command cannot have the object types StandaloneNode or HAPair or NodeGroup as an argument.
A Summary of CLI Configuration Editing
The following is a summary of points that should be noted when editing configurations through the CLI:A node has to be added and imported before its configuration can be edited.
An import or series of imports requires an activate and commit before any configuration editing can be done.
The InCenter CLI context must be changed to be that of the node before its configuration can be edited.
All changes are kept by InCenter but only applied to the InCenter database and deployed to the node when an activate command is entered. A commit command make the changes permanent.
Before the activate command is issued, all changes are kept in non-volatile memory and will be retained through system restarts. They can be discarded with the reject command.
The activate and commit command sequence will make all changes permanent, regardless of the InCenter CLI context.
To edit the configuration of a node, the node must be first selected in the main WebUI node list and the Configure button pressed.
Depending on the type of node, the way the configuration is edited is different:
For NetWall nodes, this will open a new tab in the browser and the node's WebUI will be displayed. This WebUI represents direct communication between the browser and the NetWall node and InCenter does not mediate this communication. NetWall configuration steps are therefore described in the separate cOS Core Administration Guide for the node and will not be described further in this publication.
For NetShield nodes, node configuration is mediated by InCenter and an InCenter WebUI page will be displayed for configuration of the chosen node.
The rest of this section will further describe the steps for editing a NetShield configuration.
Adding a Configuration Object
As an example of configuration editing, the following steps will add a new IP address to a node configuration:Select the type of object to be added or edited from the dropdown box. This displays a list of the existing configuration objects of that type.
Press the Add button to open a dialog to input the property values of the new object.
In the object list, an object that has been added but still has the commit pending will have an a plus icon next to it, as shown below.
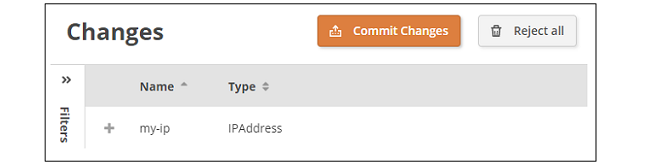
The new object will appear in the address list but the change still needs to be committed by selecting first selecting the Changes menu option.
The pending configuration changes are now displayed. It is possible to have many pending changes in a single node. It is also possible to have pending changes from more than one node. All pending changes can now be committed to all nodes by pressing the Commit Changes button. As explained in Section 5.2, Activating InCenter Changes, it is also possible in this step to discard all pending changes or any single pending change.
A message is then displayed to confirm that the changes have been committed and will indicate if there were any configuration warnings.
Clicking on the warnings link will display the warnings. Below is an example of some warnings from adding an address object.