| Home Prev | Next |
Preconditions for Creating an HA Cluster
When setting up an HA cluster, the following is required:Two Clavister NetShield Firewalls with identical hardware configurations both running the same version of software. For virtual systems, the resources available to each firewall should be the same. One firewall should be designated the master node, the other is designated the slave node.
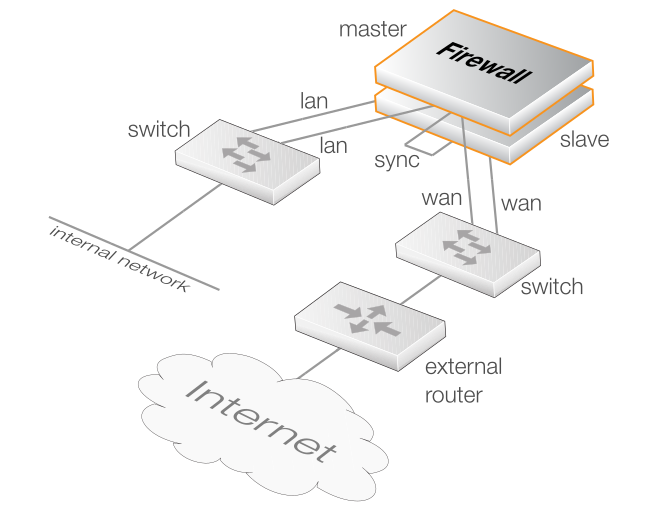
The interfaces of both cluster nodes are connected via a common switch as shown in the illustration below. The interface names on both firewalls must be identical. The sync interface does not need to be connected via a switch but can instead use a direct connection.
Setup Steps
The steps necessary for cluster setup can be summarized as:Ensure the EthernetDevice settings are correct.
Set the interface shared and private IP addresses of all interface pairs for both master and slave. If the private IP is not going to be used it should be set to the local host address.
Set the interface type of all interface pairs for both master and slave.
Configure at least one monitor target on each critical interface.
Activate HA on both master and slave.
Details of how to perform these steps are explained below.
Checking EthernetDevice Settings
The EthernetDevice:0 and EthernetDevice:1 properties for each interface on both master and slave should be the same and set to the Ethernet device name for that interface. The current values of these settings can be checked with the command:System:/> show Interface EthernetInterface if1
Property Value
----------------------------- ----------------------------------
Name: if1
EthernetAddress: 0:<empty> 1:<empty>
HAEthernetAddressMode: PrivateSharedMAC
HAType: Critical
MonitorTargets: <empty>
MonitorTargetVLANs: <empty>
HeartbeatTransport: <local>
Backplane: No
EthernetDevice: 0:if1 1:<empty>
VLANOutboundPrio: 0
VLANOutboundPrioPolicy: Set (Set priority)
PrivateIP: 0:<empty> 1:<empty>
RouterAdvertisementProfile: DefaultProfile
MTU: 1500
IPAddress: if1_ip
IP4Broadcast: <empty>
RoutingTableMembership: <all>
DHCPEnabled: <empty>
SecurityEquivalentInterfaces: <empty>
IPv6AddressConfiguration: Static
Zone: <empty>
Comments: <empty>In the example above, EthernetDevice:1 is incorrectly set to <empty>. To fix this, use the command:
System:/> set Interface EthernetInterface if1 EthernetDevice:1=if1The device name can be the same as the interface name, as is the case here, but this is not always true. Note that the EthernetAddress values are <Empty> because the actual MAC addresses are being used.
Setting the Interface Type
The HAType for each interface should be set to either Critical, NonCritical or Sync and this setting must agree between master/slave interface pairs. A single interface must be designated as Sync . The default is Critical.Setting the interface type can be done in the same CLI command that sets the interface IP addresses. For example:
System:/> set Interface EthernetInterface if1 HAType=SyncThis command should be repeated for both the master and slave.
Setting Interface IP Addresses
Each interface on both the master and slave units has two IP addresses associated with it:The Shared IP Address
The shared IP address is the address that is shared between the cluster nodes. Only the active cluster node is allowed to use this address and it is the main IP address used by almost all functions and features in cOS Stream. An example would be when creating an IPv4 IP policy that performs address translations (NAT) for traffic to the Internet, the default source IP would be the shared IP address of the destination (outgoing) interface. If the interface if1 is to have the shared IPv4 address 10.6.12.1 then the CLI command to set this is:
System:/> set Interface EthernetInterface if1 IPAddress=10.6.12.1This command is repeated for both the master and slave.
The Private IP Address
A private IPv4 address is also assigned to each interface but it is not the same for a pair of interfaces. Each interface gets a unique address so that it is possible to connect to a specific interface on a specific node in the cluster. Connection to this address could be for the purpose of management or to ping the interface.
For allocating the private IP, each interface has two properties associated with it: PrivateIP:0 and PrivateIP:1. PrivateIP:0 is the private IPv4 address of the master interface in an interface pair and PrivateIP:1 is the private address of the corresponding slave interface in a pair.
For example, if 10.6.12.10 is the private IPv4 address of the interface if1 on the master and 10.6.12.11 is the private IP of interface if1 on the slave then the following command should be applied:
System:/> set Interface EthernetInterface if1
			PrivateIP:0=10.6.12.10 PrivateIP:1=10.6.12.11
This command is repeated for both the master and slave and can be combined with the command for setting the shared IPv4 address. As seen in this example, it is usual to use private and shared IPv4 addresses from the same network.
It may seem redundant that the private IP of both master and slave are set on both cluster nodes. However, like other elements of a configuration, these private IPv4 addresses are mirrored between master and slave. If a management interface is connected to the master and the private address PrivateIP:1 for the slave is changed only on the master, it allows the address to be automatically copied over to the slave's configuration.
All interfaces in a cluster will require a shared IP and also a private IP. A unique private IP address is required to allow pinging of the interface or if the interface is to be used for SSH management access or if log messages are sent by the interface and therefore need a unique source IP. If the private IP is not going to be used for these purposes it can be set to the local host address.
For each critical Ethernet interface, MonitorTargets need to be configured with at least one IP address that can be monitored. This can be configured on either the Ethernet interface itself, or on VLANs attached to the critical Ethernet interface. Or on both. Monitoring of these IPs help cOS Stream determine where a potential fault is, in case of a heartbeat failure.
cOS Stream is using ARP (IPv4) or ND (IPv6) to query the Monitor Target(s) using the interface IP address as source, this means that the specified host must be within the same IP range and layer-2 broadcast domain as the interface.
Setting the Monitor Targets can be done in the same CLI command that sets the interface IP addresses. For example:
System:/> set Interface EthernetInterface if1 HAType=Critical
				MonitorTargets=MyHost
![[Important]](images/important.png) |
Important: Monitoring Targets is Considered Mandatory |
|---|---|
|
On all interfaces where the HAType is set to Critical, MonitorTargets must be configured. Without configuring the MonitorTargets option the Ethernet Interface is demoted to non-critical, and would cause the following effects:
|
Additional Details About Monitor Targets
The purpose of Monitor Targets is to verify the health of the critically tagged interface(s) in order to help cOS Stream determine where a potential fault is in case of a heartbeat failure. Monitor Target IPs will be queried only if/when the cluster node has not received sufficient heartbeats from its cluster peer.This means that Monitor Targets will not be queried unless there is a heartbeat failure situation. This way cOS Stream can determine if the fault is related to the cluster peer or the network in general. If both heartbeats and responses from the Monitor Target(s) fail, it would mean a generic network problem (e.g. cable is disconnected).
If an interface is configured to be HAType critical without any Monitor Targets configured, cOS Stream will generate a configuration warning during deployments. Configuring the Monitor Targets option or set the HAType to be NonCritical will remove the warning.
![[Note]](images/note.png) |
Note: Link Failure on a NonCritical Tagged Interface |
|---|---|
|
If an interface is set to be NonCritical and the interface link goes down, cOS Stream will not react nor perform a HA failover. |
Monitor Target Over a VLAN
It is possible to set a Monitor Target to be a host behind a VLAN. To accomplish this, the VLAN(s) must first be added to the MonitorTargetVLANs option on the Ethernet interface, as shown in this example:System:/> set Interface EthernetInterface if1
MonitorTargetVLANs=VLAN_10, VLAN_20System:/> set Interface VLAN vlan_10 MonitorTargets=MyHost![[Warning]](images/warning.png) |
Warning: Setting MonitorTarget On a VLAN Without Configuring MonitorTargetVLANs |
|---|---|
|
If setting MonitorTarget on a VLAN without adding the VLAN to the MonitorTargetVLANs option on the Ethernet Interface will cause the the monitoring to have no effect. |
Activating HA on the Master Node
To activate HA on the master, the following properties must be set:Role: Master.
ClusterID: A unique ID between 1 and 63.
AutoSyncCfg: Yes/No depending on if resynchronization should be automatic after reconfiguration.
Enabled: Yes
This is done using the CLI command:
System:/> set HighAvailability Role=Master ClusterID=1
			AutoSyncCfg=Yes Enabled=Yes
The changed master configuration should finally be activated and committed.
Activating HA on the Slave Node
To activate HA on the slave, the following properties must be set:Role: Slave.
ClusterID: Same ID used for the master.
AutoSyncCfg: Yes/No depending on if resynchronization should be automatic after reconfiguration.
Enabled: Yes
This is done using the CLI command:
System:/> set HighAvailability Role=Slave ClusterID=1
			AutoSyncCfg=Yes Enabled=Yes
The changed slave configuration should finally be activated and committed.
Verifying Synchronization
Once the slave configuration is activated, synchronization between the cluster nodes will take place. The CLI command ha will indicate that both systems are running in HA mode and that the nodes are alive.If a firewall is not part of a HA cluster, the output when CLI command ha is applied to it will be:
System:/> ha
This device is a standalone system (HA not configured)
If it is the master node in an HA cluster, the output will be similar to the following:
System:/> ha
This device is a HA MASTER
This device is currently Active (for 17h 10m 17s)
HA cluster peer is ALIVE
HA object sync 97%
The time shown in parentheses is the length of time that the cluster node has been in its current active or inactive state. When the state changes, this time counter is reset to zero.
Similarly, when the same CLI command is applied to the slave, the output could be something similar to the following:
System:/> ha
This device is a HA SLAVE
This device is currently Active (for 17h 10m 11s)
HA cluster peer is ALIVE
HA object sync 95%
If the cluster peers are in the process of synchronizing, the last line will be similar to the following:
HA object sync: 12% (RE-SYNCING)
The HA object sync percentage in the above output gives a quick indication if there are any synchronization problems in the cluster. As synchronization begins, this number will start at zero and then climb. In a fully functioning cluster where both nodes have had time to synchronize, the HA object sync percentage should typically be above 95%. A consistently lower figure should be investigated by using the following CLI command to look deeper into cluster behavior:
System:/> ha -status -moduleThis will list the synchronized objects by type. For example, the number of IPsec tunnel objects that are synchronized. Where the synchronized object number does not match the number that should be synchronized, this indicates an area for further investigation.
The HA object sync percentage can be lowered by certain types of system activity such as large numbers of IPsec tunnels being set up and taken down.
Using Actual MAC Addresses and Disabling Promiscuous Mode
By default, HA in cOS Stream will use synthetic MAC addresses and it will also use promiscuous mode. Both of these can be disabled by setting the property HAEthernetAddressMode on the relevant EthernetInterface objects to the value InterfaceMAC (the default value is PrivateSharedMAC). For example:System:/> set Interface EthernetInterface if1
HAEthernetAddressMode=InterfaceMACChanging the HAEthernetAddressMode property to the value InterfaceMAC may be needed in either or both of the following situations:
Using promiscuous mode is undesirable.
A virtual environment does not allow synthetic MAC addresses to be used. In particular, this can be relevant when using SR-IOV in a virtual environment and this is also discussed in the separate Virtualization Guide.
The following should be noted if the administrator sets the HAEthernetAddressMode property to the value InterfaceMAC:
If no HA peer MAC addresses are configured, the peers will try to learn these addresses from the heartbeats that are broadcast on the sync interface.
All devices in the same layer 2 network segment as the interface should be configured to accept gratuitous ARP packets (for IPv4) or NDP packets (for IPv6).
This is important because after an HA failover occurs, the caches of devices in the same network segment must be updated with the MAC address of the newly active HA peer. Note also that this updating of device caches may increase the HA failover time slightly.
There should be at least one critical interface in the HA cluster that has the property HAEthernetAddressMode set to PrivateSharedMAC, or has it set to InterfaceMAC and also has a manually configured MAC address.
If an interface with the property HAEthernetAddressMode set to InterfaceMAC uses DHCP to fetch its IP addresses, the DHCP server should be able to handle DHCP option 61 (the DHCP client identifier), as specified in RFC 2131. If this is not the case, the interface may get a different IP address from the address assigned by the DHCP server after an HA failover.
When the InterfaceMAC option is used, and because of broadcast on the sync interface, it is recommended that the sync interfaces are placed in their own broadcast domain. In other words, both sync interfaces should either be directly connected, or they should not share their network segment with any other HA interfaces from their own or any other HA cluster.