| Home Prev | Next |
The cOS Core installation package for VMware can be downloaded by logging into the relevant MyClavister account. Packages contain a predefined cOS Core virtual machine image file which is imported into VMware to create the virtual firewall. The VMware packages available for download are:
The 32 bit version should be used only if resource usage must be kept to a minimum. Otherwise, the 64 bit version is recommended, particularly where maximum performance is required. Some cOS Core features may also not be available in the 32 bit version.
The choice of virtual machine image is discussed further in an article in the Clavister Knowledge Base at the following link:
https://kb.clavister.com/336143546
Upgrading the Default VMware Virtual Machine
VMware virtual machines have a VM Hardware Compatibility setting that describes the virtual machine platform. For the VMware images of cOS Core version 14.00 and later, this is set to a value of 9 and there is usually no need to change this. However, if upgrading the default VMware version, there are some issues which need to be considered and these are discussed in an article in the Clavister Knowledge Base at the following link:https://kb.clavister.com/346357797
Memory Requirements
All cOS Core image files for virtual environments have a predefined memory allocation. This is the minimum amount of memory required for cOS Core to run and it should never be reduced. This default allocation may need to be increased depending on the cOS Core license purchased and the number of connections/tunnels that will be open simultaneously. The minimum memory recommended memory allocation is:The highest possible memory allocation for cOS Core is:
Any available memory above these limits will not be used by cOS Core.
If the allocated memory is insufficient during operation, cOS Core will output console messages indicating this while trying to reduce the number of open connections/tunnels. Eventually, cOS Core will enter safe mode where only management access is possible.
Requirements for AI Use
To use the AI functionality in cOS Core (version 15.00 and up), the license must include support for AI. The standard license does not allow administrators to configure AI functionality by default. In addition, there are requirements for platform and CPU:32 bit x86 : Not supported
64 bit x86: Minimum number of cores: 4
cOS Core Installation with the VMware Server
The steps for cOS Core installation with the "classic" server and ESXi 3.5 are as follows:![[Note]](images/note.png) |
Note: From cOS Core 11.00, only ESXi 4.1 or later is available |
|---|---|
|
Beginning with cOS Core version 11.00, only cOS Core installation packages for VMware ESXi version 4.1 and later are available for download. However, 11.00 versions and later can run under VMware Server or ESXi 3.5 by upgrading an earlier cOS Core distribution for these VMware platforms. |
cOS Core Installation with the ESXi Server
The steps for cOS Core installation with the ESXi server are as follows:For a detailed step by step description of installation with a vSphere client, see Chapter 3, Installation with vSphere.
The VMware Console
When cOS Core starts, VMware will display a console which represents the console that is normally directly connected to the local console port of a physical Clavister NetWall Firewall.![[Tip]](images/tip.png) |
Tip: Changing focus to the VMware console |
|---|---|
|
VMware will keep focus in the console window after clicking it. Use the key combination Ctrl-Alt to release focus. |
This console displays output from cOS Core exactly as it would be displayed with a non-virtual firewall. It will show the initial startup sequence output and this can be interrupted, if required, by key presses to enter the boot menu. After startup, the VMware console can be used to issue CLI commands to configure cOS Core further.
|
Tip: Capturing VMware console output in a file |
|---|---|
|
An article in the Clavister Knowledge Base at the following link describes how to capture VMware console output in a file: |
The Default Virtual Ethernet Interfaces
The standard cOS Core installation provides a number of virtual Ethernet interfaces. These act like E1000 NICs and can be connected to a physical Ethernet interface using the VMware Bridged option or to another virtual machine in the same host with the Custom option.cOS Core assigns the following default names to the virtual interfaces:
Connecting to the Virtual Firewall
By default, cOS Core enables a DHCP client on all the Ethernet interfaces so they can receive an IP address from a suitably configured external DHCP server. If DHCP is not used, an IP address must be assigned to the management interface manually and doing this is described in Section 4.4, Manual CLI Setup. Once assigned, this IP address can be used for a network connection using the cOS Core CLI over SSH or using the cOS Core WebUI over HTTPS.Virtualization of the Management Workstation
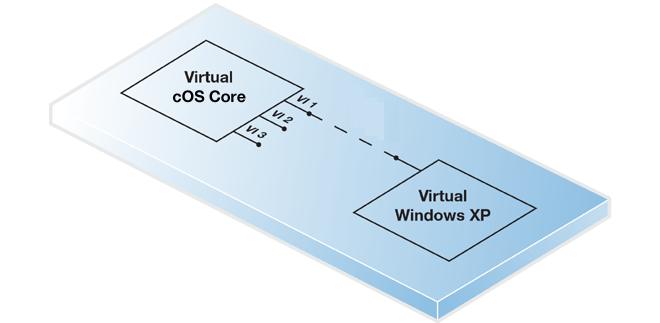
The workstation running the web browser or SSH client can be located in different places:A virtual workstation running under the same VMware host.
In this case, there are two options depending on the version of VMware:
For VMware Server:
The VMware Custom (not bridged) option can be used to connect the virtual Ethernet interface with a virtual Ethernet interface on the virtual workstation.
For ESXi:
The virtual interface of cOS Core and the virtual interface of the management workstation should be connected to the same port group on a virtual switch.
The virtual workstation might be, for example, a Windows installation as shown below. For this option to function, VMware must be configured so that the virtual Ethernet interface on both cOS Core and the workstation are on the same virtual network.
A physically separate workstation computer.
In this case, VMware's Bridged mode should be used to connect the virtual Ethernet interface to a physical interface. Physical connection is then made between the physical interface and an interface on a physically separate workstation computer.

In both the above cases, the real or virtual workstation PC needs its connecting Ethernet interface configured with an IP address on the same network as the cOS Core interface. Once this is done, the management workstation and the firewall can communicate and initial cOS Core setup can then be performed in exactly the same way as a non-virtual firewall. This is described next in Chapter 4, Configuring cOS Core.
Setup with Multiple Virtual Clavister NetWall Firewalls
When there are multiple virtual machines running cOS Core under one VMware host, the IP address of the management virtual Ethernet interface must be different for the different virtual machines if administration is to be done through the Web Interface or an SSL client.The recommended way to change the management interface IP address is to enter CLI commands into the cOS Core console which is displayed by VMware after cOS Core starts. The commands to do this for the If1 interface are the following:
Device:/> set Interface Ethernet If1 DHCPEnabled=NoDevice:/> set Address IP4Address InterfaceAddresses/If1_ip
Address=10.0.0.1Device:/> set Address IP4Address InterfaceAddresses/If1_net
Address=10.0.0.0/24Device:/> show RemoteManagementAlternatively, turn off strong passwords with the following command:Device:/>cc LocalUserDatabase AdminUsersDevice:/AdminUsers>set User admin Password=Mynew*pass99
Device:/> set Settings MiscSettings EnforceStrongPasswords=NoDevice:/> activateDevice:/> commit