| Home Prev | Next |
Overview
The cOS Core feature RADIUS Relay is designed for telecom scenarios, such as Mobile Data Offloading (MDO), where User Equipment (UE), such as a smartphone, switches from an operator's wireless network to communicating using WiFi via an Access Point (AP). The AP connects the UE to resources, such as the Internet, via a Clavister firewall with the firewall controlling this access.To gain access to the resources behind the firewall, the UE must authenticate itself via the AP using a RADIUS server. A RADIUS authentication request is sent to cOS Core by the AP which relays it to a RADIUS server. The server's reply is relayed back to the AP and authenticated users are entered into the cOS Core user list so that they can then be granted access to resources based on cOS Core security policies.
Event Sequence During RADIUS Relay Authentication
The following sequence of events occurs with radius relay:The UE requests network access from an AP.
The AP sends a RADIUS Access-Request to cOS Core. Providing the cOS Core radius relay feature has been set up, this request is forwarded to the configured RADIUS server.
The RADIUS server either authenticates or does not authenticate the UE by sending a RADIUS Access-Accept or Access-Reject message back to cOS Core. The content of these messages is examined by cOS Core as they are relayed back to the AP.
If it is authenticated by the RADIUS server, the UE issues a DHCP request and a DHCP IP lease from the configured cOS Core DHCP server is sent back to the UE.
The DHCP server must be configured so that leases are only be distríbuted to authenticated clients (the LeasesRequireAuth option is enabled).
Successful authentication also means that cOS Core includes the UE's username in its list of logged in users (visible with the CLI userauth command and through the Web Interface) and this allows the UE access to resources determined by predefined cOS Core security policies.
Using Group Membership
cOS Core security policies can be based on group membership where the UE's membership in a group determines if access is allowed. If this is the case, the RADIUS server must be specially configured to send back the group name of the user during authentication. In addition, RADIUS servers communicating with cOS Core must have the Vendor ID set correctly. Doing this is described further at the end of this section.It is also important that that IP rule or IP policy that allows access by the UE must use an IP address object for its Source Network which has its Authentication property (the UserAuthGroups property in the CLI) set to the same group name sent back by the RADIUS server. Doing this is described further in Section 9.4, IP Policies Requiring Authentication.
If validation with group membership is not required then the No Defined Credentials property of the IP address object used for the Source Network should be enabled.
A symptom that the group name has not been specified for the Source Network address object is that the connection will be dropped after the Idle Timeout period of the RADIUS Relay object has elapsed, even though traffic has been flowing during that time.
![[Important]](images/important.png) |
Important: Enable the DHCP server LeasesRequireAuth option |
|---|---|
|
If RADIUS relay is being used in the cOS Core configuration, all DHCP servers must be configured to only distribute leases to configured clients. This is done by enabling the LeasesRequireAuth property in the CLI and in the Web Interface or InControl, enabling the option Distribute leases only to RADIUS relay authenticated clients. If this is not done on all DHCP servers, irrespective of whether they are used with RADIUS relay or not, it could possibly create a security vulnerability and allow an unauthenticated client access to protected resources. |
Radius Relay Object Properties
The important properties of a Radius Relay object are the following:Name
A descriptive name for the object which will be used throughout the configuration.
DHCP Server
The DHCP server that will be used to hand out IP address leases once the UE is authenticated.
Source Interface
This is the cOS Core interface on which cOS Core will listen for AP requests. This can be any of the following:
If the property Override User Data Interface is set, this interface will only listen for the initial connection from the AP and carry authentication traffic. The interface assigned to Override User Data Interface will carry the data traffic. This is explained further below.
Client IP Filter
This specifies the source IP range that the AP belongs to. This will typically be a network range and it is recommended it is specified as an address book object in the cOS Core configuration.
Listening IP
This is the IP address that the AP will connect to on the Source Interface. If the listening interface is an Ethernet interface or VLAN it is optional and will default to the IP address of the interface if not specified.
If the Source Interface is an interface group, the listening IP must be specified.
Listening Port
This is the listening port number for the listening interface and is 1812 by default.
Override User Data Interface
By default, a user is authenticated using the same interface that is used for forwarding data traffic and that is the value set for the Source Interface property above. This can pose a security risk and it is recommended to use different interfaces for these two functions. The Override User Data Interface property is set to the interface used only for data. Usually Source Interface and Override User Data Interface will be two different VLANs running over the physical interface connected to the AP. This is discussed further below.
Routing Table
When the UE is authenticated and it receives an IP address, a route to its IP will be automatically added to this routing table. Usually, the default main routing table is used.
Remote Server IP
This is the IP address of the RADIUS server that will perform UE authentication.
Remote Server Port
This is the port number of the RADIUS server that will perform UE authentication. The default value is 1812 which is the standard for RADIUS.
Sending IP
This optional IP address will be used as the sending IP of the request sent to the RADIUS server. If not set, the IP address of the sending interface will be used. The sending interface is determined by a route lookup of the RADIUS server's IP address.
Idle Timeout
After this amount of seconds without traffic from the authenticated user, the user will be automatically logged out.
Session Timeout
This is the absolute allowed length of an authenticated user session in seconds. This is normally set to zero, meaning a session can be of infinite length.
Use Timeouts Received from Authentication Server
If this property is enabled and the RADIUS server is correctly configured, the Idle Timeout and Session Timeout properties will take values sent by the RADIUS server.
Separate Authentication and Data Traffic
It is strongly recommended to set the property Override User Data Interface to the interface used only for the data traffic so that it is different from the interface assigned to the Source Interface property for the authentication traffic. Typically, they will be set to two different VLAN interfaces which will run over the same physical Ethernet interface and which is connected to the AP. This will fully separate the authentication data going to the RADIUS server from the data flowing to the backbone network. Not doing this will pose a security risk.The following should be noted when using the Override User Data Interface property:
The administrator must ensure the AP sends authentication and data traffic are sent over the correct VLANs.
The interface used for the DHCP server object which hands out IP addresses will be the interface used for the data (the Override User Data Interface) and not the interface used for authentication (the Source Interface).
No extra IP rule set entry is required for either DNS traffic or authentication traffic. The IP rule set entry that allows data to flow from the client to the backbone is the only one required.
Example 9.10. Configuring Radius Relay
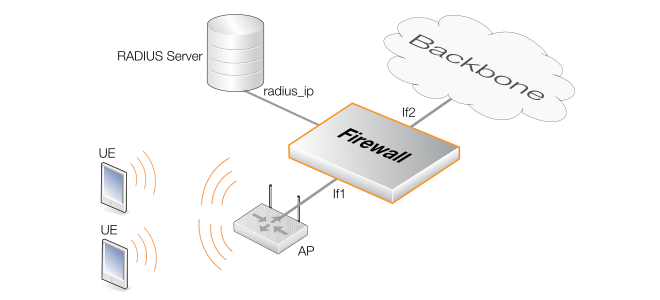
This example shows how to configure a Radius Relay object for the scenario illustrated below. Here, client devices (UE) must access data services through a backbone network via an Access Point (AP). First, they must be authenticated against a RADIUS server and then allocated an IP address. The AP is connected to the physical If1 Ethernet interface of a Clavister firewall and the backbone network is connected to the If2 interface.
The following assumptions are made:
Two VLANs are already configured and these cOS Core objects are called vlan_auth for client authentication traffic and vlan_data for data traffic flowing to the backbone.
Both these VLANs are already set up to run over the physical Ethernet interface If1 and that the AP has also been correctly configured to use the appropriate VLAN for authentication and data.
Authenticated users must belong to the group called ue_group.
A Radius Relay object called r_relay1 will be created which will listen for authentication requests on the vlan_auth interface and relay them to a RADIUS server with the IPv4 address radius_ip. The scenario is illustrated in the diagram below.
After successful authentication, IP address leases will be handed out by a DHCP server object called rr_dhcp_server. It is assumed that the UEs will be allocated addresses belonging to the network 192.168.10.10-192.168.10.255 that will be defined in an IPv4 address object called client_net.
After successful authentication, UEs will be granted access to a backbone network on the If2 interface using an IP policy called client_access_rule.
Command-Line Interface
A. Create the IP4Address object that defines the range of client IP addresses for the UEs and assign it the authentication group called ue_group:
Device:/> add Address IP4Address client_net
			Address=192.168.10.10-192.168.10.255
			UserAuthGroups=ue_group
B. Create the IP4Address object that defines the IP address pool for the DHCP server. This must be a different object although it uses the same IP range:
Device:/> add Address IP4Address client_ip_range
			Address=192.168.10.10-192.168.10.255
C. Create the DHCPServer object that hands out these addresses:
Device:/> add DHCPServer rr_dhcp_server
			Interface=vlan_data
			IPAddressPool=client_ip_range
			Netmask=255.255.255.0
			LeasesRequireAuth=Yes
D. Create the IPPolicy object that grants access for client data flowing to the backbone network which is connected to the interface If2:
Device:/> add IPPolicy Name=client_access_rule
			SourceInterface=vlan_data
			SourceNetwork=client_net
			DestinationInterface=If2
			DestinationNetwork=all-nets
			Service=all_services
			Action=Allow
E. Create the RadiusRelay object:
Device:/> add RadiusRelay r_relay1
			SourceInterface=vlan_auth
			ClientIPFilter=client_ip_range
			RemoteServerIP=radius_ip
			DHCPServer=rr_dhcp_server
			OverrideUserDataInterface=vlan_data
InControl
Follow similar steps to those used for the Web Interface below.
Web Interface
A. Create the IP4Address object that defines the range of client IP addresses for the UEs and assign it the authentication group called ue_group:
B. Create the IP4Address object that defines the IP address pool for the DHCP server. This must be a different object although it uses almost the same IP range:
C. Create the DHCPServer object that hands out these addresses:
D. Create the IP Policy object that grants access for client data flowing to the backbone network which is connected to the interface If2:
E. Create the RadiusRelay object:
![[Note]](images/note.png)